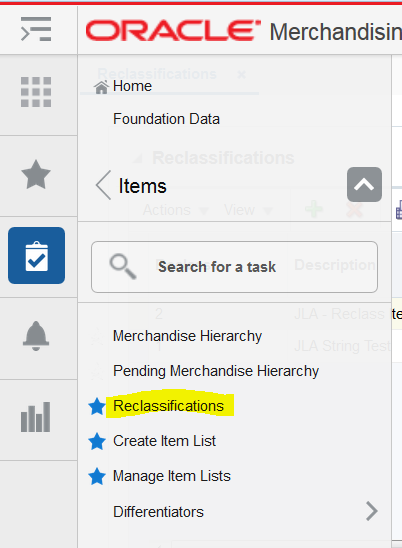
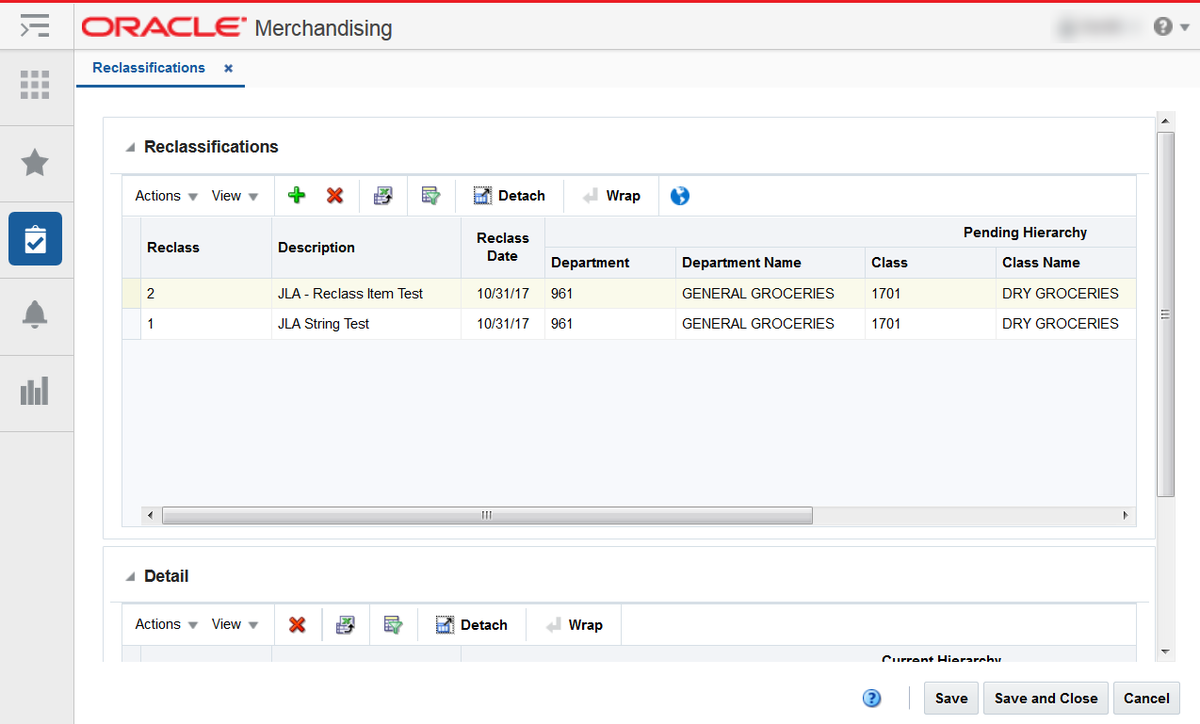
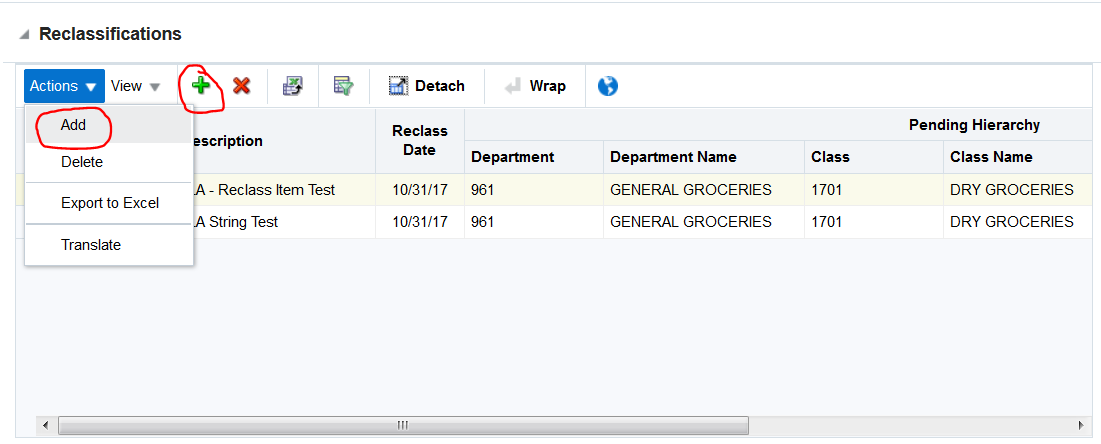
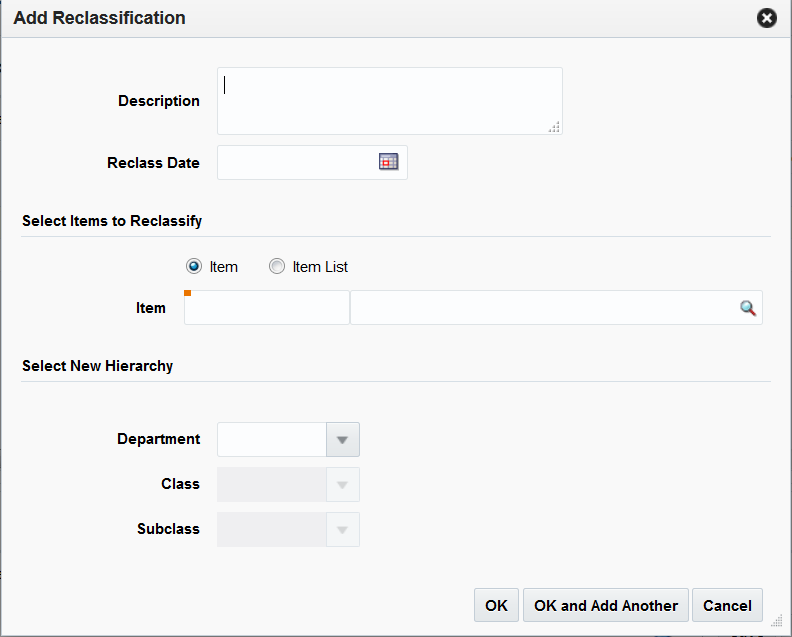
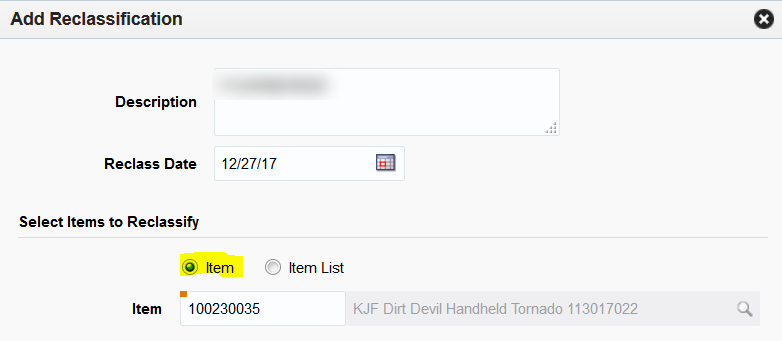
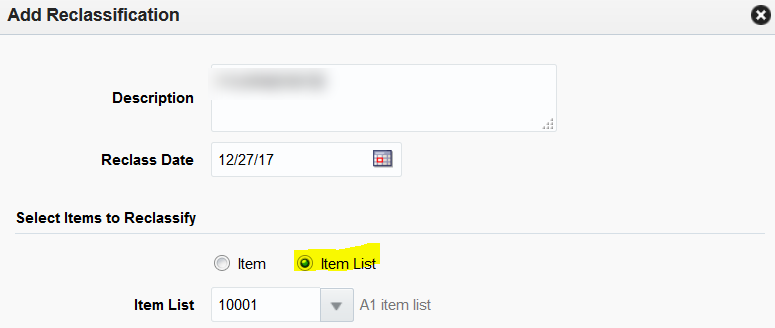
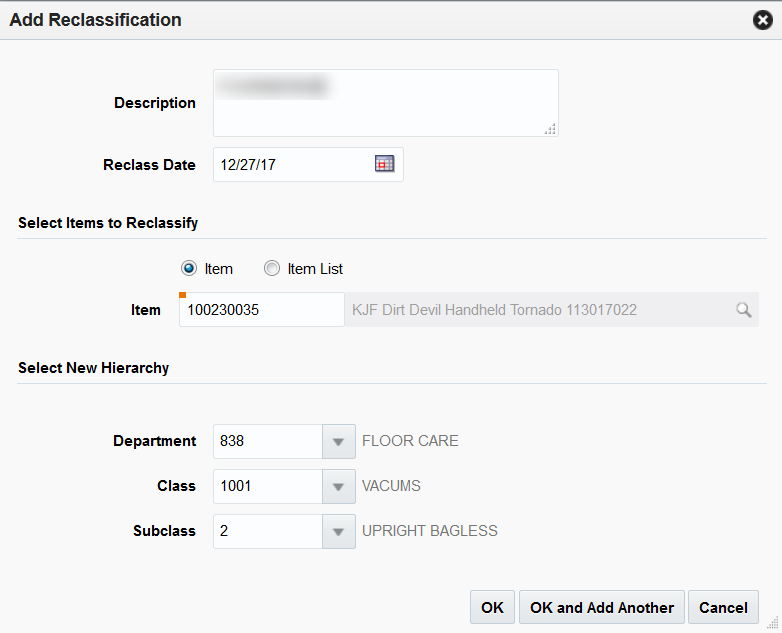
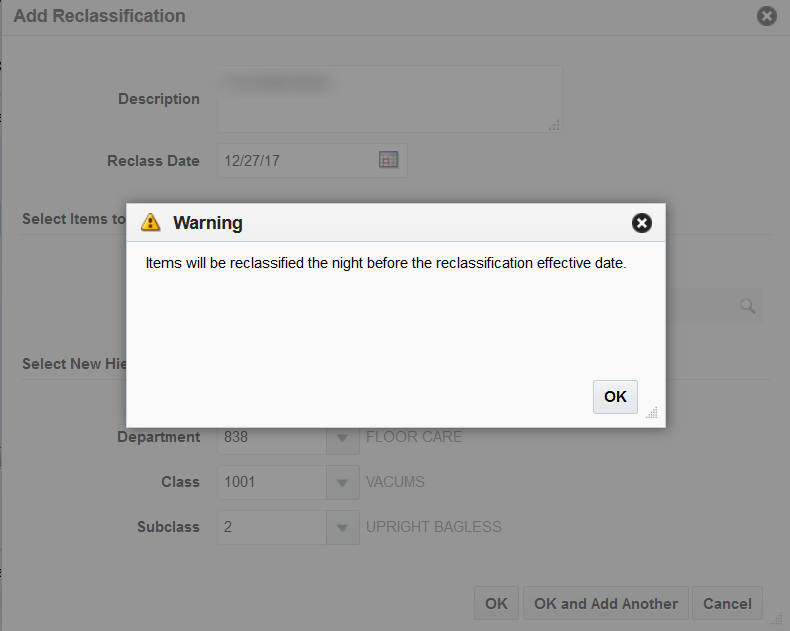
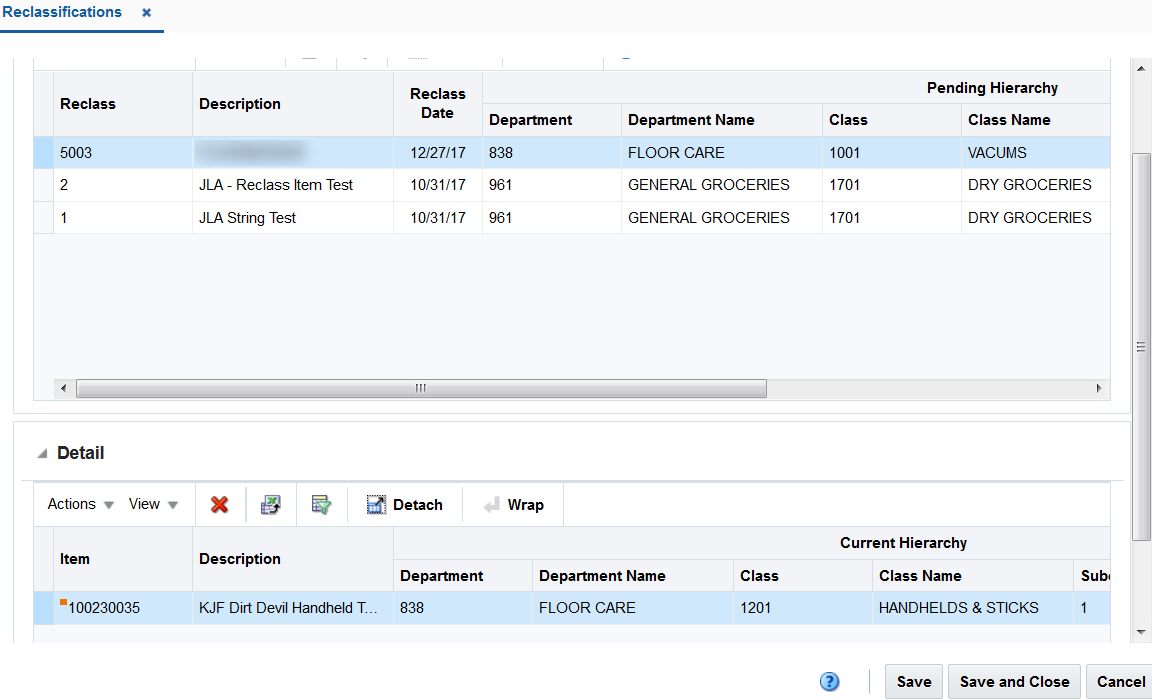
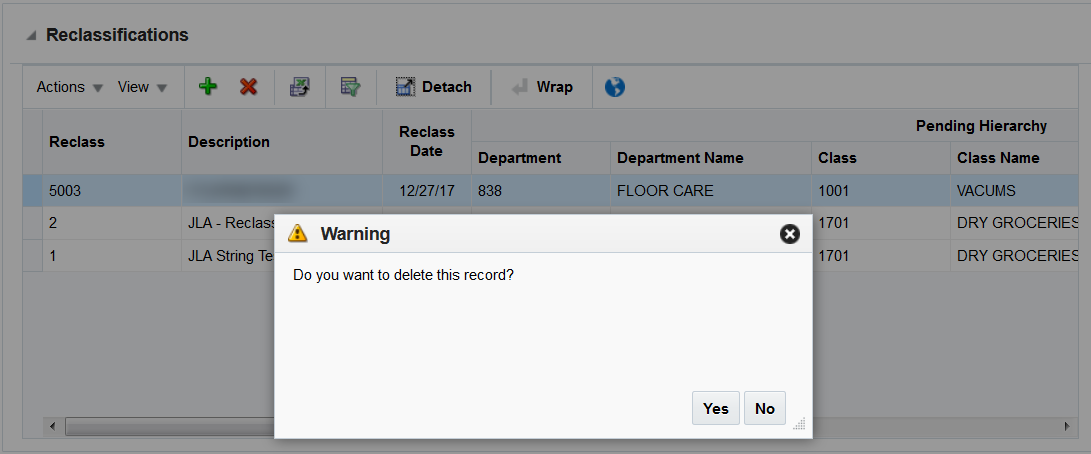
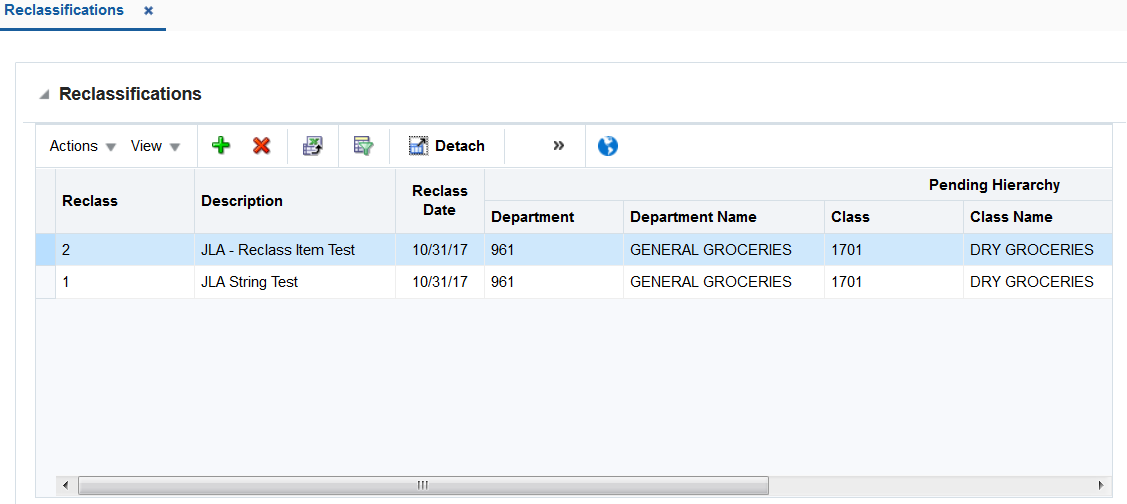
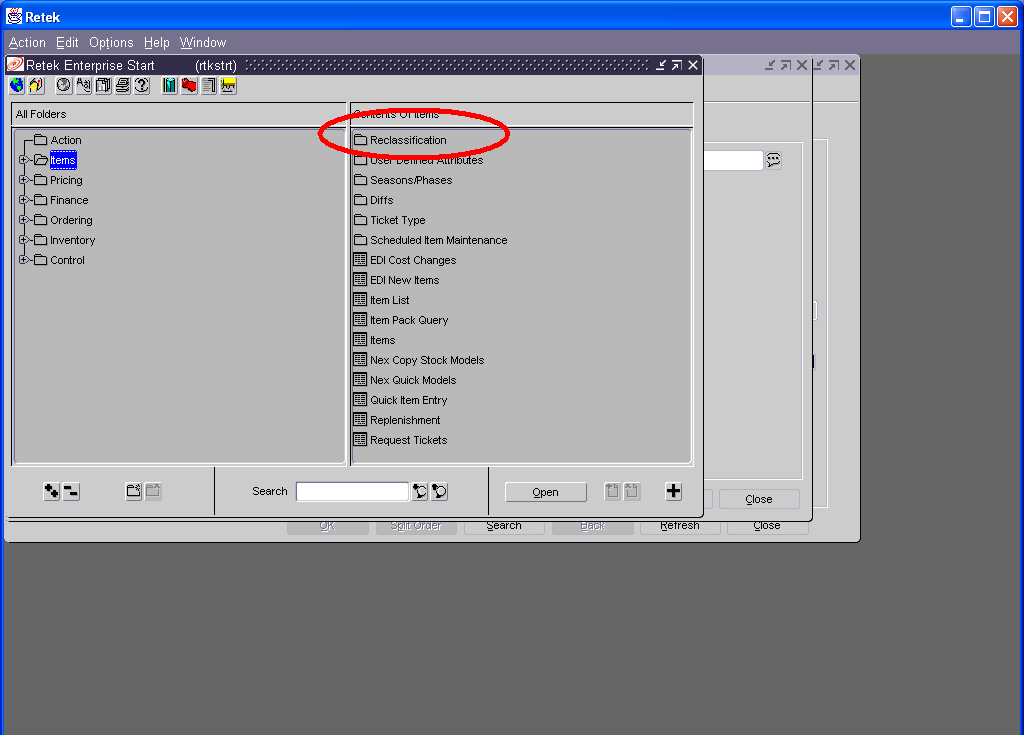
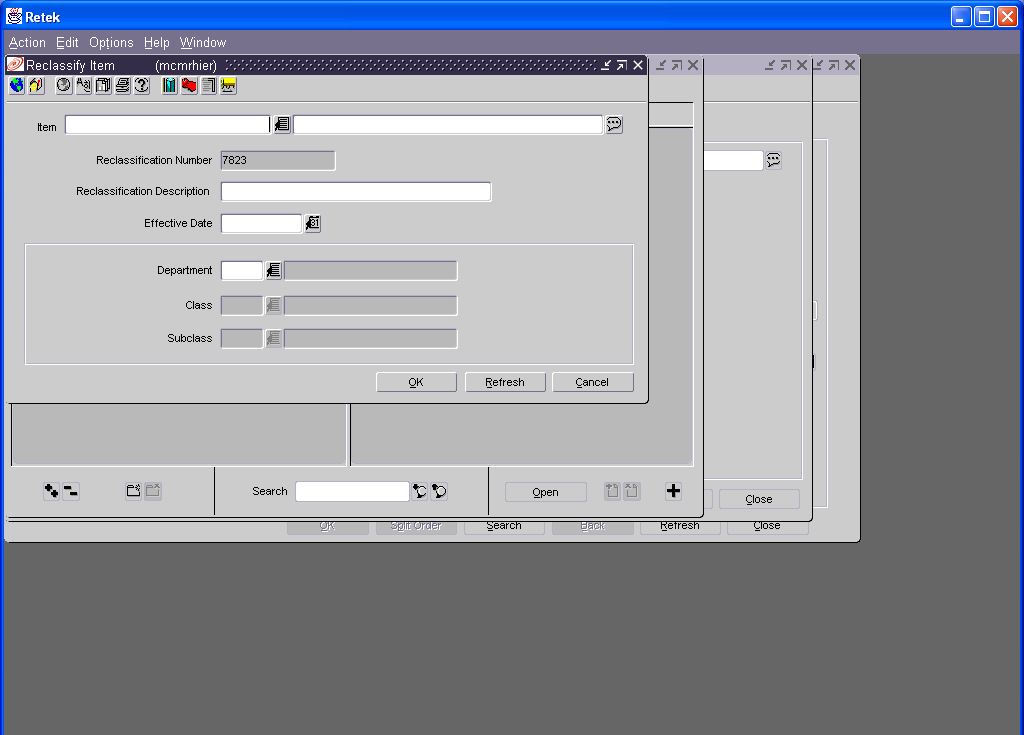
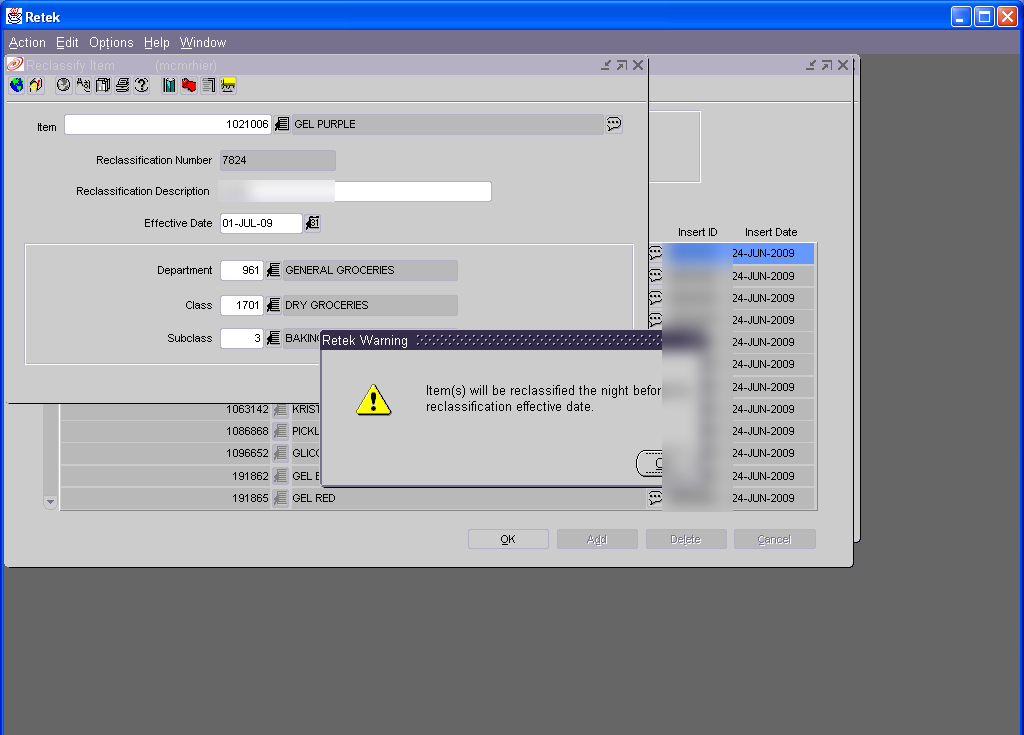
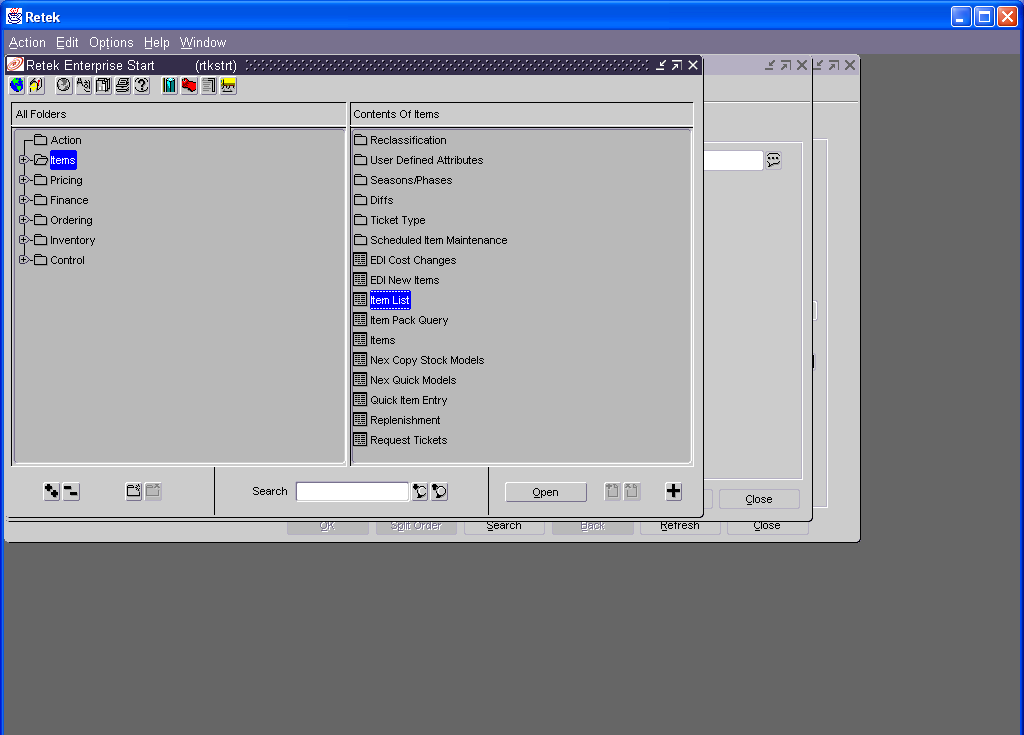
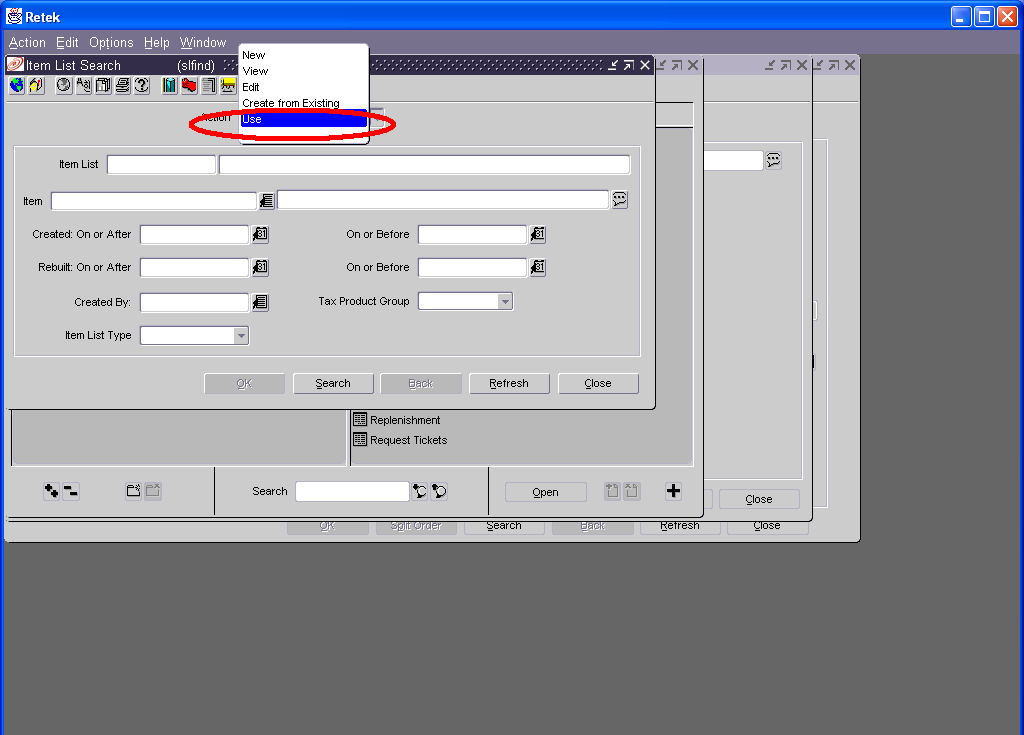
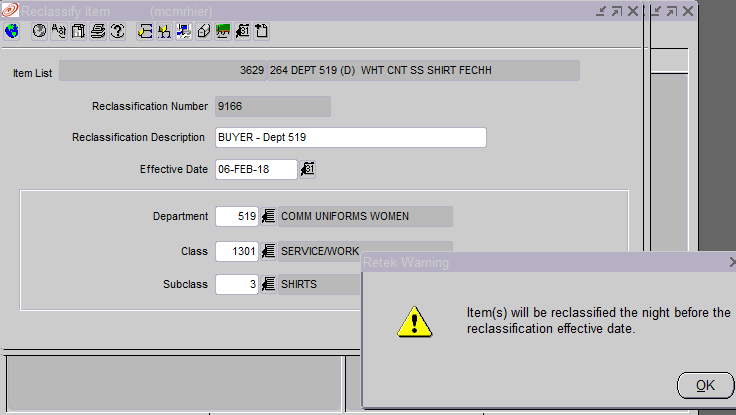
Re-class RIN(s) to a different dept/class/subclass
Re-classification Template. Done the first full week of every month; see Item Reclassification.
Create, add or edit a dept/class/subclass
Merchandise Hierarchy Template. Done twice a year.
Email Responses
Canned / template email responses used by the Data Steward Team. Each subheader below is a scenario; the text beneath it is the ready-to-send response — click the copy icon to copy it exactly as written.
⚠
Action Required
25
ACTION REQUIRED for Add Web Loc(s):
Email Response
Upon initial review of the submitted Item Induction Location form, please review the following field(s):

Items are missing the following Web requirements:
- Missing BOPIP UDAs

Please submit an update to Add the BOPIP UDAs along with your request to Add Web locs.

If you have any questions, please let us know.

Thank you,
Data Steward Team
ACTION REQUIRED for Update Primary Supplier: — Suppliers not attached to items
Email Response
Upon initial review of the submitted Manual Maintenance Location form, please review the following:

Please check/validate suppliers are attached to the item(s).

Please submit an Add Supplier Item Induction form along with your manual maintenance form.

If you have any questions, please let us know.

Thank you,
Data Steward Team
ACTION REQUIRED for Update Primary Supplier: — Incorrect Supplier entered on form
Email Response
Upon initial review of the submitted Manual Maintenance Location form, please review the following:

Please check/validate supplier # is correct on your form as this supplier is not attached to the item(s).
-You have supplier #698140691 on your manual maintenance form but your form is indicating DeCA which is supplier #835949082

Please submit an Add Supplier Item Induction form (if necessary) along with your manual maintenance form or update your manual maintenance form and resubmit.

If you have any questions, please let us know.

Thank you,
Data Steward Team
ACTION REQUIRED CHECKER NOT BEING USED: — Doesn't show template ran though checker
Email Response
Good morning and are you having checker issues?  Your template was not ran through the checker prior to submitting this template.

Please run your template through the checker and save that copy or advise if you’re having issues.  If you’re having issues with the checker, please provide the error you are receiving.

If you have any questions, please let us know.

Thank you,
Data Steward Team
ACTION REQUIRED:
Email Response
Upon initial review of the submitted Item Induction form, please review the following field(s):

**List invalid fields**

Please review, correct and re-submit.

If you have any questions, please let us know.

Thank you,
Data Steward Team
ACTION REQUIRED for Building a New Brand Request:
Email Response
Upon initial review of your Brand Request Form,  please review the following field(s):

- Web Brand (column C) – please check and validate Spelling is correct.
- You have FAUDI SPADA on the form but the website shows it as FEVDI SPADA
- Web Brand/UDA Display (column D) – please check that this is populated correctly – see the notes for this field below:
- This column needs to show the Vendors brand standard and how the Brand should be displayed on MNE.com's search bar results and copy - i.e. it be all CAPS, Proper, miXed and also should include any necessary characters like accents, etc
- You have this in All Caps FEUDI SPADA – is that correct or should it be proper case?

Please review, make any necessary corrections and re-submit.  If you attached an item induction template to build items, please confirm that is still accurate and correct (in case changes were needed for the Brand) and reattach with your Brand Request form as well.

If you have any questions, please let us know.

Thank you,
Data Steward Team
ACTION REQUIRED for Location Tab (duplicate IFID records):
Email Response
Upon initial review of the submitted Item Induction form, please review the following field(s):

- Please review your Location Tab.  You have duplicate records - for each Item Family ID, you have it listed multiple times – this will cause the system to throw errors.  You only need the item Family ID once for each unique Location record.
- Highlighted in red & bolded the records you should have on your template.

Please review, correct and re-submit.

If you have any questions, please let us know.

Thank you,
Data Steward Team
ACTION REQUIRED for Add Trans (Diff/Size Issues):
Email Response
***View in HTML***

Upon initial review of the submitted Item Induction form, please review the following field(s):

- Please review your size code you are trying to utilize – you cannot change your size code, it must match the size code of the Parent item you are trying to attach this Tran to
- Your induction template is requesting size code 006S be used but the Parent # 19745338 you are trying to attach it to is built with a size code of 036S.  This will error on us when we induct it into RMS.
- It looks like you requested size 25 be added to 006S but it may have needed to be added to 036S.

Please review, correct and re-submit.

If you have any questions, please let us know.

Thank you,
Data Steward Team
ACTION REQUIRED for Add Trans (Diff/NRF Issues):
Email Response
***View in HTML***

Upon initial review of the submitted Item Induction form, please review the following field(s):

- Please review your NRF color code you are trying to utilize – you cannot reuse a color code if it’s already been used for that size code
- Please review the highlighted records – we show this color code already being used for this Parent(s).  Please update your color code to one that is not being utilized and resubmit.
- We have attached a report that shows what is currently being used for those Parents

Please review, correct and re-submit.

If you have any questions, please let us know.

Thank you,
Data Steward Team
ACTION REQUIRED for Brands, Item Desc, & Loc Tab:
Email Response
***View in HTML***

Upon initial review of the submitted Item Induction form, please review the following field(s):

We see you ran your template through the checker, did you not receive any errors?

- 5 ERROR: Qty  Brands has an incorrect value. Please fix and rerun script.
- (Must be in the validation file. – Did not see Hawaiian King Chocolate built in our system or anything with Hawaiian King.  If you need this built please submit on the Web Brand form that is on the HUB and DST will build it for you.

- Once the Brand is built or you have the correct Brand, please review your item descriptions again and make sure they are consistent.  You have Hawaiian Brand Chocolate for the first 3 records and then Hawaiian King (without the chocolate for the last 2 records.  You need to use the brand correctly for all Item Descriptions
- Location Tab: there is no data on this tab.  Please populate or not locations will be attached to your items.

Please review, correct and re-submit.

If you have any questions, please let us know.

Thank you,
Data Steward Team
ACTION REQUIRED for cost higher than retail:
Email Response
***View in HTML***

Upon initial review of the submitted Item Induction form, please review the following field(s):

WARNING: Qty 1 Costs are higher than Retail (Col AG and BN). Please validate. Is this correct?  You have a cost of $740 and a retail of $6.99.  This would impact your financials for markups/markdowns, etc.

Please review, correct and re-submit.

If you have any questions, please let us know.

Thank you,
Data Steward Team
ACTION REQUIRED for Dimension Field(s):
Email Response
Upon initial review of the submitted Item Induction form, please review the following field(s):

Please review your Gross Weight field (column CA).  This needs to be a number with no other data included.  You have several that have the UOM included in the field.  This will error upon induction.

Please review, correct and re-submit.

If you have any questions, please let us know.

Thank you,
Data Steward Team
Missing Web Requirements for Adding Loc(s):
Email Response
***View in HTML***

Upon initial review of Item Induction template to Add Loc(s), we noticed you have Web loc(s) (781 and/or 9870) on your Location Tab.  Please keep in mind, if you are adding 781, you MUST add 9870; and items MUST have all Web Requirements attached before we can process your request.

Items are missing the following Web requirements:
- Missing BOPIP UDAs
- Brand
- VPNs if vendor provided
Here is the link to the HUB that provides the Web Requirement Instructions and have attached a soft copy as well.

Please review your items and submit a download form to add any missing Web requirements and resubmit all template to DST for processing.

If you have any questions, please let us know.

Thank you,
Data Steward Team

Or

Upon initial review of Item Induction template to Add Loc(s), we noticed you have Web loc 9870 on your Location Tab.  Why are you adding the Web Warehouse loc?  You don’t have 781 attached to this item.  Pease keep in mind, if you are adding any web loc(s) you must add both 781 and 9870, and you MUST have all Web Requirements attached before we can process your request.

NOTE:  If you just need loc 182 to resolve the pricing issue, then please resubmit without the 9870 loc so we may process.

Items are missing the following Web requirements:
- Missing BOPIP UDAs
- Brand
- VPNs if vendor provided
- Web UDA’s (
- MSRP’s (unless on the exempt list from Web Team)
Here is the link to the HUB that provides the Web Requirement Instructions and have attached a soft copy as well.

internal-link

Please review your items and submit a download form to add any missing Web requirements and resubmit all template to DST for processing.

If you have any questions, please let us know.

Thank you,
Data Steward Team
UPLOAD w/ Errors:
Email Response
Your Item Induction form received the following error(s) during the upload process with the following error(s):

Once reviewed, please correct and re-submit on the proper form.

If you have any questions, please let us know.

Thank you,
Data Steward Team
UPLOAD w/ Errors for mis-matched size group ids w/in a grouping:
Email Response
Your Item Induction form received the following error(s) during the upload process with the following error(s):

You have a mis-matched size group id for 1 of your Item Groupings.  Nots sure if they should have been grouped together or not; but you cannot have different size groups for any given Item Grouping.  We have attached your original template and have highlighted the Item Grouping and then in red showed where the size group id is different.  These 4 items did not build.

Action:  If these items should be part of this grouping then please resubmit (on a clean item induction template) the 4 items as an Add Trans utilizing the correct size group id/values.  If this is truly a unique and different item, then submit (on a clean induction template) a Create Item Family action for these 4 items.

All other items have built successfully and we have attached the BI Item report for those items.

Once reviewed, please correct and re-submit on the proper form.

If you have any questions, please let us know.
UPLOAD w/ Errors for a duplicate color code w/in a grouping:
Email Response
***View in HTML***

Your Item Induction form received the following error(s) during the upload process with the following error(s):

- This child/grandchild item already exists for item 20236711 – You duplicated a color code for the same Parent (020 – Gray).  You cannot use the same color/side combination within a single item grouping.
- We’ve attached your original induction template highlighting the item that error out and bolded in Red the fields that need to be corrected

Action: Please submit a new clean item induction template to add the missing item using the “Add Trans” Action on the Item Induction sheet and change your NRF color code to something different and use a different color name.  You cannot use Gray as you have used it for another transaction within that same grouping.  There needs to be some differentiator.  For example is a Heather Gray, Light Gray, etc.

All other items have built successfully and we have attached the BI Item report for those items.

Once reviewed, please correct and re-submit on the proper form.

If you have any questions, please let us know.

Thank you!
Data Steward Team
UPLOAD w/ Errors for invalid UDA Id value:
Email Response
Dafne,

Your Item Induction form received the following error(s) during the upload process with the following error(s):

Invalid UDA id.  Please be aware your items have been built and approved but UDA's have not been attached.  If you need the UDA(s) attached to these items, please submit a request to add these UDA's to your items.

Once reviewed, please correct and re-submit on the proper form.

If you have any questions, please let us know.
UPLOAD w/ Errors for Hierarchy not matching Parent:
Email Response
Betsy,

Your Item Induction form received the following error(s) during the upload process with the following error(s):

Please review the record highlighted in yellow and your hierarchy.  Your requested hierarchy does match the Parent hierarchy in the system.  We have attached a report that shows you the hierarchy for the Parent # you have provided.

Once reviewed, please submit a new, clean item induction template with that single record on it for processing.

If you have any questions, please let us know.

Thank you,
Data Steward Team
UPLOAD w/ Errors for Missing Sheet/Input:
Example / reference data
Item
Item Description
Supplier Site
Country of Sourcing
Worksheet
Row
Column
Issue Type
Issue Description
Item_Master
Error
Missing sheet in the input file.
Error
Invalid template. Check the sheets and/or columns in the spreadsheet used.
Email Response
***View in HTML***

Your Item Induction form received the following error(s) during the upload process with the following error(s):

Did you by chance delete any columns or try and change anything?  Please remember this template or data is very finicky so something was deleted that is causing this to error out.  Please redownload the form and make your updates again and resubmit for processing.

If you have any questions, please let us know.

Thank you,
Data Steward Team
UPLOAD w/ Errors for Updating Dimensions when no Dimensions attached:
Email Response
***View in HTML***

Your Item Induction form received the following error(s) during the upload process with the following error(s):

Error: This dimension object does not exists for the item-supplier-country of sourcing relationship.  It looks like you were trying to update dimensions for items that did not have any dimensions attached to them.

NOTE:  If you are trying to Add new dimensions to item(s) then please either submit them via an item induction template or you may update them manually on the front end (if you have completed Item Maintenance training).  Also attaching the link to our DST Document Guide that tells you how to which form(s) or use or if you can do them on the front end by Action.

internal-link

If there were multiple updates submitted, the others had no errors.

Once reviewed, please correct and re-submit on the proper form.

If you have any questions, please let us know.

Thank you,
Data Steward Team
Action Required for Case Packs w/ Whs SOH:
Email Response
Upon initial review of the submitted Item Induction form, please review/update the following.

You're requesting to change case packs but it appears one or all of them have SOH in warehouse.  ROADS handles all case pack requests for items warehouse.  Please fill out the attached form and submit to the ROADS Team

internal-link
File Name: Case Pack Request Form

Please review, correct and re-submit.

If you have any questions, please let us know.

Thank you,
Data Steward Team
ACTION REQUIRED for Pack GTIN(s) that Exist in RMS:
Example / reference data
GTIN
PACK_NO
DEPT
CLASS
SUBCLASS
ITEM_DESC
CREATE_DATETIME
072140039417
17254330
603
1501
2
Eucerin Body Asst 12pc
8/08/24
072140039424
17254329
603
1501
4
Aquaphor Body Asst PDQ
8/08/24
Email Response
***View in HTML***

Upon initial review of the submitted Pack Induction form, please review the following field(s):

Your GTINs exists in RMS already. If the all the information is the same for the packs, then you'll find your pack item information below.  If they are not correct, you will need to submit a Delete request to delete the GTIN(s) so you may rebuild the new packs.

Please review, correct and re-submit.

If you have any questions, please let us know.

Thank you,
Data Steward Team
ACTION REQUIRED for GTIN Delete (template format/submission):
Email Response
***View in HTML***

Upon initial review of the submitted Item Induction form, please review the following field(s) for your delete request:

Please make sure you are paying attention to the field(s) you are populating.  Your data is in the incorrect field, see the procedure to note that your delete request must go in the PARENT Field as this is the only field the system is looking at when processing these deletes.

Here is the link to the instructions on the HUB and have attached a soft copy as well.
internal-link
How to Submit a Delete GTIN Induction Form to DST
*Note: This is to delete GTINs out of RMS and downstream systems.

For Buying Teams:
You must provide a reason for all Delete requests in the body of the email.  DST has been tasked to track all deletes as there are downstream ramifications when we process any delete requests.  NOTE: Please Do Not put the reason in the Subject Line
Reminder/Notes:
- If the Transaction Item the GTIN is currently attached to has multiple GTINs, please make sure the GTIN being deleted is NOT flagged as primary.  If it is, you must change the primary flag to another GTIN.  This is a hard stop for RMS as the purge job will error and will delay your request as it will be sent back to you for updating.
- If your Delete should only be happening in a single system (i.e. RMSv16 Only or RMSv10 Only).  You MUST notate that in your email or the delete will automatically be processed for both systems.
- If you are requesting to delete at Parent or Trans level, please be aware the items MUST meet the purge criteria in order to delete – no transactions of any kind for 2 years àIf there are any transactions out there it is a hard stop.
- If you will be building new items with these GTINs, please DO NOT attach the new Item Induction to the Delete request email.  It must be submitted to DST separately after the delete has processed.
To delete a GTIN through the Custom Item Induction template, please follow these steps:
Email Response
- Select Action = ‘Add Item CFAS’ (Column A)
- Enter GTIN(s) or Parent/Trans to be deleted in the Parent Item (Column H) - this should be whatever level you are trying to delete (i.e. GTIN, Trans, or Parent).
- Enter Buyer Number in the Buyer (Column DK)
DO NOT POPULATE ANY OTHER FIELDS:
Email Response
- Submit and E-mail to the DST (as an Excel Macro-Enabled Workbook) with DELETE GTIN (or ITEM) Request in the Subject Line

If you have any questions, please let us know.

Thank you,
Data Steward Team
✓
Successful
17
Add Loc(s):
Email Response
NOTE: Please make sure there are no spaces after your item #(s) as it will cause issues with locs adding.

Your Item Induction form to Add Loc(s) has been successfully uploaded .  Your item/loc should be available to use within one hour, but could take up to two hours.  If you do not see your item/locs in v10 after four hours from receiving this email, please contact the team.

If you have any questions, please let us know!

Thank you!
Data Steward Team
Add Loc(s)/Update Status:
Email Response
Your Item Induction form to Add Loc(s) has been successfully uploaded along with your manual maintenance form to update status .  Your item/loc  and status update should be available to use within one hour, but could take up to two hours.  If you do not see your item/locs in v10 after four hours from receiving this email, please contact the team.

If you have any questions, please let us know!

Thank you!
Data Steward Team
Add Supplier/Loc(s):
Email Response
Your Item Induction form to Add Supplier(s) and Loc(s) has been successfully uploaded .  Your item/supplier & locs should be available to use within one hour, but could take up to two hours.  If you do not see your item/locs in v10 after four hours from receiving this email, please contact the team.

If you have any questions, please let us know!

Thank you!
Data Steward Team
Update Primary Supplier:
Email Response
Your Manual Maintenance form to Update Primary Supplier has been successfully updated.  Your item/Supplier update should be available to use within one hour, but could take up to two hours. If you do not see your updates in v10 after four hours from receiving this email, please contact the team.

If you have any questions, please let us know!

Thank you!
Data Steward Team
Update Item/Loc Status:
Email Response
Your Manual Maintenance form to Update Status has been successfully updated.  Your item/loc update should be available to use within one hour, but could take up to two hours. If you do not see your updates in v10 after four hours from receiving this email, please contact the team.

If you have any questions, please let us know!

Thank you!
Data Steward Team
RMS Download:
Email Response
Your RMS Download form has been successfully updated.  Your updates should be available to use within one hour, but could take up to two hours. If you do not see your updates in v10 after four hours from receiving this email, please contact the team.

If you have any questions, please let us know!

Thank you!
Data Steward Team
NEW ITEM BUILDS:
Email Response
Your Item Induction form has been successfully uploaded with no errors. Please see the attached report to retrieve your item information. Your items should be available to use within one hour, but could take up to two hours. Please wait until your items are FULLY in V10 (Parent, Grandparent, UPCS, Locations, etc). If you do not see your items in v10 after four hours from receiving this email, please contact the team.

If you have any questions, please let us know!

Thank you!
Data Steward Team
QTY KEY UPDATES:
Email Response
Your request to add Qty Key to loc(s) xxx has been completed.

If you have any questions, please let us know!

Thank you!
Data Steward Team
NEW DITTY PACK BUILD:
Email Response
Your Pack  Induction form has been successfully uploaded with no errors. Please see the attached report to retrieve your item information. Your items should be available to use within one hour, but could take up to two hours. Please wait until your items are FULLY in V10 (Parent, Grandparent, UPCS, Locations, etc). If you do not see your items in v10 after four hours from receiving this email, please contact the team.

Loc 109 has been added and qty key added.

If you have any questions, please let us know!

Thank you!
Data Steward Team
Add Supplier & Update Primary Supplier:
Email Response
Your Item Induction form to Add Supplier & Manual Maintenance form to Update Primary Supplier has been successfully updated.  Your item/Supplier update should be available to use within one hour, but could take up to two hours. If you do not see your updates in v10 after four hours from receiving this email, please contact the team.

If you have any questions, please let us know!

Thank you!
Data Steward Team
Add Supplier:
Email Response
Your Item Induction form to Add Supplier has been successfully updated.  Your item/Supplier update should be available to use within one hour, but could take up to two hours. If you do not see your updates in v10 after four hours from receiving this email, please contact the team.

If you have any questions, please let us know!

Thank you!
Data Steward Team
Add UDAs:
Email Response
Your Item Induction form to Add UDAs has been successfully updated.  Your item/UDA updates should be available to use within one hour, but could take up to two hours. If you do not see your updates in v10 after four hours from receiving this email, please contact the team.

If you have any questions, please let us know!

Thank you!
Data Steward Team
RMS Download for Web Requirements & Add Web Locs:
Email Response
Your RMS Download form to Add Web Requirements has been successfully updated and your induction to add Locs has been successfully uploaded.  Your updates should be available to use within one hour, but could take up to two hours. If you do not see your updates in v10 after four hours from receiving this email, please contact the team.

If you have any questions, please let us know!

Thank you!
Data Steward Team
RMS Download:
Email Response
Your RMS Download form has been successfully updated.  Your updates should be available to use within one hour, but could take up to two hours. If you do not see your updates in v10 after four hours from receiving this email, please contact the team.

If you have any questions, please let us know!

Thank you!
Data Steward Team
Update SOM:
Email Response
Your Manual Maintenance form to Store Order Multiple has been successfully updated.  Your SOM updates should be available to use within one hour, but could take up to two hours. If you do not see your updates in v10 after four hours from receiving this email, please contact the team.

If you have any questions, please let us know!

Thank you!
Data Steward Team
SUCCESSFUL UPLOAD:
Email Response
Your Item Induction form has been successfully uploaded with no errors. Please see the attached report to retrieve your item information. Your items should be available to use within one hour, but could take up to two hours. Please wait until your items are FULLY in V10 (Parent, Grandparent, UPCS, Locations, etc). If you do not see your items in v10 after four hours from receiving this email, please contact the team.

If you have any questions, please let us know!

Thank you!
Data Steward Team
WEB BRAND REQUEST:
Example / reference data
BRAND_NAME
BRAND_DESCRIPTION
FEUDI SPADA
FEUDI SPADA
Email Response
Your Web Brand request has been created.  Please use the below in the Brand Column (AN) on the Item Induction Template:

If you have any questions, please let us know.

Thank you,
Data Steward Team

***Provide Web Brand Name in ALL CAPS and the new Description***
**Copy Jenni Blythe or Web Team Member who approved changes**
SQL Query Reference
General Reference Queries
How to use these: replace the sample values (item numbers, lists, process IDs) with your own before running. YOURUSERID is your RMS user ID. Lines starting with -- are optional filters you can switch on by removing the dashes. Re-class queries are in the Item Re-Class Query Index below.
Uploads & Process Tracking
Check whether templates you uploaded have processed, and find out why one failed.
My Recent Uploads (Last 2 Days)
Lists your template uploads from today and yesterday with their process ID, description, destination and status. Run this first after uploading to see if a template processed. Replace the user ID with your own RMS user ID in uppercase.
SQL
SELECT PROCESS_ID, PROCESS_DESC, PROCESS_DESTINATION, ACTION_DATE, STATUS
FROM rms.svc_process_tracker
WHERE USER_ID = 'YOURUSERID'ANDTRUNC(SYSDATE) - TRUNC(ACTION_DATE) <= 1
ORDER BY action_date DESC, PROCESS_ID DESC;
Today's Uploads with Full Timestamps
Shows every column of today's process tracker entries for a user, with action dates displayed to the second. Useful when you need the exact time a template ran or want to check a teammate's uploads.
SQL
ALTER SESSION SET nls_date_format = 'mm/dd/yyyy HH:MI:SS';
SELECT *
FROM rms.svc_process_tracker
WHERE USER_ID = 'YOURUSERID'ANDTRUNC(action_date) = TRUNC(sysdate)
ORDER BY action_date DESC;
Today's Item Master Data Uploads
Lists today's uploads to the Item Master Data tables (Item Induction templates). Remove the user ID line to see everyone who is inducting templates today, or uncomment the status line to show only unprocessed (N) uploads.
SQL
SELECT *
FROM rms.svc_process_tracker
WHERE TEMPLATE_KEY = 'ITEM_MASTER_DATA'AND USER_ID = 'YOURUSERID'--AND STATUS = 'N'ANDTRUNC(action_date) = TRUNC(sysdate)
ORDER BY PROCESS_ID DESC;
Staging Record Count by Status (Process ID)
Counts the item master staging records for one process ID by processing status, so you can see how many records have processed and how many are still pending or in error.
SQL
SELECT process$status, COUNT(1)
FROM rms.svc_item_master
WHERE process_id = '21006523'GROUP BY process$status;
Has RMS Started Processing an Item?
Checks the item master staging table for today's records of an item that haven't finished processing (status not P). No rows means the item has processed. You can filter by process ID or creator instead of item.
SQL
SELECT *
FROM rms.svc_item_master
WHERE process$status <> 'P'--AND process_id = 205680AND ITEM = '193070986586'ANDTRUNC(create_datetime) = TRUNC(sysdate)
ORDER BY create_datetime DESC;
Step 2 (Item/Location) Upload Status
Shows today's Step 2 item/location staging records you created that haven't finished processing. No rows means Step 2 has processed. Uncomment a line to narrow it to one item or process ID. Uses your user ID in lowercase.
SQL
SELECT *
FROM rms.nex_svc_item_loc
WHERE created_by = 'youruserid'--AND item = '12657293'--AND process_id = '205667'AND process_status <> 'P'ANDTRUNC(created_date) = TRUNC(sysdate)
ORDER BY created_date DESC;
Find the Process ID for an Item
Looks up which upload (process ID) created an item, along with its parent, grandparent, description, creator and create date. Use it to find the process ID to plug into the error query below.
SQL
SELECT PROCESS_ID, ITEM, ITEM_PARENT, ITEM_GRANDPARENT, ITEM_DESC, CREATE_ID, CREATE_DATETIME
FROM rms.svc_item_master
WHERE item IN ('20328861');
Error Messages for a Failed Upload (by Process ID)
Returns the readable error text for every error on a process ID. The commented block can replace the process ID filter to search by reference number, parent or grandparent instead.
SQL
SELECT r.rtk_text,
REPLACE(c.error_msg, '@0', '') error_message,
c.*
FROM rms.coresvc_item_err c, rms.rtk_errors r
WHERE /*process_id IN (SELECT process_id FROM rms.svc_item_master
WHERE (orig_ref_no LIKE'%VALUE%'OR item_parent LIKE'%VALUE%'OR item_grandparent LIKE'%VALUE%'))
AND*/ REGEXP_SUBSTR(REPLACE(c.error_msg, '@0', ''), '[^@]*') = r.rtk_key (+)
AND process_id IN ('21650342')
ORDER BY process_id DESC, rtk_text;
Item/Supplier/Country Dimensions in Staging
Checks whether an item already has a record waiting in the item/supplier/country dimension staging table.
SQL
SELECT *
FROM rms.svc_item_supp_country_dim
WHERE item IN ('14508509');
Item & Hierarchy Lookups
Find items and check how they are built.
Look Up Items by GTIN
Returns the item master record for one or more GTINs, including the item parent and whether each GTIN is the primary reference item.
SQL
SELECT * -- or: ITEM_PARENT, ITEM, PRIMARY_REF_ITEM_INDFROM rms.item_master
WHERE item IN ('198566072262', '198566072279', '198566072286', '198566072293');
Vendor & Transaction Details by GTIN
Starting from a GTIN, shows its create date, dept, primary vendor, parent and transaction items with names, VPN and status.
SQL
SELECTDISTINCTTRUNC(im.create_datetime) create_date, im.dept dept, s.supplier vendor, s.sup_name vendor_name,
im.item_grandparent parent, im.item_desc_secondary parent_name, iss.vpn vpn,
im.item_parent transaction, im.item_desc transaction_name, im.item gtin, im.status
FROM rms.item_master im, rms.item_supplier iss, rms.sups s
WHERE im.item_parent = iss.item
AND iss.supplier = s.supplier
AND im.item IN ('847280052899')
AND iss.primary_supp_ind = 'Y'ORDER BY im.item_grandparent, im.item_parent ASC;
Item Hierarchy for an Add-Transaction Request
When a buyer submits an add transaction, shows the parent and its existing transaction items with dept/class/subclass, color, size group, size and secondary description, so you can match the new transaction to the existing setup.
SQL
SELECT im.item_grandparent AS "PARENT", im.item_parent AS "TRANSACTION", im.dept, im.class, im.subclass, im.diff_1 AS color,
xim.diff_2 AS size_group_id, im.diff_2 AS "SIZE", im.item_desc_secondary, im.create_datetime, im.create_id
FROM rms.item_master im, (SELECT item, diff_2 FROM rms.item_master) xim
WHERE im.item_grandparent = xim.item
AND im.item_grandparent IN ('16863505')
--AND im.diff_1 IN ('403', '651')ORDER BY im.dept, im.class, im.subclass, im.diff_1, xim.diff_2 ASC;
Dept / Class / Subclass of a Parent Item
Returns the department, class and subclass of the items under a parent.
SQL
SELECT dept, class, subclass
FROM rms.item_master
WHERE item_parent = '17156710';
Colors and Sizes Under a Parent
Lists each transaction item under a parent with its color code and description (diff 1) and size ID and description (diff 2). Use it to check whether a size/color combination already exists before adding one.
SQL
SELECT im.item,
im.diff_1 AS color_code,
d1.diff_desc AS color_desc,
im.diff_2 AS size_id,
d2.diff_desc AS size_desc
FROM rms.item_master im
LEFT JOIN rms.diff_ids d1 ON im.diff_1 = d1.diff_id
LEFT JOIN rms.diff_ids d2 ON im.diff_2 = d2.diff_id
WHERE im.item_parent = '19893011'-- parent itemAND im.item_level = im.tran_level
ORDER BY im.diff_1, im.diff_2;
Items in a Dept / Class / Subclass
Lists items in a department, class and subclass, newest first, with descriptions and who created them. Uncomment the description line to search for a word, for example items named "Display".
SQL
SELECT item, item_parent, short_desc, item_desc, create_id, create_datetime
FROM rms.item_master
WHERE dept = '280'AND class = '1400'AND subclass = '3'--AND item_desc LIKE '%Display%'ORDER BY create_datetime DESC;
Classes and Subclasses in a Department
Lists every class/subclass combination set up under a department, to confirm a dept/class/subclass exists before building or re-classing.
SQL
SELECT *
FROM rms.subclass
WHERE dept = '770';
Ranging Built Items to Another Dept (e.g. 781)
For items being ranged into an already-built dept/class/subclass, pulls each parent and transaction with web description, brand, MSRP, VPN, supplier color and e-comm UDA values.
SQL
SELECTDISTINCT im.item_grandparent AS parent, im.item_parent AS transaction, im.dept, xim.item_desc_secondary AS web_desc,
xim.brand_name AS brand, xim.mfg_rec_retail AS msrp, iss.vpn AS vpn, iss.supp_diff_1 AS supplier_color,
uil.uda_id AS ecomm_uda, uil.uda_value AS ecomm_uda_value
FROM rms.item_master im
JOIN rms.item_supplier iss ON im.item_parent = iss.item
LEFT JOIN rms.uda_item_lov uil ON im.item_parent = uil.item
AND uil.uda_id IN ('9630', '9631', '9632', '9627')
JOIN (SELECT item, brand_name, mfg_rec_retail, item_desc_secondary FROM rms.item_master) xim
ON xim.item = im.item_parent
WHERE im.item_grandparent IN ('19507468', '19507466', '19507467')
AND iss.primary_supp_ind = 'Y'ORDER BY im.dept, im.item_grandparent, im.item_parent ASC, uil.uda_value DESC;
Item Lists & Location Lists
Check what is on an item list (SKULIST) or location list, and whether the items are set up for a supplier or locations.
Items on an Item List
Lists every item on one or more item lists (SKULISTs).
SQL
SELECT *
FROM rms.skulist_detail
WHERE skulist IN ('22430800');
Locations on a Location List
Lists every location on a location list.
SQL
SELECT *
FROM rms.loc_list_detail
WHERE loc_list = '609219';
Item List Items That Have a Supplier
Shows which items on an item list already have a given supplier attached, with the supplier name.
SQL
SELECT sd.item,
s.supplier,
s.sup_name
FROM rms.skulist_detail sd
JOIN rms.item_supplier isp ON sd.item = isp.item
JOIN rms.sups s ON isp.supplier = s.supplier
WHERE sd.skulist = '22420417'AND s.supplier = '118828241';
Item List Items Missing a Supplier
Shows which items on an item list do not have a given supplier attached, so you know which still need it added.
SQL
SELECT sd.item
FROM rms.skulist_detail sd
WHERE sd.skulist = '22490360'ANDNOT EXISTS (
SELECT 1
FROM rms.item_supplier isp
WHERE isp.item = sd.item
AND isp.supplier = '505794');
Item List Items That Have Locations from a Location List
For every item on an item list and every location on one or more location lists, shows the item/location pairs that already exist in RMS.
SQL
SELECT sd.item,
lld.location
FROM rms.skulist_detail sd
CROSS JOIN rms.loc_list_detail lld
WHERE sd.skulist = '22435542'AND lld.loc_list IN ('481320', '481311')
ANDEXISTS (
SELECT 1
FROM rms.item_loc il
WHERE il.item = sd.item
AND il.loc = lld.location
)
ORDER BY sd.item, lld.location;
Item List Items Missing Locations from a Location List
The opposite of the query above: shows each item/location pair from the item list and location list that is not set up yet.
SQL
SELECT sd.item,
lld.location
FROM rms.skulist_detail sd
CROSS JOIN rms.loc_list_detail lld
WHERE sd.skulist = '22430800'AND lld.loc_list IN ('1600005')
ANDNOT EXISTS (
SELECT 1
FROM rms.item_loc il
WHERE il.item = sd.item
AND il.loc = lld.location
)
ORDER BY sd.item, lld.location;
Locations, Retail & Quantity Key
Check an item's locations, retail by location, primary supplier at location level, and order multiple / quantity key settings.
Count of Locations on an Item
Returns how many locations an item is ranged to.
SQL
SELECT item, COUNT(loc)
FROM rms.item_loc
WHERE item IN ('20273384')
GROUP BY item
ORDER BY item ASC;
Item Locations That Are on a Location List
Shows which locations from a location list are already attached to a single item.
SQL
SELECT il.item,
il.loc,
lld.loc_list
FROM rms.item_loc il
JOIN rms.loc_list_detail lld ON il.loc = lld.location
WHERE il.item = '13105994'AND lld.loc_list = '609219'ORDER BY il.loc;
Location List Locations Missing from an Item
Shows which locations on a location list are not attached to a single item yet. Enter the item number in both places.
SQL
SELECT'13105994'AS item,
lld.location AS loc,
lld.loc_list
FROM rms.loc_list_detail lld
WHERE lld.loc_list = '609219'ANDNOT EXISTS (
SELECT 1
FROM rms.item_loc il
WHERE il.loc = lld.location
AND il.item = '13105994'
)
ORDER BY lld.location;
Retail by Location for a Parent Item
Lists the unit retail and selling unit retail at every location for the items under a parent. Use it to confirm a price change or check retail differences between stores.
SQL
SELECT im.item_parent, il.loc, il.unit_retail, il.selling_unit_retail
FROM rms.item_master im
JOIN rms.item_loc il ON il.item = im.item
WHERE im.item_parent = '19948102';
Primary Supplier and Status at the Location Level
Shows the primary supplier and status of an item at its locations. Swap in the commented lines to check every item on an item list, or every location on a location list, instead of a single item or location. Used to verify Manual Maintenance primary supplier updates.
SQL
SELECT item, loc, primary_supp, status
FROM rms.item_loc
WHERE item IN ('14857302')
--WHERE item IN (SELECT item FROM rms.skulist_detail WHERE skulist = '')--AND loc IN (SELECT location FROM rms.loc_list_detail WHERE loc_list = '')--AND loc IN ('350')
;
Item/Locations Missing the Expected Primary Supplier
Cross-checks an item list against a location list and returns each item/location whose primary supplier isn't the one expected, with order multiple, source and last update details.
SQL
SELECT sd.skulist, sd.item, lld.loc_list, il.loc, il.primary_supp, il.store_ord_mult, il.source_method, il.source_wh,
il.last_update_datetime, il.last_update_id
FROM rms.skulist_detail sd, rms.loc_list_detail lld, rms.item_loc il
WHERE sd.item = il.item
AND il.loc = lld.location
AND sd.skulist IN ('20740102')
AND lld.loc_list IN ('109220')
AND il.primary_supp <> '91796839'---AND il.store_ord_mult <> 'I'ORDER BY sd.skulist, lld.location ASC;
Quantity Key: Store Order Multiple by Location
For a list of items at one location, shows the primary supplier, status and store order multiple spelled out (I = Inner, C = Cases, E = Eaches). Results come back in the same order as the item list you paste in, so they line up with your spreadsheet.
SQL
WITH item_order AS (
SELECT ROWNUM AS seq,
column_value AS item
FROMTABLE(sys.odcivarchar2list(
'12183476'
))
)
SELECT i.item,
i.loc,
i.primary_supp,
i.status,
CASE i.store_ord_mult
WHEN'I'THEN'Inner'WHEN'C'THEN'Cases'WHEN'E'THEN'Eaches'ELSE i.store_ord_mult
ENDAS store_ord_mult
FROM rms.item_loc i
JOIN item_order o ON i.item = o.item
WHERE i.loc = '715'ORDER BY o.seq;
Quantity Key: Confirm Updates at a Location
Confirms quantity key updates for a list of items at one location. Only items whose QTY_KEY_OPTIONS is R (the expected value after the update) are returned, in the order you paste them, so any missing item still needs updating.
SQL
WITH item_order AS (
SELECT ROWNUM AS seq,
column_value AS item
FROMTABLE(sys.odcivarchar2list(
'127176',
'537701',
'7124146'
))
)
SELECT i.item,
i.loc,
i.qty_key_options
FROM rms.item_loc_traits i
JOIN item_order o ON i.item = o.item
WHERE i.loc = '461'AND i.qty_key_options = 'R'ORDER BY o.seq;
Suppliers & Costing
Confirm suppliers exist, are attached to items, and have the right VPN, unit of purchase and country records.
Suppliers and VPNs Attached to an Item
Lists the suppliers attached to an item and the VPN for each. Add AND supplier IN ('…') to check one supplier.
SQL
SELECT item, supplier, vpn
FROM rms.item_supplier
WHERE item IN ('20328903');
Look Up a Supplier
Confirms a supplier site exists in RMS and shows its details.
SQL
SELECT *
FROM rms.sups
WHERE supplier = '107257560';
All Suppliers
Lists every supplier with its DUNS number, parent, name, status and create date.
SQL
SELECT supplier, duns_number, supplier_parent, sup_name, sup_status, create_datetime
FROM rms.sups
ORDER BY supplier;
Default Unit of Purchase (UOP)
Shows the default unit of purchase for an item and supplier, with who last updated it and when.
SQL
SELECT item, supplier, default_uop, create_datetime, last_update_id, last_update_datetime
FROM rms.item_supp_country
WHERE item IN ('13284518')
  AND supplier IN ('9207775', '8086');
Item/Supplier/Country Record
Shows the full item/supplier/country record (cost, pack sizes, Ti/Hi and more) for an item.
SQL
SELECT *
FROM rms.item_supp_country
WHERE item IN ('7465374');
Item/Supplier/Country Dimensions
Shows the live dimension records for an item. This is the same check as the staging query above, run against the live table.
SQL
SELECT *
FROM rms.item_supp_country_dim
WHERE item IN ('14508609');
UDAs, Brands & Diffs
Look up UDA values, brands and differentiator (size/color) codes.
Look Up a UDA Value
Finds a UDA value by UDA ID and value number, or by its description (swap the WHERE lines).
SQL
SELECT *
FROM rms.uda_values
WHERE uda_id = '9267'AND uda_value = '2';
--WHERE uda_value_desc = 'Fruitables';
Required (Mandatory) UDAs
Lists the UDA defaults flagged as required, i.e. the UDAs that must be on an item in the departments they apply to.
SQL
SELECT *
FROM rms.uda_item_defaults
WHERE required_ind = 'Y';
Look Up a Brand
Finds a brand by name. Remove the WHERE line to list every brand alphabetically.
SQL
SELECT *
FROM rms.brand
WHERE brand_name = 'OMBRE'ORDER BY brand_name;
Look Up a Diff (Size/Color) ID
Lists differentiator IDs. Uncomment a line to search by description or by diff ID.
Note: These are the queries referenced by number (Q2, Q3…) in the Item Reclassification procedure. A copy is also saved as "Queries for Re-classes" in the Item Re-class folder.
Mandatory UDAs
Q2: UDAs on an Item List
Lists the UDA IDs and values attached to every item on an item list (SKULIST). Step 2 of the mandatory UDA check.
SQL
SELECT DISTINCT sd.item, ul.uda_id, ul.uda_value
FROM rms.uda_item_lov ul, rms.skulist_detail sd
WHERE ul.item = sd.item
  AND sd.skulist = '';
Forecasting Checks
Q3: Is a Department Forecastable?
Returns the departments in the list that have forecastable items. The destination department must match the item's forecastability.
SQL
SELECT DISTINCT dept, forecast_ind
FROM rms.item_master
WHERE forecast_ind = 'Y'AND Dept IN ('');
Q4: Is an Item on Forecasting?
Shows whether an item is on forecasting (active replenishment). This must match the destination department.
SQL
SELECT DISTINCT ril.dept, ril.item, item_desc
FROM rms.repl_item_loc ril, rms.item_master im
WHERE ril.item = im.item
AND ril.item IN ('')
AND forecast_ind = 'Y'AND (deactivate_date IS NULL OR deactivate_date > sysdate);
Q5: Is an Item List on Forecasting?
Shows which items on an item list are forecastable, with their current hierarchy.
SQL
SELECT sd.skulist, im.ITEM_PARENT, im.item_grandparent, im.DEPT, im.class, im.subclass, im.item_desc, im.forecast_ind
FROM rms.skulist_detail sd, rms.item_master im
WHERE sd.item = im.item_parent
  AND sd.skulist IN ('')
  AND im.forecast_ind = 'Y';
Domains for Forecastable Departments
Lists the forecasting domains attached to departments. A destination department must be in a domain before it can be forecastable.
SQL
SELECT *
FROM rms.domain_dept
WHERE dept IN ();
Pack Components on Order
Q6: Component Items on Open Orders
Finds open purchase orders for packs that contain the item. Those POs must be closed before the component can be re-classed.
SQL
SELECT *
FROM rms.ordhead oh, rms.ordsku os, rms.packitem p
WHERE oh.order_no = os.order_no
AND oh.status = 'A'AND p.pack_no = os.item
AND EXISTS (
SELECT'x'FROM rms.packitem p, rms.item_master im
WHERE p.pack_no = os.item
AND (im.item = ''OR im.item_parent = ''OR im.item_grandparent = '')
AND p.item = im.item
);
Open Orders, Deals Tables & Appointments
Q7: Items on Partially Received Open Orders
Finds open, partially received orders for the items under a parent. These POs can block a re-class.
SQL
SELECT oh.order_no, oh.order_type, oh.status, ol.item, oh.written_date, oh.NOT_AFTER_DATE, ol.location, ol.qty_ordered, ol.qty_received, ol.last_received
FROM rms.ordloc ol, rms.ordhead oh
WHERE oh.order_no = ol.order_no
AND ol.item IN (SELECT item_parent FROM rms.item_master WHERE item_grandparent IN ('12385927'))
AND oh.status <> 'C'AND ol.qty_received IS NOT NULLAND ol.qty_ordered > ol.qty_received
ORDER BY order_no DESC;
Q8: Check the Deals Tables
Checks both deals tables for the PO numbers found with Q7. Run both queries.
SQL Profile 1
SELECT *
FROM rms.deal_calc_queue
WHERE order_no IN ('');
SQL Profile 2
SELECT *
FROM rms.deal_order_temp
WHERE order_no IN ('')
ORDER BY order_no ASC;
Q9: Open Appointments on POs
Shows appointments on the POs and their status. Appointments must be closed before a PO can be closed.
SQL
SELECT DISTINCT ad.doc, ah.loc, ah.appt rms_appt_nbr, ah.status,
                DECODE(ah.status, 'SC', 'Scheduled',
                                  'AR', 'Arrived',
                                  'AC', 'Closed',
                                  'UNKNOWN') AS appt_status
FROM rms.appt_head ah, rms.appt_detail ad
WHERE ad.appt = ah.appt
  AND ad.doc IN ('');
Rejections & Validation
Q11: Recent Re-class Rejections
Shows rejection reasons from the last batch, by user ID (or by item). Only the previous batch's errors are kept here.
SQL
SELECT *
FROM rms.mc_rejections
WHERE user_id = 'NEXADID'; -- (By user ID)---and item in (''); -- (By item, if using only item, replace 'and' with 'where')
Q12: Past Re-class Rejections
Searches the rejection archive by change type, date keyed, user ID or item.
SQL
SELECT *
FROM rms.mc_rejections_archive
WHERE change_type = 'M'; -- (By re-class change type)--and TRANS_DATE = 'DD-MMM-YY'; -- (By date re-class was keyed)AND user_id = 'NEXADID'; -- (By User ID)---and item in (''); -- (By item)
Q13: Did an Item List Re-class?
Shows the current dept/class/subclass of every item on an item list. Filter it in Excel to spot items that didn't move.
SQL
SELECT sd.skulist, im.ITEM_PARENT, im.item_grandparent, im.DEPT, im.class, im.subclass, im.item_desc
FROM rms.skulist_detail sd, rms.item_master im
WHERE sd.item = im.item_parent
  AND sd.skulist IN ('');
Q14: Did a Single Item Re-class?
Shows an item's current dept/class/subclass.
SQL
SELECT item_parent, item_desc, dept, class, subclass
FROM rms.item_master
WHERE item IN ('');
Lawson (Financial) Moves
Q15: Departments on an Item List
Lists the departments of the items on an item list. More than one department can mean a mis-keyed item or a financial move.
SQL
SELECT DISTINCT dept
FROM rms.skulist_detail sd, rms.item_master im
WHERE sd.item = im.item_parent
  AND sd.skulist = '';
Q16: Is It a Financial (Lawson) Move?
Shows the group for each department, to confirm whether a re-class crosses financial groups.
SQL
SELECT g.group_no, g.group_name, d.dept, d.dept_name, d.group_no
FROM rms.groups g, rms.deps d
WHERE g.group_no = d.group_no
  AND d.dept IN ();
Nightly Batch
Q18: Re-classes Scheduled for the Nightly Batch
Lists every pending re-class in the re-class header table.
SQL
SELECT *
FROM rms.reclass_head
ORDER BY reclass_no ASC;
Q19: Look Up Specific Re-class Numbers
Shows the effective date and details for specific re-class numbers, to confirm a re-class was submitted correctly.
SQL
SELECT *
FROM rms.reclass_head
WHERE reclass_no IN ();
Compare v16 and v10 Hierarchies After Re-classing
Run the week after a re-class. Compares each re-classed item's dept/class/subclass in RMS v16 with RMS v10 to confirm both systems match.
SQL
SELECT DISTINCT im.item_parent, ri.item, im.dept, im.class, im.subclass,
COALESCE(vim.item_parent, vim.item) AS Highest_level_RIN,
vim.item, vim.dept, vim.class, vim.subclass
FROM rms.nex_reclass_item ri, rms.item_master im, rms_v10.item_master vim
WHERE ri.item = im.item
AND ri.item = vim.item
AND im.item = vim.item
AND reclass_date >= 'DD-MMM-YY'AND reclass_date <= 'DD-MMM-YY'AND im.item_level = '2';
Additional Re-Class Queries
Item Count per Item List
Counts the items on each item list. Lists of about 100–150 items process best.
SQL
SELECT skulist, COUNT(item)
FROM rms.skulist_detail
WHERE skulist IN ('')
GROUP BY skulist;
Adding a Size Code (ID)
*Note: Before building a new size code or Differentiator Group - please make sure that size code is not already built and, that if a team is requesting a new Diff Group that there isn't already a Diff group that contains some or a majority of the sizes requested.
Download Differentiators Template
In RMS, navigate through the menu paths to download the template foundation metadata layer:
Go to: Tasks → Foundation Data → Data Loading → Download
ORACLEMerchandising
★
✓
🔔99+
<Data Loading▼
⚲Search for a task
★
Download
★
Upload
Review Status
Download Blank Template
Once in the Download Data tab For the Template Type select Items and for Template select Differentiators
☰ORACLEMerchandising
👤username ▼❓
Download Data ×
▼
▼
Click Download Open with Microsoft Excel Click OK
Once Excel Spreadsheet opens, go to the Diff_IDs tab
Clear Diff_IDs tab out data below Headers and do as follows: For Action: Select CREATE from the drop-down list. For Diff ID: Enter the size code requested (e.g., 30"). For Diff Description: Enter the size description (e.g., 30").
Notes: Diff IDs CANNOT have spaces or underscores. If a space is needed create a USD Incident to RAVE and they will insert it on the backend. Diff IDs cannot be longer than 10 characters - INCLUDING spaces.
Repeat previous steps as needed if creating more than one size
Save as an .ods file
Naming Protocol:Sizes_Dates
Drive Registry Path:X:\shared\folder
Go to: Tasks → Foundation Data → Data Loading → Upload
ORACLEMerchandising
★
✓
🔔99+
<Data Loading▼
⚲Search for a task
★
Download
★
Upload
Review Status
Download Blank Template
Once in the Upload Data tab input the following:
For the Template Type select Items
For Template select Differentiators
For Process Description it can be left the same or edited
For Source File click Browse and find .ods file that was saved
ORACLEMerchandising
👤username ▼❓
Upload Data ×
▼
▼
Size Uni Test 2 101218.ods
Upload File
To determine if induction was successful: If you receive a notification, there was an error. Check Issues and troubleshoot Run below query with LOWERCASED RMSv16 User ID:
SQL
SELECT to_char(s.action_date, 'DD-Mon-YY HH:MI:SS') a_date,
s.process_id, s.process_desc, s.status, s.user_id, s.file_path
FROM rms.svc_process_tracker s
WHERE user_id = 'username'ORDER BY action_date DESC;
Run queries included in index so add new sizes to Quick Reference Guide (QRG) listing on the SharePoint HUB and let Senior Tech or Data Steward Team Manager know new sizes were created
Creating a new Differentiator Group
In RMS16 go to Tasks > Foundation Data > Items > Differentiators > Diff Groups
Click Actions > Add or Click the green plus sign
Note:Click Query by Example to find the next sequential Diff Group number
ORACLEMerchandising
👤username▼
❓
Upload Items from File ×
Differentiator Groups ×
▲Diff Groups
ActionsView
+✏️✕
📊↓🔄
📄 Detach🌐
Group
Group Description
Type Description
Region
Department
▼
▼
125S
BELT SIZES
Size
127S
MEN'S SHIRTS
Size
end;
128S
5/6 - 9/10
Size
129S
SHORT SLV SHIRT
Size
131S
INFANTS
Size
▲Group Detail
ActionsView
+✕
📊↓🔄
📄 Detach
Sequence
Size
Description
▼
1
S/M
S/M
2
M/L
M/L
Finding/Adding a Diff Group Number
For Group input the next sequential number (you can filter the Group category by descending to see the next number)
11. If adding a Size, S must be put after the number
For Group Description input desired group name
Group Description must not exceed 40 characters - INCLUDING SPACES
Click OK or OK and Add Another
Add Group
*Group
*Group Description
*Type
▼
Size
Region
▼
Department
▼
Save and Close
Adding sizes or colors to a new Diff Group
In the "Diff Groups" section click on Group wanting to edit (so it's highlighted)
▲Diff Groups
Actions ▼View ▼
+✏️✕
📊↓🔄
📄 Detach🌐
Group
Group Description
Type Description
Region
Department
▼
▼
TODDLER MI
2T,3T,4T,S,M,L,XL
Size
GIFTCRD
WEB GIFT CARD DENOMINATIONS
Size
COLOR
Color
Color
321S
SuperFeet Insoles
Size
320S
UNIFORMS - FOOTWEAR
Size
▲Group Detail
Actions ▼View ▼
+✕
📊↓🔄
📄 Detach
Sequence
Size
Description
▼
SF.B
B: 4.5-6 US Women's/2.5-4 US Juniors
SF.C
C: 6.5-8 US Women's/5.5-7 US Men's
SF.D
D: 8.5-10 US Women's/7.5-9 US Men's
SF.E
E: 10.5-12 Women's/9.5-11 US Men's
SF.F
F: 12.5+US Women's/11.5-13 US Men's
SF.G
G: 13.5-15 US Men's
In the Group Detail section below click the green plus sign
Enter the first or next Sequence number and a valid RMS Size
Add Detail
✕
*Size
8
▼
8
Click OK or OK and Add Another
Click Save and Close
Send the following e-mail with the information below:
ECOMM group will respond back that they have made the updates
Differentiator Batch
The APPWORX batch for the Diff Groups and Sizes runs every 8 hours: 4AM, 12PM, 8PM. If someone needs a size built AFTER the 12PM batch is ran, you can either - wait until the next day and submit it before 12PM or you can get RAVE to ADHOC the batch.
To ADHOC the batch submit a USD Ticket to the RAVE team with the following message format:
Incident Description
Hi Team!

Requesting to have the ORETAIL_INT_MASTER_DATA batch to run because I built the sizes after the 12pm batch.

We created 10 new sizes
and added all 10 to the Group 313S
Queries
SQL
---Full list of Diff Groups and their respective IDsSELECT DISTINCT dg.diff_group_id, dg.diff_group_desc, di.diff_id
FROM rms.diff_ids di, rms.diff_group_head dg, rms.diff_group_detail df
WHERE df.diff_id = di.diff_id
AND dg.diff_group_id = df.diff_group_id
AND dg.diff_group_id <> 'COLOR'ORDER BY dg.diff_group_id, dg.diff_group_desc, di.diff_id;
---To see Diffs created on a specific date (change date as necessary)SELECT *
FROM RMS.DIFF_IDS
WHERE TRUNC(create_datetime) = '16-OCT-18';
SELECT *
FROM RMS.DIFF_IDS
WHERE TRUNC(create_datetime) = TRUNC(SYSDATE);
Adding a Supplier via Item Induction
Use this process when adding a new supplier to an existing item. The Item Induction Form is used — only the Item Tab and (optionally) the Location Tab need to be filled out.
NOTE: If locations are ALREADY attached to items, a Manual Maintenance
template will need to be filled out with the Action - Update Primary Supplier and
enter the Parent Item [An Item List is required when there are 5 or more items
going to the same supplier], Location List, and Supplier. Buying teams should
submit both of these templates on the same e-mail.
Item Tab — Required Columns
Column
Field / Notes
A — Action
Select Add Item Supplier
H — Parent Item
Required
I — Transaction Item
Required
V — VPN
Populate per Web/DST/Vendor requirements for BOPIP, Drop Ship, etc. If adding VPN: copy transaction RIN to parent column on a secondary line; delete from Transaction Item column.
BE — Supplier Site
Required
BG — Primary Supplier Ind
Change to No if the new supplier is not the Primary
BN — Unit Cost
Required
BR–BU — Inner Size, Case Size, Ti, Hi
Required
DK — Buyer
Required
Action
Status
Item Type
Sellable
Parent Item
Transaction Item
VPN
Supplier Site
Supplier Site Name
Primary Supplier Ind
Unit Cost
Default UOP
Inner Size
Case Size
Ti
Hi
Round Level
Buyer
Add Item Supplier
Approved
Regular Item
Yes
14910832
894000C599080
8086
Yes
3.91
CS
8
8
1
1
Case
346
Add Item Supplier
Approved
Regular Item
Yes
14910842
894000C599080
8086
Yes
3.91
CS
8
8
1
1
Case
346
Location Tab (if ranging to new locations)
Column
Field / Notes
A — Action
Defaults to Create Location
C — Item
Parent-level RIN
D–E — Location List
Use if ranging by Location List
G–I — Location
Use if ranging by single location
Save file as ODS and upload to V16
Updating Primary Supplier — Item List
ℹ
An Item List is required when 5 or more items are going to the same supplier. Buying teams should submit both the Item Induction template and the Manual Maintenance template in the same email.
Required columns on the Manual Maintenance template:
Click More Actions → Mass Change → Location Attributes.
Actions ▼View ▼|➕✏️|📊📅|◪ Detach
Location Type
Location
Name
Status
Average Cost
Unit Cost
Unit Retail
Currency
Store
2
NORF PACKAGE STORE
Active
4.10
USD
Store
5
NORF CCC
Active
4.10
USD
Store
7
HUNTINGTON HALL MM
Active
4.10
USD
Store
8
NORF V55 MM/GAS
Active
4.10
USD
Store
9
NORF CEP 76 MM/GAS
Active
4.10
USD
Store
10
NORF MAIN STORE
Active
4.10
USD
Store
13
NORF LT PARKING
Active
4.10
USD
Click the Green (+). Select the appropriate location type: Store, Warehouse, Location List-Store, or Location List-Warehouse → OK. Add additional locations as needed.
Paste the Primary Supplier into the Primary Supplier Site field. Set Primary Country to USA.
This Standard Operating Procedure (SOP) describes the process for AGC mass UPC deletion.
Scope
This SOP is a mandatory document and shall be implemented by all employees when engaging in this project.
Training
The Manager of the Data Steward Team is responsible for ensuring that team members who follow this procedure understand the SOP's objectives and other inter-related activities. Ensure that team members sign that they have read and understand this SOP.
Precautions
Use this SOP in conjunction with other related item induction and item deletion procedures.
Responsibility
Data Steward Team members are responsible for the activities identified in this procedure.
Equipment / Systems
Data Steward Inbox
HUB: Merchandising / Support / ORUP
Item Induction Template
Microsoft Exchange Email
RMSv16 & RMSv10
TOAD / SQL — RMSv16 & RMSv10
ℹ
This procedure is for the Monthly AGC/PRG 832 UPC/EAN Mass Deletes. This process has been set up with the AGC (American Greeting Cards) vendor, as these departments are on Scan Base Trading — an initiative where NEXCOM does not own any inventory. AGC manages the inventory and NEXCOM receives the sales.
This 832 UPC/EAN deletion process happens monthly. The email will usually come in on the first Monday of the first full week of the month. As phases of RMSv16 are being implemented, data is managed in both RMSv16 and RMSv10 — the deletion process takes at least 2 days to fully delete UPCs out of both systems (longer if there are issues with the UPCs or delays with data flowing/batches running).
The UPC deletion process is a nightly job in the RMS batches and runs in the After Batch, after all other phases have completed. The DST will flag UPCs for deletion in RMSv16 via the CFAS flag. This flag sends a message to RMSv10 to put the UPCs into "Delete Pending" status in RMSv10. The UPCs will purge via the Daily Purge job in the nightly batch, and then send a message back to RMSv16 to place the UPCs into "Delete Pending" status there as well. The UPCs then purge out of RMSv16 via the Daily Purge job in the nightly batch.
Notification & Submission
Notification of AGC Monthly UPC Deletes will come into the DST inbox. The original email will be from the TLE Admin User and will be forwarded to DST from either the EDI Business Team or START. Subject will be: "RETEK 832 UPC/EAN Deletion Report for (Date)."
The email will contain a list of UPCs to delete, and at the bottom will be a count of UPCs.
Creating Item Induction Template for Mass UPC Deletes
ℹ
At this time, there is still a need to create the store in both RMS and Richter. When completely off of Richter, this process needs to be re-evaluated.
Download or open the Item Induction Template from the HUB. The most current template may be downloaded from: Item Induction Template internal-link
In the Action Field (Column A): select Add Item CFAS.
In the Parent Field (Column H): enter the UPCs from the Retek 832 UPC/EAN Deletion Report.
⚠
Note: Copy the UPCs, and when pasting into the Parent field, select "Match Destination Formatting." A straight paste will lose the front-loading zero on the UPCs.
In the Buyer Field (Column DK): enter 260 (Buyer # for these departments).
Copy the Action Field of "Add Item CFAS" and Buyer Field of "260" down to match the amount of UPCs pasted into the template.
Item Information
Action
Status
Item Type
Sellable
Orderable
Inventory
Item Family ID
Parent Item
Transaction Item
Buyer
Add Item CFAs
Approved
Regular Item
Yes
Yes
Yes
013051280376
260
Add Item CFAs
Approved
Regular Item
Yes
Yes
Yes
013051280482
260
Add Item CFAs
Approved
Regular Item
Yes
Yes
Yes
013051280499
260
Add Item CFAs
Approved
Regular Item
Yes
Yes
Yes
013051280529
260
Add Item CFAs
Approved
Regular Item
Yes
Yes
Yes
013051312053
260
Add Item CFAs
Approved
Regular Item
Yes
Yes
Yes
013051571641
260
Add Item CFAs
Approved
Regular Item
Yes
Yes
Yes
018100028497
260
Add Item CFAs
Approved
Regular Item
Yes
Yes
Yes
018100527877
260
Validate front-loading UPCs did not drop off.
If you have a Security Warning Banner stating macros have been disabled, select the Enable Content button.
Select the Populate Button in Rows 2 & 3 / Column C & D — the 4 tabs at the bottom of the template will explode out, and UPCs will populate the necessary tabs.
On the Item Tab, go all the way to the end and validate there are no errors upon populating the template. Errors, if any, will populate in columns DN & DO.
At the bottom of the template by the tabs, select the right arrow with the line to show the last several tabs so you see the Vw_Nexcfas tab.
On the Vw_Nexcfas tab, column G (Delete Flag) is populated with "N." Change this field to "Y" and copy down for all records on the template.
A
B
C
D
E
F
G
1
Item
Plan-o-Gram Required
NRF Size Code
NRF Size Desc
Base Zone
Buyer
Delete Flag
2
013051280376
Y
260
Y
3
013051280482
Y
260
Y
4
013051280499
Y
260
Y
5
013051280529
Y
260
Y
Name the file (e.g., AGC-PRG Deletes_06May19 #1) and save the template as an .ODS file. It must be an .ODS file in order to induct it into RMSv16.
⚠
Note: If there are several thousand UPCs to delete, break this process up into multiple templates with no more than 800 UPCs. The maximum supported for deleting UPCs is not yet known — it may be higher, but large batches can be more cumbersome to troubleshoot if issues arise.
Inducting Mass Delete Item Induction Template
Log into RMSv16 internal-link and go to the Main Screen.
Select Items > Upload Items from File. If saved in Favorites, select the Star and then Upload Items from File. If not, select Tasks (Clipboard with Check Mark) → Items → Upload Items from File. The Upload Items from File screen will open.
From the Upload Items from File screen, populate the following fields:
Source and Destination
AGC-PRG Deletes_06May19 #1.ods
The file will process in the background. You'll receive a notification under the Bell Icon when the file has finished processing.
Select the Bell Icon; the Notifications box will open. Select the blue link, and the Data Loading Status screen will open.
From the Data Loading Status screen, check the Status of your Item Induction Delete File.
ℹ
You may need to scroll right to see the status field. Make note of your Process ID # — it will be important for a later step.
The record will show a Process ID # and the Status should say "Processed with errors," since not all fields are being populated but the file still processes.
If the Status says Processed w/ Errors, the View Issues button will be enabled — select it to check your errors. The most common error indicates that the template is expecting fields to be populated that are not; these fields are not needed for deleting UPCs.
For additional Delete Files, repeat the upload steps above until all Delete Files have been processed.
To validate the file updated correctly, log in to RMSv16 SQL Developer or TOAD and run the following query (entering the UPCs you submitted to be deleted):
SQL — Validate CFAS Flag (RMSv16)
SELECT *
FROM RMS.ITEM_MASTER_CFA_EXT
WHERE ITEM IN ('601350155138',
'601350155145',
'601350155152',
'601350155169',
'747941643698',
'747941643704',
'747941643711',
'747941621757');
The results you are looking for are the VARCHAR2_2 & VARCHAR2_3 fields populated with 'Y' and the Buyer #.
≡
ITEM
GROUP_ID
VARCHAR2_1
VARCHAR2_2
VARCHAR2_3
VARCHAR2_4
601350155138
10009
Y
Y
940
601350155145
10009
Y
Y
940
601350155152
10009
Y
Y
940
601350155169
10009
Y
Y
940
747941339560
10009
Y
Y
940
747941339577
10009
Y
Y
940
747941339584
10009
Y
Y
940
747941339591
10009
Y
Y
940
747941621726
10009
Y
Y
940
747941621733
10009
Y
Y
940
747941621740
10009
Y
Y
940
747941621757
10009
Y
Y
940
747941643698
10009
Y
Y
940
747941643704
10009
Y
Y
940
747941643711
10009
Y
Y
940
You can also check on the frontend. From Favorites or the Task list, select Manage Items. Select the UPC to open the Item Screen with the item information.
On the bottom right, select More Actions and scroll down to Other Attributes.
Select Item Master CFAS — this opens the Item Master CFAS Screen. You should see the Delete Flag box checked.
From here, the process sends the delete file to RMSv10 and places the UPCs into Delete Pending status there.
The Daily Purge job is a nightly batch in RMSv10 that processes anything in Delete Pending. This is an overnight job — you will not see results until the following day.
To validate UPCs have been deleted, run the following query in RMSv10 (SQL Developer or TOAD) — no records should be returned:
SQL — Validate Deletion (RMSv10)
select distinct item, item_parent TRANSACTION, item_grandparent PARENT, item_desc, dept, class, subclass,
create_datetime, last_update_id, last_update_datetime
from rms.item_master
where item in ('601350155138',
'601350155145',
'601350155152',
'601350155169',
'747941643698',
'747941643704',
'747941643711');
Assuming the Daily Purge job runs with no issues, the UPCs will delete out of RMSv10 and send a file to RMSv16 to place the UPCs into Delete Pending there as well.
The Daily Purge job is also a nightly batch in RMSv16. This is again an overnight job — results will not appear until the following day.
To validate UPCs have been deleted, run the same query above in RMSv16 (SQL Developer or TOAD) — no records should be returned.
If records are returned, run the following queries in RMSv16:
SQL — Daily Purge Tables
select *
from rms.daily_purge;
-- If data is still in this table, the UPCs are slated to be deleted;
-- check whether the Daily Purge job ran the previous night.

select *
from rms.daily_purge_error_log;
-- If data is returned here, something has blocked or prevented the UPC from purging.
For AGC/PRG, it's very rare to have issues with UPCs deleting. The most common error is if the UPC is in the Ordsku table in the REF_ITEM field.
Table
select *
from rms.ordsku
where ref_item = '',
23
select *
24
from rms.ordsku
25
--where ref_item = '';
26
Data Grid
|◀◀▶▶|+-▲✓✕
ORDER_NO
ITEM
REF_ITEM
ORIGIN_COUNTRY_ID
▶
20364755
11365734
610764826176
USA
20364762
2444
085000007167
USA
20364796
8789250
030111420411
USA
20364797
6873410
030111416735
USA
20364802
12712854
846675011404
USA
⚠
If UPCs are in this field, create an Incident for RAVE requesting that they clear the field so the UPCs may be deleted in the Daily Purge job.
Deleting Process ID's
Once all UPCs have deleted out of both systems, go back into RMSv16 and delete your Process IDs. This step is needed because AGC/PRG will re-use (or do a Price Change on) their UPCs — if the Process IDs are not deleted or cleared out of RMSv16, then when the new UPCs are inducted, it will error upon induction.
From the RMSv16 main screen, select Notifications (Bell Icon), and at the bottom select "See All."
The Notifications screen will open.
In the Search field above Description, enter your Process ID with a % (wildcard) sign in front — e.g., %3875833 — then hit Enter and your record should return.
Select the Description link; the Data Loading Status screen will open. Select the red X at the top.
A warning box will appear asking "Are you sure you want to delete this record?" Select Yes.
You'll be taken back to the Data Loading screen and the record should be gone — it should state "No Data to Display."
Select Save and Close at the bottom right; you'll be taken back to the Notifications screen.
Repeat this process for any other Process IDs you need to delete.
Corporate Delete Process
We have identified the most effective way to process corporate deletes in RMS v16 so the information will translate into reports in our IKB and help eliminate holes on the shelf and lost sales.
Benefits
Better information out of RMS with UDA tracking and reporting ability.
Adding _D to the end of the item description is a quick way to identify that the item is deleted.
Adding (D) to the beginning of the VPN should prevent a supplier from shipping.
Adding UDA ID 533 and UDA Value 2 flows into IKB and identifies the item as deleted.
The Process
Buyer determines the item is a corporate delete. The buying team can either:
Update the item on the front end in RMS v16: Add _D to the end of the item description.
Add (D) in front of the VPN.
Add UDA 533, Value 2.
Or:
Download the item from RMS v16 following the steps below and send it to the Data Steward Team to be uploaded (strongly recommended if you have multiple RINs).
Note on Parent/Child RINs: If an item has 1 Parent and 1 Child, both RINs need to be updated. If an item has 1 Parent and many Children, only the Child RIN needs to be updated.
Step 1 — Create Your Item List
Create your item list in RMS v16, including both Parent & Child RINs if necessary.
Step 2 — Download the Item List from RMS
Click the Tasks button and choose "Items."
ORACLEMerchandising
★
✓
🔔
Tasks
⚲Search for a task
Foundation Data
˃
Items
˃ •
Cost
˃
Price
˃
Orders
˃
Choose "Download Items from RMS."
ORACLEMerchandising
★
✓
🔔
<Items
▼
⚲Search for a task
Create Item
Manage Items
Download Items from Staging
Download Items from RMS
Upload Items from Staging
Upload Items from File
Upload Items Step 2
Enter the Item List # and click Search. Item details will appear at the bottom of the screen.
Click the Download button.
ORACLE
Merchandising
👤 username ▾❓
Download Items from RMS
✕
▲ Search
Item
🔍
Item Description
Department
▼
Class
▼
Saved Search
Default
▼
Subclass
▼
VPN
▼
Item List
▼
Supplier Site
▼
▲ Results
Actions ▾
View ▾
💾↑
📋↓
🔳 Detach
Download
Item
Item Description
Supplier Site
Department
Class
Subclass
10294178
FRAME 8X10 WALNUT_D
613705565
795
1101
1
10348111
BP ACACIA WOOD FRAME GREY...
613705565
795
1101
1
10348112
BP ACACIA WOOD FRAME GREY...
613705565
795
1101
1
10348622
BP PS FRAME METAL & WOOD L...
613705565
795
1101
1
10348646
BP BARNWOOD TEXTURED WO...
613705565
795
1101
2
10348650
BP BARNWOOD TEXTURED WO...
613705565
795
1101
2
10902669
5X7 RAISED DIAMOND GRAY_DIOI
1056936
795
1101
1
10908125
BP BARNWOOD TEXTURED WO...
613705565
795
1101
1
A box will pop up — choose "Item Master." A Process Description will auto-populate. Click OK.
Step 3 — Open the File in Excel
You'll see the option to Open the file — choose Open with Microsoft Excel.
The file that opens is the "Item Induction Base Template." Note the multiple tabs at the bottom of the spreadsheet.
Click the “Item Master” tab: This tab contains all Item Description information from RMS in columns X, Y, Z.
Buying team will need to add _D at the end of the item description in column X.
Status
Item Description
Secondary Description
Short Description
Approved
BP ACACIA WOOD FRAME GREY WASH WYATT 5x7_D
BP 5x7 Acacia Wood Frame Grey Wash Wyatt_D
BP ACACIA WOOD FRAME_D
Approved
5X7 RAISED DIAMOND GRAY_D
5X7 RAISED DIAMOND GRAY_D
5X7 RAISED DIAMOND GRAY_D
Approved
BP METAL CLAD FRAME 5x7 - OFF WHITE W/PEWTER_D
BP METAL CLAD FRAME 5x7 - OFF WHITE W/PEWTER_D
BP METAL CLAD FRAME_D
Approved
BP MIRROR ON MIRROR FRAME 4x6 - SILVER TEXTURE_D
BP MIRROR ON MIRROR FRAME 4x6 - SILVER TEXTURE_D
BP MIRROR ON MIRROR FRAME_D
Approved
FRAME 8X10 WALNUT_D
FRAME 8X10 WALNUT_D
FRAME 8X10 WALNUT_D
Click the “Item_Supplier” tab. This tab contains the VPN in column E. Buying team will need to add (D) in front of each VPN
Supplier
Primary
VPN
61370556
Yes
(D) 150334601
1056936
Yes
(D) 2267-57
61370556
Yes
(D) 18357-44A-14
61370556
Yes
(D) 11679-02M-27
61370556
Yes
(D) 11679-46-27
Click the “Item_LOV_UDAs” tab.This tab contains any UDAs currently attached to the items. Please leave these rows as-is User will go back to the Item Master tab and copy all RIN#s from column ‘B’ (only Child RINs live on POGs). Paste those RIN#s in Column B of the Item_LOV_UDAs tab. In Column A chose “Create” for any new RINs and add the Corporate Delete UDAs in columns C & D
Action
Item
UDA
UDA Value
10348611
5463
15
10348612
5463
15
10348650
9632
2
10902669
9632
2
10908125
5463
15
10908138
5463
15
Create
10348612
533
2
Create
10348622
533
2
Create
10348646
533
2
Create
10348650
533
2
Create
10902669
533
2
Create
10908125
533
2
Create
10908138
533
2
Create
10908139
533
2
Create
10908170
533
2
Create
10908175
533
2
Step 4 — Save & Send
Save the file to your personal drive with whatever name you choose. The file will automatically be in the correct ODS format (Open Document Spreadsheet).
Send the ODS file to the Data Steward Team for upload. Please note "Corporate Delete" in the subject line. You're done!
DST Uploads via Tasks>Items>Upload Items From File
Item Reclassification
DocumentSOP-S.05.1.2 · Item Re-class (v16 & v10)
AuthorData Steward Team
ScopeMandatory: all DST members
What it is
A re-class moves an approved item from one department/class/subclass to another in RMS. Buying teams request them through the DST Inbox; DST checks that the item can safely move, keys the re-class in RMS v16 (and in RMS v10 where required), and the change is applied by the nightly batch. Most of the work is in the checks beforehand: forecasting, mandatory UDAs, open orders on the deals tables, pack components and financial (Lawson) moves are the usual reasons a re-class fails.
Key fact
Detail
Non-financial re-classes
Processed monthly, during the 1st full week of the month.
Financial re-classes
Processed twice a year, directly after inventories (February and August).
Item level
In v16, always re-class at the Parent level (Level 1, formerly the Grandparent in v10). Packs are the only 2-level items.
Item lists
Required when more than five items go to the same dept/class/subclass. A separate list is needed for v16 and v10.
Nightly volume
Soft cap of 25,000 items per night, counting all items exploded out.
When it runs
The re-class job runs in Phase 4 of the nightly batch (the after-batch), the night before the effective date.
Closing POs
Orders that must be closed have to be closed in v16 by 1 pm EST so the change flows to v10.
Process at a glance
Receive the request in the DST Inbox and check the re-class form is complete.
Run the pre-re-class checks: forecasting, mandatory UDAs, hierarchy changes, financial moves, and open or pack orders.
Reply to the original email with the canned response once validation is complete.
Definitions
Term
Definition
2-Level Item
An item built with a RIN and Reference number; built at Trans Level 1.
3-Level Item
An item built with a Grandparent RIN, Transaction RIN and Reference number. All items are 3-level in v16, except Packs.
Component Item
An item inside a pack, such as an individual pack of cigarettes or a single bag of jerky.
Deals Tables
Tables that cause re-classes to fail when POs are on them.
Forecasting
The RMS module that estimates future sales.
Pack Item
The container that holds other items (e.g. a carton of cigarettes, or a display/shipper). The ONLY 2-level items in v16; they have no Parent Item.
Parent Item
The highest item level in v16, formerly the Grandparent in v10. All v16 re-classes are done at this level.
Query / Report
The script run in SQL or Toad, and the results it returns (or results from RDW/QS).
Skulist
The SQL name for an Item List: a group of items compiled on a single list.
Transaction Item
The level 2 item that is ordered and sold. The Child item in 3-level items, or the RIN in 2-level items.
UDA
User Defined Attribute.
About this Procedure
Purpose: documents the steps needed to complete RMS item re-classes.
Scope: mandatory for all DST members when creating or editing item re-classes for the buying groups.
Training: DST makes sure team members understand this SOP. Buying teams are trained quarterly on submitting re-classes correctly.
Responsibility: DST updates and maintains this procedure.
Systems: the buying group's Item Re-class form, RMS v16 & RMS v10, Toad/SQL, and the DST role in v16 & v10.
⚠
Precaution: buying groups must tell their planner about any PO cancellations so replenishment isn't affected. If POs need to be closed (for the deals tables or a pack component on order), don't run those re-classes over a weekend or holiday, so someone is in the office to handle issues and reinstate the POs afterwards.
Receiving a Re-class Request
Buying teams email the DST Inbox with the subject FINANCIAL RECLASS or RECLASS [1, 2, 3, …], depending on the type of re-class.
During open re-class cycles, check the inbox several times a day and move new emails to the Received folder. Leave them unread until you start working on them. The manager assigns re-classes based on workload.
Open the email and confirm the re-class form is filled out completely and correctly. The blank template is on the HUB under Code M → Support → ORUP → Templates.
If more than five items are going to the same dept/class/subclass, the buying group must supply an item list, one for v16 and a separate one for v10 (v16 item lists don't flow to v10). v16 items must be at the Parent level.
Keep a running total of items being processed each day and tell RAVE/RIB, so they can adjust and keep batches from running long (25k soft cap).
Re-class form columns
Column
What it tells you
Item # / Item List #
The Parent-level item, or the item list, to move.
RC#
The re-class number. Record it here once the re-class is keyed.
Current Dept / Class / Subclass
Where the item is today.
Item Count
How many items the re-class covers, for the nightly total.
New Dept / Class / Subclass
Where the item is going.
New Dept Forecastable? Y/N
Whether the forecasting check below applies.
Required UDAs Attached? Y/N
Whether the destination's mandatory UDAs are on the item.
Lawson/Financial Move? Y/N
Whether approval and extra notifications are needed.
Pack or Component Items Included? Y/N
Whether to check pack orders before keying.
Pre-Re-class Checklist
Run these checks before keying anything. Each one catches a common cause of a failed re-class. Links go to the queries in the Re-class Query Index.
Check
How to check
If it applies
Mandatory UDAs
Q1 (mandatory UDAs by dept; not in the query index) then Q2 (UDAs on the item list).
Add every mandatory UDA for the destination dept/class/subclass before the re-class. Most were removed in RMS 16.
Buying group cancels the pack's orders. See Pack Components.
Forecasted Items
Run Q3 to see whether the destination department is forecastable, then Q4 (single item) or Q5 (item list) to see whether the items are on forecasting. The item's forecastability must match the destination.
Item must stay forecastable: the Forecasting Team sets up the new dept/class/subclass as forecastable. If the destination dept isn't forecastable, it must be added to a domain for the financial group (see the domain query in the query index).
Item doesn't need forecasting: ask the Forecasting Team to change its replenishment method to min/max. You can then re-class it without making the destination forecastable.
⚠
Skipping this check is risky: the item won't re-class, and the Mass Change Item Rejection Report shows an unrelated error instead of saying the item is forecastable.
Merchandise Hierarchy Changes
Always check whether the destination dept/class/subclass was recently changed. Search the DST Inbox for an email tagged "FYI . . . Please Read" titled "Please Map New and Edit Dept, Class, and Subclasses". These stay in the inbox for 48 hours, then move to the Merchandise Hierarchy folder.
Destination is…
When you can re-class
A dept/class/subclass with a name change
As soon as the new name is visible in RMS. Name changes don't affect downstream systems.
A newly created dept/class/subclass
Wait for confirmation from the downstream systems. Going early can make sales report incorrectly.
A re-activated dept/class/subclass (was N/A, reopened with a new name)
Wait for confirmation from the downstream system POCs listed in the "Please Map New and Edit…" email.
Keying a Re-class in RMS v16
One screen handles single items and item lists, and is also where you view and delete pending re-classes.
From Tasks, select Foundation Data → Items → Reclassifications.
The Reclassifications screen lists every pending re-class, with its details below.
Click the green +, or Actions → Add.
In the Add Reclassification window, fill in:
Description: the submitter's last name. If they sent more than one, add a number: DOE - #1, DOE - #2, and so on.
Reclass Date: defaults to tomorrow. Pick a later date if needed; the system holds the re-class until then.
Under Select Items to Reclassify, choose Item or Item List and enter the Parent-level item or the item list number (or search with the magnifier/LOV).
ℹ
For 2-level items, the items on your v16 item list won't match the v10 item list.
Under Select New Hierarchy, enter the Department, Class and Subclass the item is GOING TO.
Click OK, or OK and Add Another to key the next one (repeat steps 4–6).
A warning confirms the items will be reclassified the night before the reclassification effective date. Click OK. The job runs in Phase 4 of the nightly batch.
Record the new re-class number in the RC# column of the re-class form.
Viewing or Deleting Pending Re-classes
Re-classes can't be edited. To change one, delete it and key it again.
Open Tasks → Foundation Data → Items → Reclassifications. The grid shows re-classes that are still waiting to run (not ones already processed). Select a row to see its items in Detail.
To delete, highlight the re-class and click the red X (or Actions → Delete). Select Yes at the warning.
Click Save and Close to save the deletion.
⚠
If a re-class didn't process in the nightly batch and there are no partially received orders, it must be deleted and keyed again. Changing its date in the back end won't make it run.
Keying a Single-Item Re-class in RMS v10
From Retek Enterprise, double-click the Items folder, then open the Reclassification folder.
Select Reclassify one item.
Enter the item's RIN. The Reclassification Number fills in automatically; record it in the RC# column of the form.
Reclassification Description: buyer's last name and department, plus a number if there are several, e.g. DOE - Dept 123 #1.
Effective Date: defaults to tomorrow; choose another day if needed.
Enter the Department, Class and Subclass the item is GOING TO, then click OK.
A warning confirms the item(s) will be reclassified the night before the reclassification effective date (Phase 4 of the batch).
Keying an Item List Re-class in RMS v10
From Retek Enterprise, double-click the Items folder, then Item List.
Choose Use from the drop-down, enter the v10 item list number and click OK.
From the top menu select Options → Create Mass Item Change → Reclassification. The re-class form opens with Item List in place of Item.
Record the re-class number on the form.
Description:Buyer Last Name - Dept # - #1 (same format as single items).
Set the Effective Date (tomorrow by default), enter the Department, Class and Subclass the items are GOING TO, and click OK.
Re-classes Between Lawson (Financial) Departments
A re-class that moves an item into a different Lawson (financial) group is a financial move and needs extra approval and notice.
Confirm it's a financial move: run Q15 to list the departments on the item list (this also catches a mis-keyed item from another department), then Q16 to check whether those departments belong to different groups.
Get approval from the Vice President of Merchandising Support (the Director of Merchandise Planning and Analysis can also approve moves outside the financial group).
Notify the DMM of Planning and Replenishment. POCs are the Director of Merchandise Planning and Analysis and the Director of Merchandise Planning.
Key the re-class as normal (RMS v16, plus v10 if required).
The Merchandise Accounting Manager reviews financial moves in a monthly report and handles any follow-up.
Nightly Batch Communication to RAVE
Each evening, the last team member to leave runs the batch queries: Q18 (re-classes scheduled for tonight) and Q19 (details for specific re-class numbers). The SOP also lists Q20 for tonight's re-class numbers, which isn't in the query index.
Post the total number of items being re-classed that night in the Record Counts/Batch Count Teams chat. Keep it under the 25k soft cap.
After the batch, check the results with Q13 (item list) or Q14 (single item). Export to Excel and filter one item list at a time. You can select several lists together if they're going to the same dept/class/subclass.
If a list shows more than one value for dept, class or subclass, some items didn't move. For very large lists, just check each filter drop-down for extra values.
For any failure, find the reason with Q11 (last batch only) or Q12 (older rejections, by user, date or item). The rejection reason tells you what to fix.
Once everything validates, reply to the original email with the canned response.
Unfiltered results: one item list with all its items.
SKULIST
ITEM
DEPT
CLASS
SUBCLASS
187376
103688
973
8000
8000
187376
256116
973
8000
8000
187376
5532526
973
1001
3
Filtered to the old class/subclass: these two items did not re-class and must be done again.
SKULIST
ITEM
DEPT
CLASS
SUBCLASS
187376
103688
973
8000
8000
187376
256116
973
8000
8000
Failed Because of Open Orders
An item usually fails because of an open PO on the deals tables, or because it's a component of a pack that's on order.
Run Q7 to find the item or item list on open orders, then check those PO numbers with Q8 (both deals tables) and Q9 (open appointments, which must be closed before the PO can be). Together they give you the POs that need closing.
Export the results to Excel with columns expanded, a gray header row, a filter and all borders. Include PO number, status and, optionally, item number.
Email the buying group asking them to cancel the POs and let DST know when done. For a few POs, paste a screenshot into the email; for more, attach the spreadsheet.
When they confirm, check the POs are closed (Q10 in the SOP, which isn't in the query index), then key the re-class again. If RMS still sees a PO as open, wait a few minutes and retry.
Failed Because of Pack Components on Order
If the item isn't on order itself but still fails for open orders, it's probably a component of a pack that is on order.
Run Q6 with the item number. It returns the POs the pack is on.
Ask the buying group to cancel those orders, then key the re-class for the component item(s) again.
Price for Prompt
CreatedApril 21, 2026
AuthorJ. Reynolds
SystemsRMS v16, CA Service Desk Manager (ITCSC), Outlook
Next ReviewApril 21, 2027
Price for Prompt marks specific items to prompt the cashier for a price when scanned at the register. Typical candidates are third-party services and custom items. The buying team will indicate in the email body that an item needs price prompt.
⚠
Price prompt items must be built with a retail of $0. Due to their nature, they typically have no associated GTINs and will always be built with a system-generated GTIN.
1. Building the Item
Follow all normal DST item build standards.
Due to the nature of the items, they typically do not have associated GTINs, so price prompt items will always be built with a system generated GTIN
Dept
Class
Subclass
Parent Item Description
Transaction Item Description
Web Description
Supplier Color
Primary Ref Ind
Item Number Type
GTIN
23
1001
2
Askar Handicrafts
Askar Handicrafts
Askar Handicrafts
Yes
UCC12
Generate
After completing visual checks, run the template through the Template Checker. Most price prompt items are from Overseas — their checker may have issues, so always run it to catch errors.
Once ran through the template checker, populate the template
Save as .ods.
Upload to RMS v16: Tasks → Item → Upload Items from File Set Template to Item Master, Destination to RMS Tables, select your file → Upload.
Adding Locations
Once the items are built:
In RMS v16: Tasks → Items → Upload Items — Step 2
Select the .ods file, assign a process name → Upload.
ℹ
Adding locations is a batch job that runs at the top of every hour. Once attached in v16, locations will flow to v10 within 1–2 hours.
Creating the Incident Ticket
⚠
Locations must be fully attached in both v16 and v10 before creating the incident ticket.
Fill in the following fields:
• Affected End User: Whoever submitted the item request
• Incident Area: Oracle Retail → RMS → Other
• Group: START Group
• Summary: Add Item To Special Items Table - Price Prompt
• Description: Please mark newly created item, [TRANSACTION RIN(s)], as price prompt at the location level, and then add it to the special items table
Save. You will receive an email confirmation with the incident number and buying group.
Quantity Key
Quantity Key updates are made at the item/location level. The Qty Key option on the Location tab is only good for new item/location relationships — for existing item/location relationships, use the steps below.
From the Item screen (Clipboard icon → Item → Manage Items), enter the item provided from the SMU or email.
In the results box, select the item, and the Item screen will open.
▼
▼
▼
▼
▲Results
Actions ▼View ▼
➕⭐📋✏️👓
📊↓⏳↓
📄 Detach↪️ Wrap
Item
Description
Item Level
Department
Class
Subclass
Subclass Name
Status
14806261
Aroma 4-Cup Rice Cooker White
Level 2
826
1401
1
RICE/PRESR/STM ...
Approved
In the bottom right corner, select More Actions → Locations, and the Item/Loc screen will open.
▲Transaction "14806261 | Aroma 4-Cup Rice Cooker White
Parent"14806260 | Aroma 4-Cup Rice Cooker
Department826 | SMALL ELECTRICS
Class1401 | COOKING APPLIANCES
Subclass1 | RICE/PRESR/STM COOKE
Transaction LevelTransaction
Unit Retail19.00
Unit ELC13.5000
Markup %28.95
CurrencyUSD
SellableYes
OrderableYes
InventoriedYes
▲Descriptions
Oracle Retail Item Number
▲Cost and Price
▲Usage and Units
▲Attributes
▲
✔ Suppliers
Retail by Zone
✔ Locations
Item Up Charges
✔ List Children
Simple Pack▶
Transformation
✔ Replenishment
Substitute Items
✔ User Defined Attributes
▼
Enter the location in the Loc field.
Transaction "14806261 | Aroma 4-Cup Rice Cooker White
Actions ▼View ▼
➕✏️
📊↓
📄 Detach
▼
ALL▼
Location Type
Location
Name
Status
Average Cost
Unit Cost
Store
2
NORF PACKAGE STORE
Active
9.0000
13.5000
Store
7
HUNTINGTON HALL MM
Active
9.0000
13.5000
Store
8
NORF V55 MM/GAS
Active
9.0000
13.5000
Store
9
NORF CEP 76 MM/GAS
Active
9.0000
13.5000
Store
10
NORF MAIN STORE
Active
14.3623
13.5000
Store
15
NORF N LODGE STORE
Active
9.0000
13.5000
Store
16
LCREEK MAIN STORE
Active
13.5071
13.5000
Store
20
YORKTOWN MM/GAS
Active
9.0000
13.5000
Store
21
CHEATHAM ANNX MM/...
Active
9.0000
13.5000
Store
24
NSA HAMPTON ROADS ...
Active
9.0000
13.5000
Store
28
PORTS SCOTT CTR MAIN
Active
9.0000
13.5000
Store
29
NAVY EXCHANGE POR...
Active
9.0000
13.5000
Store
30
PORTS VA NMC MM
Active
9.0000
13.5000
Store
31
OCEANA PACKAGE ST...
Active
9.0000
13.5000
Store
32
OCEANA MM / UNIFORMS
Active
9.0000
13.5000
Store
34
OCEANA MAIN STORE
Active
13.5184
13.5000
Store
35
DAMNECK PACKAGE ST
Active
9.0000
13.5000
Store
37
DAMNECK MAIN STORE
Active
9.0000
13.5000
Store
43
LCREEK HOME GALLERY
Active
9.0000
13.5000
Store
50
NEWPORT MINI MART
Active
9.0000
13.5000
If you do not have the option to query by location, select the View drop down box
and select Query by Example:
Transaction "14806261 | Aroma 4-Cup Rice Cooker White
Actions ▼
View▼
➕✏️📊↓
📊↓
📄 Detach
Location Type
Location
Name
Status
Store
YOKO NEX DEPOT
Active
Currency Views▶
Columns▶
Detach
Sort▶
Reorder Columns...
✔Query by Example
Once the location record shows, select Actions -> Location Traits and the Item/Loc
Trait screen will open
Transaction "14806261 | Aroma 4-Cup Rice Cooker White
▲Apply Updates To
Store461|YOKO NEX DEPOT
Customer Order Attributes
▼
▼
Grocery Attributes
📅
Prohibited▼
▼
▼
In the Quantity Key field – select drop down and select Required.
Transaction "14806261 | Aroma 4-Cup Rice Cooker White
▲Apply Updates To
Store461|YOKO NEX DEPOT
Customer Order Attributes
▼
▼
Grocery Attributes
📅
Required▼
▼
Select Save and Close until you are back to the Item screen.
Repeat for additional items.
Serializing an Item
The team will indicate in the body of an email when to serialize item(s). Once serialized, the UIN Type and UIN Label fields should be visible on the Locations screen. If not, use View → Columns to add them.
Serializing a Single Item
Look up the RIN at the Transaction Level in RMS v16.
Navigate to More Actions → Locations.
Scroll down and select More Actions → Location Attributes.
Click the Green Plus Sign (+). In the Add Locations box, use the dropdown to select All Stores → click OK.
Scroll to the bottom right, select the required UIN Type and UIN Label options from the dropdowns → click Save and Close.
Save and Close out of the item.
Serializing Multiple Items (Mass Change)
Create an Item List in RMS v16 (can be Parent + Transactions, or just Transactions).
Search for Item List in RMS v16.
Click Actions → Mass Change → Item/Locations.
Click the Green Plus Sign (+). Select All Stores → click OK.
For mass change, the Primary Supplier of the items must be entered in both the Primary Supplier and Primary Country fields.
Select the required UIN Type and UIN Label options → click Save and Close.
The Item Induction Checker is an Excel macro that pre-validates an Item Induction Template before it's submitted or uploaded to RMS. It checks every row on the main sheet and on the Location tab:
formats and allowed drop-down values
required fields for the selected Action
relationships between fields (for example, Case Size must be a multiple of Inner Size)
live RMS lookups: suppliers, GTINs, hierarchy, Diff IDs, UDAs and retail
Problems are highlighted on the sheet, so you can fix common errors before they turn into failed uploads.
Header-driven: it finds columns by their header names in row 7, so inserted or reordered columns still work as long as the headers are unchanged.
Data range: rows 8–1000 on the main sheet. The Location tab uses row 2 for its headers.
Actions with specific rules: Create Item Family, Add Tran Item or GTIN, Add Item Supplier and Add Item Supp Country Dimension. General checks apply to every active row.
⚠
A clean result means the template passed the checks built into this version of the macro. It doesn't replace normal review or guarantee the upload will succeed in RMS.
When a new supplier, UDA, brand or size is created in RMS, the checker's lookup tables need updating. See Updating Template Checker Tables.
Running the Checker
Fill out the Item Induction Template as normal, using the values for the Action on each row.
With the template's main sheet active, run the validation macro.
Read the completion message and the results in cells A2–A4.
Review every highlighted cell. Many also have a cell comment with the exact reason or the correct value.
Fix the data and run the checker again. Repeat until A3 reads Successful, No Errors were Found, then save.
Result
What it means / what to do
A2
Your login and the time the check ran.
A3: Successful, No Errors were Found
Every check passed. Save the template.
A3: Errors were found, Please visually Review, Correct, and Save
At least one check failed. Fix the highlighted cells and run it again.
A4
Summary of the error categories found (the same list as the pop-up).
Cell comment
Specific detail, such as the missing headers, the RMS value, an invalid UDA, a flagged word or a character count.
Reading the Highlights
Look
Color
Meaning
Abc
Orange
General validation failure or missing required field.
Abc
Yellow
Size description (RMS Size / Diff ID) not found in RMS.DIFF_IDS.
Abc
Light red / pink
The item or GTIN already exists in RMS, or another RMS conflict.
Abc
Light yellow
Duplicate values within the worksheet.
Abc
Purple
Dept/Class/Subclass on an Add Tran Item or GTIN row doesn't match RMS for the parent.
Abc
Light orange / brown (description)
Brand name missing from the start of the Parent Item Description.
Abc
Light blue (description)
Parent description has proper-case and/or spelling, size, color or unit issues.
Abc
Light purple (description)
The same Parent Description is used for more than one Family ID.
Abc
Red, bold word
That word is a possible misspelling or a size/color/unit word.
Abc
Underlined word
That word isn't in proper case.
Swatches are approximate; text in highlighted cells is dark red unless noted.
Required Fields by Action
Error
What it means
How to fix it
Exceptions / notes
Rows Missing Required (Red Header) Fields for 'Create Item Family'
A Create Item Family row has a blank field whose row-7 header is red (required).
Fill in every applicable red-header field. The Action cell comment lists what's missing.
Supplier Color can be blank when NRF Color Code is 000. The six dimension/packaging fields can be blank when the dept doesn't require dimensions (see Dept rules).
Individual Required Fields Missing for 'Create Item Family'
A specific required field on a Create Item Family row is blank.
OK to submit after review: spelling and proper-case findings can be submitted when you've confirmed the vendor's wording is correct. The spell check uses Microsoft's dictionary and can flag legitimate brand stylings.
Color, UDA & E-Commerce Fields
Error
What it means
How to fix it
Exceptions / notes
Missing Color Description in Column AA (Color Code not 000)
NRF Color Code isn't 000 but NRF Color Description is blank.
Enter the NRF Color Description.
Skipped for Add Item Supp Country Dimension and Add Item Supplier.
Invalid NRF Color Code (must be 000-999, 3 digits)
Expired phases: a Phase ID can be on the allowed list and still be rejected once its season has ended ("Phase ID References an Already-Ended Season"). The comment gives the end date.
Season
Ends
FAL26
10/31/2026
WNT26
01/31/2027
SPR27
04/30/2027
SUM27
07/31/2027
FAL27
10/31/2027
WNT27
01/31/2028
Countries: Source Country must be USA. Manufacture Country must be a valid three-letter code from the tool's built-in list of 246 codes.
'Location' Tab: Item / Location List / Location List - Primary Supp Not Numbers Only
One of these fields has a non-digit character or hidden space.
Enter digits only.
'Location' Tab: Row Missing Both Item Family ID and Item
A Location row with data has neither Item Family ID nor Item.
Enter one of them.
Fully blank rows at the end aren't flagged.
Location Tab Required
An Action on the main sheet needs the Location tab, but it's missing or incomplete.
Fill in the Location tab.
Add Tran Item or GTIN and Add Item Supplier don't require it.
'Create Item Family' Family ID Not Found on Location Tab
A Create Item Family Family ID isn't on the Location tab.
Add it to the Location tab, or correct the Family ID so both tabs agree.
Exceptions at a Glance
Create Item Family: Supplier Color can be blank when NRF Color Code = 000; the six dimension/packaging fields can be blank when the dept doesn't require dimensions.
Dept 884 + Class 1401 and Buyers 60, 90, 720, 960: exempt from the dimension/packaging fields.
Add Item Supp Country Dimension: skips the Inner Size / Case Size / Ti / Hi rule and the NRF Color Description check.
Add Item Supplier: VPN isn't required; any one of Family ID, Parent Item or Transaction Item is enough; skips the NRF Color Description check.
Brand at start of description: skipped when the description contains "S/O"; apostrophes can be left out.
GTIN:GENERATE (all caps) is accepted; duplicate GTINs are only compared within the same Action.
Color Code 262S is never flagged as an existing color/size under the parent.
Ecomm Warranty: only flagged when 1 - Yes is chosen for an ineligible dept.
Perishable depts: Yes or No are both fine; only blank is an error.
Location tab: only required when an Action on the main sheet needs it.
Brand list: if it can't be opened, the brand-exists check is skipped instead of failing every brand.
Phase expiration: only the seasons listed above are checked for expiry.
Fixing Errors: Recommended Order
Start with the A4 summary to see which categories are present.
Fix the orange required-field and format errors first.
Read the cell comments for errors that give a specific RMS value, UDA ID, phase end date or description detail.
On Add Tran Item or GTIN rows, fix hierarchy mismatches before looking into RMS duplicates on the same row.
Resolve RMS existence and Diff/Size conflicts before treating a row as ready.
Check duplicates across the whole sheet, not just the rows on screen.
Run the checker again until A3 reads Successful, No Errors were Found, then save.
Troubleshooting
The checker validates the active worksheet, so start it from the template's main sheet.
Headers must stay in row 7 with data in rows 8–1000. If an optional header is missing from the template, its check is skipped.
If RMS can't be reached or an unexpected error happens, the tool shows a failure message instead of reporting success. Fix the connection and run it again.
While it runs, Excel events and calculation are paused and then restored. Initial Retail, MSRP and Unit Cost are set to General number format.
The brand list (X:\shared\folder\Brand2.xls) is opened read-only and hidden while the brand check runs.
When new seasons are added, the phase expiry dates in the macro also need updating, or the new phases won't be checked for expiry.
What's New in Version 2.0
Family ID consistency: rows with the same Family ID must share a Dept/Class/Subclass; Create Item Family rows must share a Size Group ID.
NRF Color Code format: exactly three digits, 000–999.
Dollar signs are flagged in Initial Retail, MSRP and Unit Cost.
GTIN check digit validated with the GS1 calculation.
Package-type duplicates now checked per Family ID + GTIN, covering Case, Each, Inner, Outer and Pallet.
Add Item Supplier redundancy: flags rows that repeat the Create Item Family supplier.
Add Tran Item or GTIN now requires Initial Retail, Supplier Site, Unit Cost and Buyer.
Header-driven processing: columns can be inserted, removed or reordered safely.
Updating Item Induction Template Checker Tables
Scope: Supplier, UDA, Brand, & Size
To update the template checker anytime a new Supplier, UDA, Brand, and/or Size has been created in RMS v16, follow the steps below:
Step 1: Run the Appropriate Query in SQL or Toad
a. UDA Query
SQL
SELECT U1.UDA_ID, U1.UDA_DESC, U2.UDA_VALUE, U2.UDA_VALUE_DESC
FROM rms.uda u1, rms.UDA_VALUES u2
WHERE U1.UDA_ID = U2.UDA_ID
----AND u1.uda_id = 5261
ORDER BY U1.UDA_ID, U2.UDA_VALUE;
b. Supplier Query
SQL
SELECT supplier, duns_number, supplier_parent, sup_name, sup_status, create_datetime
FROM rms.sups
ORDER BY supplier;
c. Size Query
SQL
SELECT DGD.DIFF_GROUP_ID, DGH.DIFF_GROUP_DESC, DI.DIFF_ID, DGD.CREATE_DATETIME,
DGD.CREATE_ID, DGD.LAST_UPDATE_DATETIME, DGD.LAST_UPDATE_ID
FROM RMS.DIFF_GROUP_DETAIL dgd, RMS.DIFF_GROUP_HEAD dgh, RMS.DIFF_IDS di
WHERE DI.DIFF_ID = DGD.DIFF_ID
AND DGD.DIFF_GROUP_ID = DGH.DIFF_GROUP_ID
--AND DI.DIFF_ID = '0'AND DGD.DIFF_GROUP_ID <> 'COLOR'AND NOT (DI.DIFF_ID = '0'AND DGD.DIFF_GROUP_ID = '262S')
--AND DI.CREATE_DATETIME > sysdate - 30--AND DGD.DIFF_GROUP_ID = '232S'ORDER BY DGD.DIFF_GROUP_ID, DGH.DIFF_GROUP_DESC, DI.DIFF_ID;
d. Brand Query
SQL
SELECT *
FROM rms.brand
ORDER BY BRAND_NAME;
e. Mandatory UDA Query
SQL
SELECT DISTINCT ud.dept, c.class, c.class_name, s.subclass, s.sub_name, ud.uda_id, u.uda_desc,
       ud.required_ind, ud.hierarchy_value, u.CREATE_ID, u.CREATE_DATETIME,
       uv.UDA_VALUE, uv.UDA_VALUE_DESC, uv.CREATE_ID, uv.CREATE_DATETIME
FROM rms.uda_item_defaults ud, rms.uda u, rms.uda_values uv, rms.class c, rms.subclass s, rms.deps d
WHERE ud.uda_id = u.uda_id
  AND U.UDA_ID = uv.UDA_ID
  AND d.dept = ud.dept
  AND d.dept = c.dept
  AND c.class = s.class
  AND d.dept = s.dept
  AND ud.class = c.class
  AND ud.subclass = s.subclass
  AND ud.required_ind = 'Y';
f. Buyer Number Query
SQL
SELECT D.DEPT, D.DEPT_NAME, D.GROUP_NO, D.BUYER, D.PURCHASE_TYPE
FROM rms.deps d
ORDER BY dept;
g. Hierarchy Query
SQL
SELECT dept || '.' || class || '.' || subclass AS key, s.* FROM RMS.SUBCLASS S
ORDER BY dept, class, subclass;
Once the query has been run, save over the current file located in X:\shared\folder File name must match exactly when being saved and must be formatted as “.xls” ie, UDA, SUPPLIERS, Size, Brand2, MandatoryUDAv16, DEPS
Once new file(s) have been saved, files must be cleaned up prior to updating the Template Checker Rename the first tab ‘Sheet 1’ Delete the second tab with the query details (labeled SQL)
Update the Item Induction Template Assistant
To update the Tables in the Item Induction Template Assistant, follow the below steps:
Open current version of the Item Induction Template Assistant Access database Either click on the individual table you are wanted to update (Supplier, Brand, UDA,
or Size) or click on Update All Tables, if you ran all queries
Close out and re-open; tables should be up to date
Once Template Assistant Updated
Once the checker tables are updated, copy the data for the Brand, UDA (filter to WEB MSTER
UDA and delete rows), and Size files into <X:\shared\folder
Team\ORUP\QRGs\Added to HUB>
Have person in charge update the HUB accordingly!
Click