
Promotion Macro
The Promotion Macro turns a vendor’s Navy Deal Offer Form (DOF) into a ready-to-key START promotion template in one click. When you click Export Promotion it:
- Builds the START promotion template rows (item, zone, fixed price, retail, comments).
- Logs the promotion to the brand’s tab in the Buyer Promo Tracker and checks for overlapping promotions.
- Optionally loads the items into the Fact Tags workbook for sale signs.
- Saves the template to the shared promotions folder, split into one file per month for long promotions.
- Drafts the Outlook email to the right team with the file attached, ready for you to review and send.
CONFIGURATION section, so update those paths to your team’s folders first (see Assign Tracker Path).Before You Run It
- Brand tab exists in the tracker. The tracker must have a tab named exactly like the vendor/brand name you enter in the macro (e.g.
MSI). See Brand Tabbing. - Paths are set. The START template, tracker and Fact Tags file locations set in the macro point to files you can open.
- Outlook is installed and signed in, so the macro can draft the email.
- Close the tracker on other computers if possible. The macro saves it, and a copy someone else has open will be read-only.
Step 1: Fill In the Deal Offer Form
Paste or type the vendor’s DOF into the macro workbook. The yellow cells are inputs; the red boxes next to the arrows are the cells the macro reads for the brand, your ID and the buyer number.
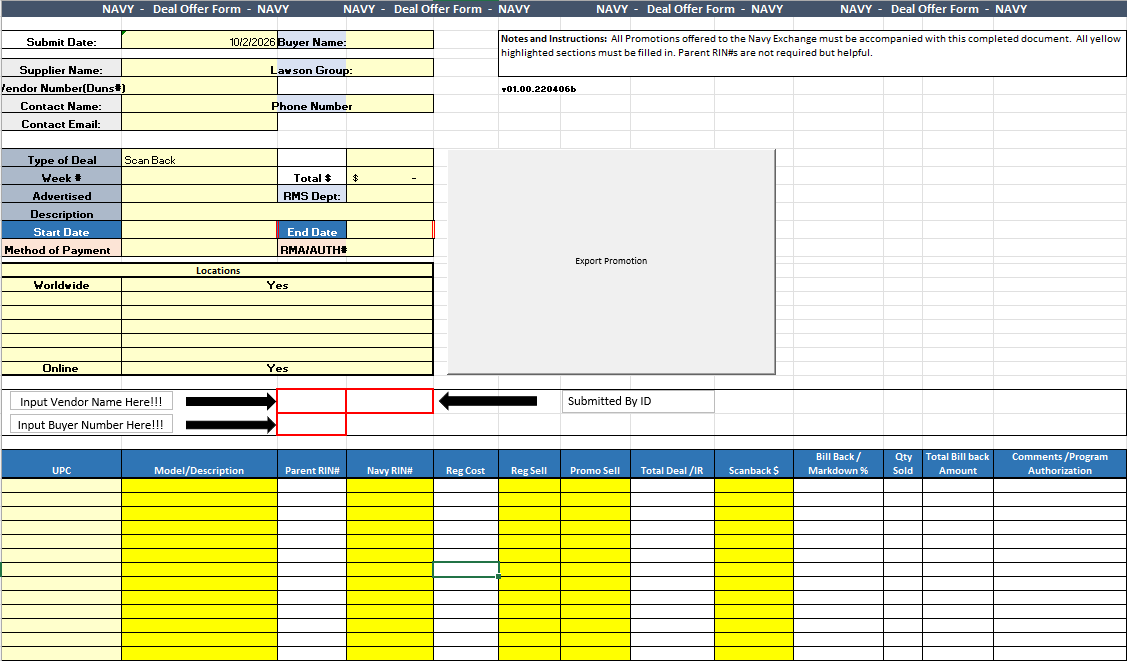
| Field (cell) | Required? | What to enter | Where the macro uses it |
|---|---|---|---|
| Start Date (B14) | Yes | First day of the promotion | START template, tracker, Fact Tags, file name |
| End Date (D14) | Yes | Last day of the promotion | Same as above; promotions over 31 days are split by month |
| Input Vendor Name Here (C26) | Yes | Brand name, spelled exactly like the tracker tab (e.g. MSI) | Tracker tab, folder name, file name, email |
| Submitted By ID (D26) | Yes | Your user ID | Template “Submitted By ID” (K2) |
| Input Buyer Number Here (C27) | Yes | Buyer number | Template “Buyer ID” (G2) |
Item rows start on row 30 (one item per row, up to row 333):
| DOF column | Required? | Goes to |
|---|---|---|
| Navy RIN# (D) | Yes | Template/tracker Item ID (M) and Fact Tags item |
| Reg Sell (F) | Yes | Template/tracker Current Retail (AB) and Fact Tags |
| Promo Sell (G) | Yes, fixed price | Template/tracker Fixed Price (W) and Fact Tags |
| Model/Description (B) | Optional | Template/tracker Comments (AA) |
| Scanback $ (I) | Optional | Tracker TC/IR (AC), used for trailing credit |
| UPC, Parent RIN, Reg Cost, Qty Sold, etc. | Optional | Not used by the macro; kept for reference |
3391, Fixed Price, applied to Both Regular and Clearance.Step 2: Click Export Promotion and Answer the Two Questions
| Question | Yes | No |
|---|---|---|
| Will you send promotion now? | File saved to …\2026\[Brand]\[Month]\, tracker Sent to START? = Yes, and an email is drafted. | File saved to …\2026\Send Later\[Month]\[Brand]\, tracker Sent to START? = No, and no email. Send it yourself later. |
| Do you want to generate sale tags? | RINs, regular and promo prices, and dates are loaded into the Sale Master sheet of the Fact Tags workbook (see Sale Fact Tags). | Fact Tags workbook is not touched. |
The macro then runs on its own. Here’s what happens, in order:
- Builds the template. Opens the START promotion template and fills one row per item.
- Logs to the tracker. Opens the Buyer Promo Tracker, finds the tab named after the brand, adds the rows under the last entry with the promo dates, scanback $ and the Sent to START answer, then saves the tracker.
- Checks for overlaps. The tracker’s Overlap Check column (C) flags any item already on promotion for those dates. If any row says Overlap, you’ll see “Overlap Detected! Check Tracker.” and the macro stops: no file is saved and no email is drafted.
- Loads Fact Tags (if you said Yes).
- Saves the file(s). The file is named
m.d.yy-m.d.yy Brand Month Promotion.xlsx, e.g.3.1.26-3.31.26 MSI March Promotion.xlsx. Missing brand/month folders are created automatically. - Drafts the email (if sending now) and shows “Process Complete.”
3.15.26-3.31.26 … March, 4.1.26-4.30.26 … April and 5.1.26-5.10.26 … May.Step 3: Review and Send the Email
When you choose to send now, Outlook opens a draft for each file. The macro picks the recipient from how soon the promotion starts:
| Promotion starts | Sent to | Subject |
|---|---|---|
| Within 7 days of today | DMM (Name Redacted) | URGENT Pricing - [file name] |
| More than 7 days out | S.T.A.R.T. team | BP - [file name] |
Attached is the promotion file for MSI during March.
- Open the attached file and verify the START template: items, fixed prices, dates, buyer ID and submitted-by ID.
*The template always applies “Both Regular and Clearance”. - Click Send. The email is only drafted, never sent automatically.
Step 4: Check the Tracker
Each promotion is logged to the brand’s tab in the Buyer Promo Tracker, which the macro saves automatically:
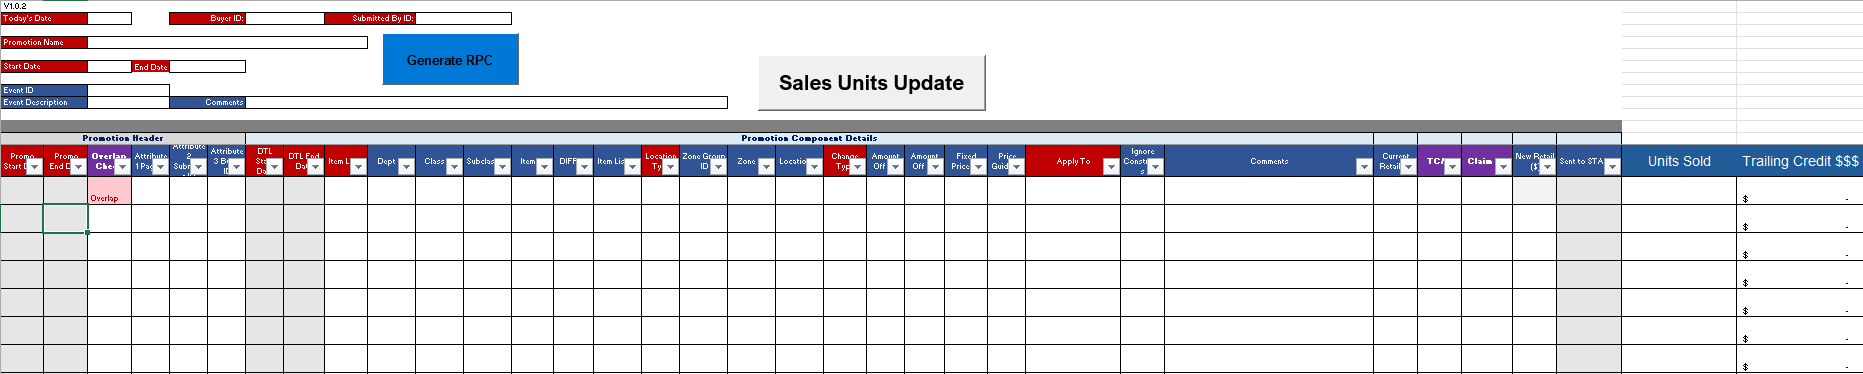
| Tracker column | Filled with |
|---|---|
| Overlap Check (C) | Calculated: shows Overlap if the item is already on promotion for those dates |
| DTL Start / End Date (G–H) | Promotion start and end dates |
| Item Level (I), Location Type (P), Zone ID (R), Change Type (T), Apply To (Y) | Item, Zone, 3391, Fixed Price, Both Regular and Clearance |
| Item ID (M) | Navy RIN |
| Fixed Price (W) | Promo Sell |
| Comments (AA) | Model/Description |
| Current Retail (AB) | Reg Sell |
| TC/IR (AC) | Scanback $ |
| Sent to START? (AF) | Yes or No from the first question |
| Units Sold / Trailing Credit (AG–AH) | Filled later with Sales Units Update; trailing credit = TC/IR × units sold |
…\2026\Send Later\[Month]\[Brand]\. When you send one, email the file yourself and change Sent to START? to Yes on the tracker.Troubleshooting
| Problem | Fix |
|---|---|
| “Overlap Detected! Check Tracker.” | An item is already on promotion for those dates. Review column C on the brand tab, delete the rows just added, fix the DOF and run again. |
| Nothing was logged to the tracker | The brand name in C26 doesn’t match a tracker tab exactly (spaces and spelling count), or the tracker path is wrong. |
| Error opening the template, tracker or Fact Tags file | A path in the CONFIGURATION section is wrong or you don’t have access to that folder. |
| Wrong or missing items | Item rows must start on row 30 with no blank rows in between; the macro stops at the last filled row in columns B–G. |
| Wrong dates or file names | Enter real dates in B14 and D14 (not text). |
| No email appeared | You answered No to “send now”, or Outlook isn’t open/signed in. |
Promotion Macro w/ automatic tracking and filing
Buyer Promo Tracker
1. Save to path team can access

| Overlap Check | Attribute 1 Page | Attribute 2 Subm. | Attribute 3 Buyer ID | DTL Start Date | DTL End Date | Item Level | Dept ID | Class ID | Subclass ID | Item ID |
|---|---|---|---|---|---|---|---|---|---|---|
| Overlap | 1/1/26 | 1/30/26 | 1234567 | |||||||
| Overlap | 1/20/26 | 2/10/26 | 1234567 |
Sales Update Button
- Highlight RIN/RINS with same start and end dates. Click button
- Enter Start and end dates of promotion for those items. Start and end dates must be MM/DD/YYYY Format
Units Sold for specified period for all locations will populate into column AG. Trailing credit will auto calculate in column AH
| Units Sold | Trailing Credit $$$ |
|---|---|
| 16 | $ 80.00 |
Brand Tabbing
- Duplicate Brand tab for each brand and rename the tab for each brand.
*if Brand Tab Name does not match Brand name input on Promotion Macro the macro will be unable to copy information over to Promo tracker. (Text just needs to match)
|
Input Vendor Name Here!!!
|
➔ | username | ➔ |
Submitted By ID
|
||
|
Input Buyer Number Here!!!
|
➔ | 430 | ||||
Assign Tracker Path to Promotion Macro
- Go to path Share Path where YOUR Tracker is located.
- Right click, select Copy as path
Back onto Promotion Macro Workbook.
- Right click macro button
- Click "assign macro"
- Click "VendorDOF" and select Edit
Assign Macro ? ✕CopyData
PERSONAL.XLSB!FFINSPECT
VendorDOFMacros in:Description - Under "Configuration" paste the path of your Buyer Promo Tracker into TrackerPath: in between the quotations.
- Under "Part 4: File Generation Loop" and "Revised Dynamic Paths" provide a path for START templates to save to. For Now location & Later location
- Do Ctrl + S to save and close the window
- *You must reassign macro
- Right click macro button again and click assign macro.
- Click VendorDOF and click OK
- Save document and close.
| ' --- CONFIGURATION --- |
| TemplatePath = "\\server\share\folder" |
| TrackerPath = "" |
| FactMasterPath = "X:\shared\folder" |
| ' --- REVISED DYNAMIC PATHS --- |
| If SendNowResponse = vbYes Then |
| ' Save to: ...\2026\[Brand Name]\[Month]\ |
| SaveFolderString = "\\server\share\folder" & BrandName & "\" & PromoMonth & "\" |
| Else |
| ' Save to: ...\2026\Send Later\[Month]\[Brand Name]\ |
| SaveFolderString = "\\server\share\folder" & PromoMonth & "\" & BrandName & "\" |
| End If |
*Now, when you run the promotion macro. The promotion information will be logged to YOUR teams Tracker file.
Fact Tags
The Fact Tags V4 workbook holds every fact tag the team has built (the shelf signs for out-of-box, on-display items) and creates the import files the sign team uses to print them. Each tab has a job:
| Tab | What it’s for |
|---|---|
| Category tabs (Apple, Audio, Cameras, Computers, TV-Video, Video Games, Majors, Small Appliances, …) | Where fact tags are built and kept: one row per item, starting on row 6. See Regular Fact Tags. |
| Master | A combined copy of the category tabs. The SALE MASTER looks every RIN up here. Refresh it with Update Master after adding or changing fact tags. |
| SALE MASTER | Builds sale signs for a promotion and sends them to the sign team (this section). |
| Clearance Master | The same idea for clearance signs. |
| Examples / Instructions | The sign team’s rules: character limits, // line breaks, required columns. |
Regular Fact Tags (Category Tabs)
Regular fact tags are the everyday shelf signs for items on display. Each category (Apple, Audio, Cameras, Computers, TV-Video, etc.) has its own tab where its tags are kept, plus an Email Fact Tags button that sends that category’s tags to the sign team. The Master tab combines all the categories so the SALE MASTER can find any item by RIN.
The workflow is: add the tag on its category tab → click Email Fact Tags → click Update Master.
Regular Tags Step 1: Add the Tag to Its Category Tab
Go to the category tab, find the first empty row below the header (row 5; tags start on row 6) and fill in one row per item:
| Column | What to enter | Rules |
|---|---|---|
| Copies (A) | 1 | Required. The export finds the last row from this column, so every tag needs it. |
| Template (B) | 5X3FACT or 7X5FACT | Required. Sign size, chosen from the drop-down. |
| UserDefined4 (C) | Regular | Required. Marks a regular-price tag. Case-sensitive. |
| SalePriceType (D) | Protection Plan | Required. The sign header image the team uses for regular tags. Pick from the drop-down. |
| ItemID (E) | Navy RIN | The key the SALE MASTER uses to find the tag. |
| Model (F) | Vendor part number (VPN) | Case-sensitive; use capital letters as the vendor does. |
| UPC (G) | Full UPC | All digits. |
| Name (H) | Item name, e.g. Apple 11-Inch iPad Air M3 Wi-Fi 128GB | Required. Up to 105 characters (about 40 per printed line). |
| Description (I) | Key features separated by // | Up to 250 characters (about 60 per printed line). // starts a new line on the sign. |
| RegPrice (J) | Regular NEX price | Required. |
| SalePrice (K) | Leave blank | Only used for sale tags. |
| StartDate (L) | Today’s date | The date you added the tag. The export uses the newest date to build the “New” file. |
| StopDate (M) | Leave blank | Only used for sale tags. |
Example (from the Apple tab):
| Name (H) | Description (I) | RegPrice (J) | StartDate (L) |
|---|---|---|---|
Apple 11-Inch iPad Air M3 Wi-Fi 128GB | 11" 2360x1640 Liquid Retina Display//Apple M3 Chip 8-Core CPU 9-Core GPU//128GB Storage//Apple Pencil Pro Supported//Available Colors: Blue, Starlight, Purple, Space Gray | 589 | 10/02/26 |
Regular Tags Step 2: Click Email Fact Tags
On the category tab, click Email Fact Tags. The macro builds two files for the sign team and drafts the email:
| Step | What the macro does |
|---|---|
| 1. Checks the tab | Stops with “[Category] tab has no data to export.” if there are no tags below row 5. |
| 2. Prepares the folder | Uses the category’s folder in the shared Fact Tag Exports folder (e.g. …\Fact Tag Exports\Apple\) and creates it if it’s missing. |
| 3. Saves the Master file | Copies the header (row 5) and every tag on the tab into a new workbook with one sheet named ItemImport, saved as [Category] Master Fact Tag_99999_Promotion_SIGNS_HQ Distributed_[YYYYMMDD].xlsx. |
| 4. Saves the New file | Finds the newest StartDate in column L and saves only the tags with that date as [Category] New Fact Tag_99999_Promotion_SIGNS_HQ Distributed_[YYYYMMDD].xlsx. If no tag has a date, it skips this file and tells you. |
| 5. Drafts the email | Opens an Outlook email to the sign team, copied to the fact tag team, with both files attached. It is not sent automatically. |
| 6. Confirms | Shows “[Category] Fact Tags exported and email is ready to fly!” |
Please find attached the Apple Master Fact Tag file and the version with the newest date only.
Let me know if you need anything else.
Best,
The Apple Team
- Open both attachments and check them: the New file should contain only the tags you just added.
- Click Send. The sign team prints from the New file and keeps the Master file as the category’s full, current list.
Every category tab works the same way; only the tab name, export folder and file names change (e.g. Audio Master Fact Tag…, TV-Video New Fact Tag…). Running it again on the same day replaces that day’s files.
Regular Tags Step 3: Click Update Master
After adding or changing tags, go to the Master tab and click Update Master (the same button is on Clearance Master). Do this before building sale signs, or new items will show #N/A on the SALE MASTER.
| Step | What Update Master does |
|---|---|
| 1. Clears the Master tab | Removes everything below the header. Master is rebuilt from scratch each time, so never type on it. |
| 2. Combines the category tabs | Copies rows 6 down (columns A–M) from Apple, Audio, Computers, Cameras, Mobile Electronics, Smart Home, TV-Video, Video Games, Majors, ASOS and Small Appliances. |
| 3. Stores RINs and UPCs as text | Forces ItemID (E) and UPC (G) to text so the SALE MASTER lookups match them exactly. |
| 4. Sorts newest first | Sorts by StartDate (L), newest on top. |
| 5. Stamps the time | Writes “Last updated: yyyy-mm-dd hh:mm” in cell Z1. |
| 6. Locks the tab | Re-protects Master (sorting and filtering still allowed) and shows a dad joke to confirm it finished. |
QuickConsolidateAndSort).Regular Tags Troubleshooting
| Problem | Fix |
|---|---|
| “[Category] tab has no data to export.” | There are no tags below row 5, or column A (Copies) is blank. Fill in Copies on every row. |
| “No rows matched the newest date…” | No tag on the tab has a StartDate. Put today’s date in column L for the tags you added; only the Master file was attached. |
| The New file has the wrong items | It contains every tag with the newest StartDate. Make sure only today’s new tags have today’s date, and that no tag has a future date. |
| Tags missing from the Master file | The bottom rows are missing Copies (A). The macro finds the last tag by looking up from the bottom of column A, so rows below the last filled Copies cell are left out. |
| “Error saving file…” | The Fact Tag Exports folder can’t be reached, or a file with the same name is open. Close it and run again. |
| “Outlook is not available.” | Open Outlook and run the button again; the files are already saved. |
| New tag shows #N/A on the SALE MASTER | Click Update Master. Tags on Floor Care and HomeGarden are not included in Update Master, so add those tab names to its list if they need sale signs. |
| Update Master didn’t sort | The workbook is in shared mode, which can block sorting. The data is still updated. |
Sale Fact Tags (SALE MASTER)
The SALE MASTER tab turns a list of RINs and sale prices into a sale-sign file for the sign team. You load the items, check that every item has a fact tag, then click EXPORT TO SIGN TEAM. The macro builds the sign-team file, removes items with no fact tag, names the file the way the sign team requires, and drafts the email.

Step 1: Load the Items
Automatically: run the Promotion Macro and answer Yes to “Do you want to generate sale tags?”. It writes the RINs, regular and promo prices, and dates into the SALE MASTER for you.
Manually: paste RINs into ItemID (D), starting on row 2 with no blank rows, then fill in the dates (H–I) and prices (L–M).
| Column | Filled by | Notes |
|---|---|---|
| ItemID (D) | You, or the Promotion Macro | The Navy RIN. Everything else is looked up from this. |
| UPC (C), Model (E), Name (F), Description (G) | Formula (VLOOKUP on the Master tab) | Shows #N/A when the RIN has no fact tag on Master. |
| StartDate / StopDate (H–I) | You, or the Promotion Macro | The dates printed on the sign. |
| RegPrice / SalePrice (L–M) | You, or the Promotion Macro | Regular NEX price and the promo price. |
| Copies (A), Template (B) | Pre-filled | 1 and 5X3FACT. |
| UserDefined4 (J), SalePriceType (K) | Pre-filled | Sale and Sale (the sign header). |
Step 2: Check for #N/A
After the RINs are in, the lookup columns fill in automatically. A row showing #N/A means that item has no fact tag on the Master tab. For each one, either:
- Build the fact tag: add the item to its category tab, following the sign team’s rules on the Instructions tab (Name up to 105 characters, Description up to 250,
//for a line break, no leading or trailing spaces). Then click Update Master so the SALE MASTER can find it. - Skip it: if the item doesn’t need a sign, leave it. The export now removes #N/A rows automatically, so no error rows reach the sign team.
Step 3: Click EXPORT TO SIGN TEAM and Answer the Prompts
Stay on the SALE MASTER tab (the macro reads whichever tab is active) and click EXPORT TO SIGN TEAM. Answer three prompts:
- Department/Brand, e.g.
Apple. Used in the file name, subject and email.Department Name ✕ - Start and end date in MM/DD/YY format. These set the week number, file name and subject; the dates printed on the signs come from columns H–I.
Start Date ✕End Date ✕
Then the macro runs on its own:
| Step | What the macro does |
|---|---|
| 1. Reads your answers | Department, start date and end date. Stops if any are blank or the dates aren’t valid. |
| 2. Works out the fiscal week | The fiscal year starts February 1. Week = days since Feb 1 ÷ 7, rounded down, + 1 (kept between 1 and 52). Example: start 03/01/26 → 28 days → Week 5. |
| 3. Opens the sign team’s template | Opens the shared Fact Tags.xlsx template read-only, so the original is never changed. |
| 4. Copies your rows | Pastes columns A–M of the SALE MASTER, down to the last RIN in column D, as plain values into the template’s ItemImport tab. |
| 5. Removes #N/A rows | Deletes every row whose UPC is #N/A (items with no fact tag), so the sign team never receives error rows. |
| 6. Saves the file | Saves the ItemImport tab as its own workbook in your Windows temp folder, using the sign team’s file-name format. |
| 7. Drafts the email | Opens an Outlook email to the sign team with the file attached. It is not sent automatically. |
Step 4: Review and Hold the Email
Outlook opens a draft to the sign team with the file attached. The file name and subject follow the sign team’s format:
| Item | Format | Example (Apple, 03/01/26–03/31/26) |
|---|---|---|
| File name | Week [#] Unadvertised [Dept] Promotion Fact Tag_99999_Promotion_SIGNS_HQ Distributed_[YYYYMMDD]_[YYYYMMDD].xlsx | Week 5 Unadvertised Apple Promotion Fact Tag_99999_Promotion_SIGNS_HQ Distributed_20260301_20260331.xlsx |
| Subject | Week [#] [Dept] Unadvertised Promotion Fact Tags [MM.DD.YYYY]-[MM.DD.YYYY] | Week 5 Apple Unadvertised Promotion Fact Tags 03.01.2026-03.31.2026 |
| To | Sign team mailbox | PLUS-SignTeam |
Please see attached Sale signs for Week 5 for Apple.
Thanks,
- Open the attachment and verify the items, prices and dates.
- Hold the email until START has keyed/approved the promotion, then send it.
*START DOES NOT WANT SIGNS SENT UNTIL THE PROMOTION HAS BEEN KEYED/APPROVED. - The attachment lives in your Windows temp folder, so keep the draft open (or save the attachment) until you send it.
Troubleshooting
| Problem | Fix |
|---|---|
| Lots of #N/A rows | Those RINs have no fact tag on the Master tab. Build them on the category tab, refresh Master, or let the export drop them. |
| A fact tag exists but still shows #N/A | The Master tab hasn’t been refreshed since the tag was added, or the RIN has a leading/trailing space. |
| Old items appear in the export | Leftover rows from a previous promotion. Delete them from the SALE MASTER before loading new items. |
| Wrong dates on the signs | The signs use columns H–I, not the dates you type at the prompts. Fix the dates in H–I and export again. |
| “Target file not found.” | The sign-team template path in the code is wrong, or you don’t have access to that folder. |
| “Invalid date format.” | Type the dates as MM/DD/YY, e.g. 03/01/26. |
| Wrong week number | The week comes from the start date you typed, counting from February 1. |
| Attachment missing later | The file is saved in your Windows temp folder, which can be cleaned up. Keep the draft open or save the attachment until you send it. |
Ad Planner & DB Uploader
The NEX Ad Planner workbook covers an ad from start to finish:
- Measure past ads. Import QuantaSense sales data and calculate how much each item’s sales rose (its lift) in the weeks it was advertised.
- Plan the next ad. Build the week’s item list, pull item details from RMS, and export the lineup to the marketing PowerPoint template.
- Upload to the Ad Database. The export also fills the Ad Database Import sheet, which you send to the Ad Database with the Update Ad Database form (Ctrl+A).
Before You Start
- Enable macros when you open the workbook, and always work in the
.xlsmfile. - PowerPoint templates: put
AE_and_FE_Templates.pptx,Email_Templates.pptxandLarge_Event_Template.pptxin the same folder as the workbook. The export looks for them there. - Network access to the Ad Database (an Access file on the shared drive) and to RMS. RMS is read through the Oracle ODBC driver with a read-only login; the password is read from a protected network file, so you never type it.
- Installed software: Excel, PowerPoint and Outlook, the Microsoft Access Database Engine (ACE OLEDB) and the Microsoft ODBC for Oracle driver.
- VBA reference: in the VBA editor (Alt+F11) under Tools → References, make sure Microsoft ActiveX Data Objects 6.1 Library (or the latest version) is ticked. The DB Uploader needs it.
- The DB Uploader keeps a copy of the department lookup list in
C:\temp; it creates the folder if it doesn’t exist.
The Weekly Workflow at a Glance
| # | Step | Sheet | Button / macro |
|---|---|---|---|
| 1 | Log the ad weeks you want to measure | Ad Week Calendar | Type them in |
| 2 | Pull 26 weeks of sales from QuantaSense and import them | Data Import | Import Data |
| 3 | Calculate lift for the ad week(s) | Data Import → Ad Summary | Build Ad Summary |
| 4 | Review results; roll up by vendor or product | Ad Summary, Lift Query | Update (Lift Query) |
| 5 | Build the new ad week and pull item details | Ad Week Planner | Import SKU Data |
| 6 | Export the slide, fill the database sheet and log the export | Ad Week Planner | Export To PowerPoint |
| 7 | Finish the database rows and upload them | Ad Database Import | Ctrl+A → Update Ad Database |
How the Ad Planner Works
The workbook links your QuantaSense sales data, RMS item data, the PowerPoint ad templates and the Ad Database. These are the tabs you work in:
| Tab | What it’s for |
|---|---|
| Ad Week Calendar | The list of ad weeks and their QuantaSense week codes. |
| Data Import | The QuantaSense sales data, loaded with the Import Data button (no pasting). |
| Ad Summary | Lift results for each item in the ad week(s) you analyze. |
| Lift Query | Rolls the Ad Summary up by week, description, Class or Sub-Class. |
| Ad Week Planner | Where you build one ad week; drives the PowerPoint export. |
| Ad Database Import | The rows that get uploaded to the Ad Database. |
How lift is measured
Baseline = the item’s normal, un-promoted sales. For each item, the Baseline Avg/Wk is the average weekly units it sold over the last 26 weeks excluding ad weeks. That answers “what does this item sell when we don’t advertise it?”, which is the right comparison, rather than a calendar-year average.
- Unit Lift = ad week units − baseline: the extra units the ad drove.
- Lift % = unit lift ÷ baseline: the headline number for one item.
- Weighted Lift % (Lift Query) = total unit lift ÷ total baseline units across a group of items.
| When you’re quoting… | Use |
|---|---|
| One item | Its Lift % on the Ad Summary. |
| A vendor, product line or whole ad | The Weighted Lift % from the Lift Query. It counts every unit equally, so it matches the actual extra units the ad drove. |
| A simple average of several items’ Lift % | Don’t. Small items with big percentages inflate it. |
Ad Week Calendar
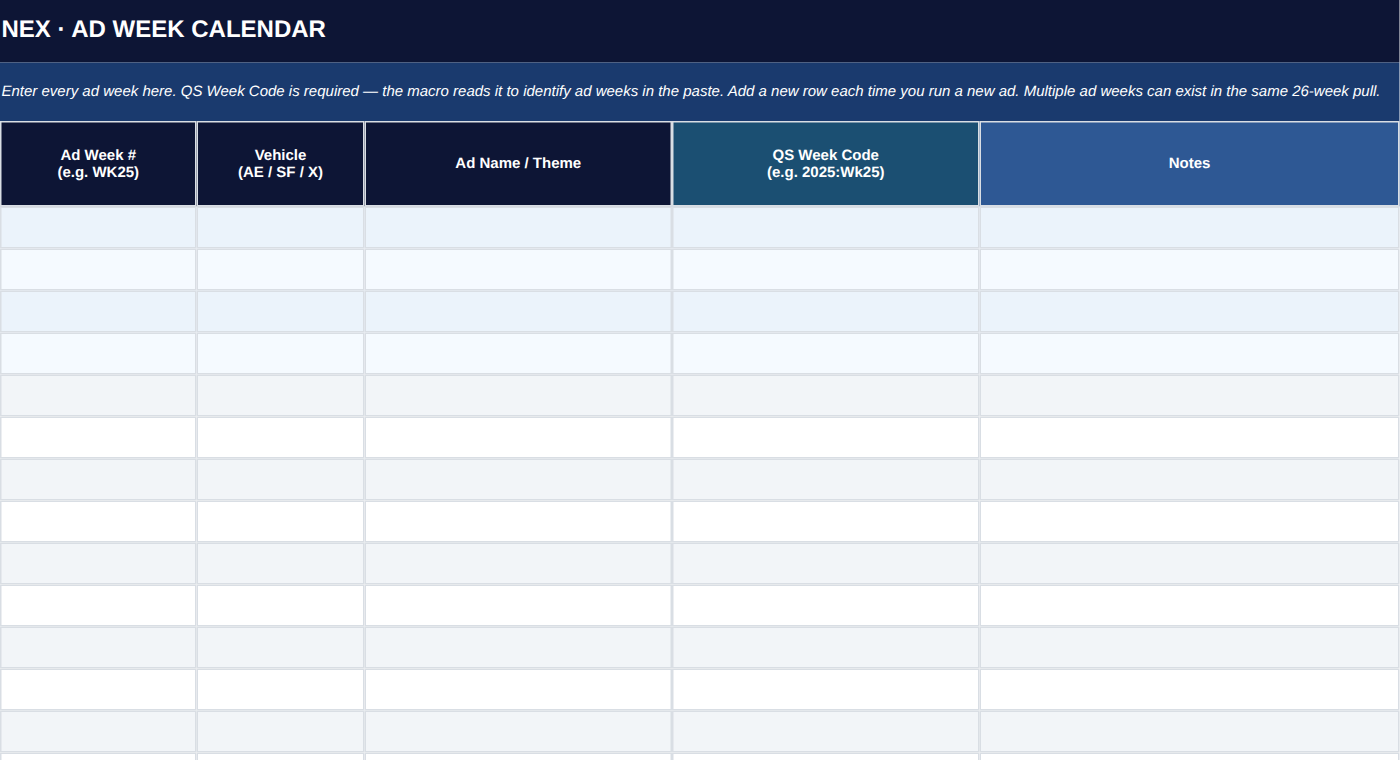
A running list of every ad you run. Add a row each time:
| Column | Example | Notes |
|---|---|---|
| Ad Week # | WK25 | |
| Vehicle | AE, SF, X | |
| Ad Name / Theme | Back to School | |
| QS Week Code | 2025:Wk25 | Required. Must match the Week column in the QuantaSense export exactly. The predecessor lookup uses this list to tell ad weeks from normal weeks. |
| Notes |
Data Import (and Build Ad Summary)

Holds the QuantaSense sales data the analysis runs on. You don’t paste into it; the Import Data button loads it for you.
1. Pull the data. In QuantaSense, export the Ad Planner V1 layout for your category group covering the trailing 26 complete weeks with the LC26W metrics selected. Include the ad week(s) you want to measure and the normal weeks around them. Save it as .xlsx.
2. Click Import Data and pick the file. The macro:
- Opens it read-only and checks the layout: row 3 must have
Groupin A,SKUin E,Weekin G andInv OHin M. Otherwise you’ll see “File does not match QuantaSense V1 layout.” - Opens a temporary Select Group(s) to Import sheet with a checkbox for every group in the file (all ticked). Untick any you don’t need, then click Confirm Selection (or Cancel).
- Clears the old data and writes the selected rows from row 5, then tells you how many rows were imported and how long it took.
3. Click Build Ad Summary. A temporary Select Ad Week(s) to Analyze sheet lists every week in the data. Tick the ad week(s) you want to measure and click Confirm Selection. Results go to the Ad Summary tab.
| Columns | What they hold |
|---|---|
| Group, Dept, Class, Sub-Class (A–D) | Product hierarchy. Sub-Class is often the brand. |
| SKU (E) | Transaction RIN. |
| Style NEW (F) | Parent RIN: Description. Rows containing UNSCANNED, DEMO or SPECIAL ORDER are ignored. |
| Week (G) | Week code, e.g. 2025:Wk25. |
| Sales $ / Sales U (I–J) | That week’s revenue and units. |
| Sales $ / Sales U LC26W, Inv OH U LC26W (K–M) | Last-26-week figures used to build the normal (baseline) weekly sales. |
Ad Summary

One row per Transaction RIN per selected ad week, showing how much the ad lifted sales compared with a normal week. The header shows the weeks analyzed (E3), the item count (H3) and when it last ran (K3).
| Column | Meaning |
|---|---|
| Ad Wk Units / Ad Wk Rev ($) | Units and revenue in the ad week. |
| Baseline Avg/Wk | Average weekly units in the non-ad weeks (the normal run-rate). |
| Baseline Weeks | How many non-ad weeks the baseline is based on. |
| Unit Lift | Ad week units − baseline. |
| Lift % | Unit lift ÷ baseline. The headline number. |
| Rev Lift ($) | Ad week revenue − average non-ad week revenue. |
| Verdict | See below. |
| Average Selling Price | Ad week revenue ÷ units. |
| Group, Dept, Class, Sub-Class | For filtering by category. |
| Verdict | Rule |
|---|---|
| STRONG (green) | Lift % of 50% or more. |
| MODERATE (yellow) | Lift % from 20% to under 50%. |
| WEAK (red) | Lift % under 20%. |
| LOW DATA (n wks) | Fewer than 4 baseline weeks, so not reliable. |
| NEW LAUNCH | No baseline weeks: the item is new. |
| No Data | No baseline and no ad week sales. |
Using it: filter Verdict to STRONG/MODERATE, sort Lift % from largest to smallest to rank the best performers, or filter Group/Dept/Class/Sub-Class to focus on a category.
Predecessor lookup: to see how an older, similar item did in every ad week in the data, type its Parent RIN in M3 and run View → Macros → LookupPredecessor. The results appear below the main table.
Lift Query

Rolls up the Ad Summary for a vendor, product or category: the number to quote when discussing performance with buyers or marketing. Fill in any of the inputs (blank = no filter) and click Update:
| Input | What it filters |
|---|---|
| Ad Week(s) (B3) | Exact week codes, comma-separated, e.g. 2025:Wk25, 2025:Wk31. |
| Description contains (B4) | Text anywhere in the description, e.g. MacBook Air. |
| Class contains (B5) | Text in the Class. |
| Sub-Class contains (B6) | Text in the Sub-Class, often the brand, e.g. Apple. |
Results: SKUs matched, total ad units and revenue, total unit and revenue lift, and the Weighted Lift % (total unit lift ÷ total baseline units), followed by the matching rows sorted by Lift %. The weighted figure counts every unit equally, so it isn’t skewed by small items the way a simple average of Lift % would be.
Ad Week Planner
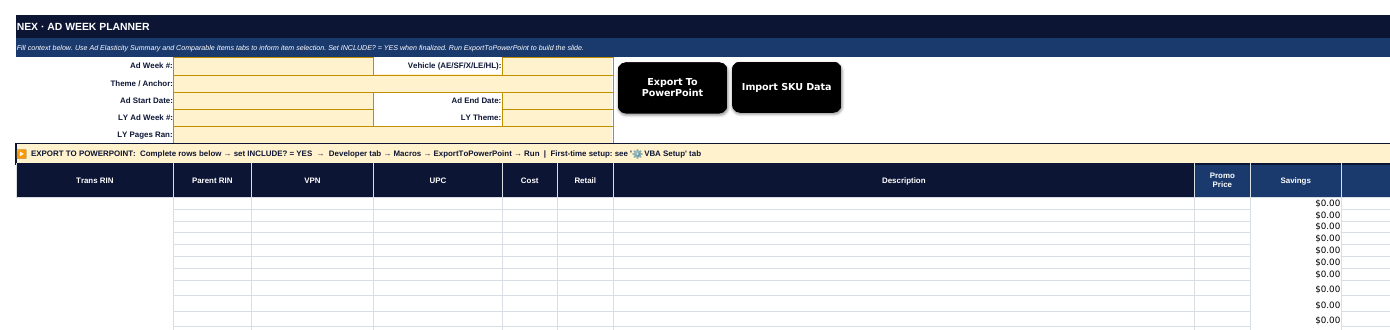

Where you build the ad. The header fields come first:
| Cell | Enter | Used for |
|---|---|---|
| Ad Week # (B3) | e.g. 25 or WK25 | Required. File name, database Week, tracker. |
| Vehicle (E3) | AE, FE, X/EMAIL, LE, … | Picks the PowerPoint template (see below). |
| Theme / Anchor (B4) | Ad theme | Copied to THEME on the Ad Database Import sheet. |
| Ad Start / End Date (B5, E5) | Dates | Reference. |
| LY Ad Week #, LY Theme, LY Pages Ran | Last year’s ad | Reference. |
Then one item per row from row 10 (up to row 89):
| Column | Filled by | Notes |
|---|---|---|
| Trans RIN (A) | You | Use TBD for a new item without a RIN yet; the slide marks it “TBD -- NEW ITEM” in red. |
| Parent RIN, VPN, UPC, Cost, Retail, Description (B–G) | Import SKU Data (from RMS) | Type over Retail or Description after importing to use your own text on the slide and in the database. |
| Promo Price (H) | You | Becomes the ad price. |
| Savings (I) | Formula | Retail − Promo Price. |
| Call Out (J) | You | e.g. New, Special Pricing. |
| Ad Info (K) | Import SKU Data (from the Ad Database) | The newest ad copy previously used for that item. |
| Predecessor RIN (L) | You | An older, similar item; fills LY Ad Units, LY Units Lift % and LY Rev Lift from the Ad Summary. |
| Curr IOH, GM %, Vendor Funded? (P–R) | You | Planning notes. |
| Elasticity (LY) (S) | Formula | STRONG / MODERATE / WEAK from LY Units Lift %. |
| INCLUDE? (T) | You | YES puts the item on the slide. |
| Brand (U) | Formula | Detected from the description using the BrandList tab. |
The formula columns (Savings, the LY columns, Elasticity and Brand) are locked so the formulas can’t be deleted; don’t type into them. If a brand isn’t detected, add it to the workbook’s BrandList tab.
Import SKU Data (the UpdateButton macro): select the Trans RIN cells to update in column A, or click any cell outside column A to update every row from 10 down, then click the button. For each RIN it reads the item’s details from RMS and the newest Ad Information from the Ad Database, then shows which rows were updated.
Export To PowerPoint
When the INCLUDE? column is set, click Export To PowerPoint on the Planner and confirm the prompt. The macro:
- Checks the setup. Ad Week # must be filled, U9 must say
Brand, and at least one item must be marked YES. - Picks the template from the Vehicle (below) and asks you for a layout if there’s a choice. If more items are marked YES than the layout has slots, it stops and tells you.
- Asks where to save the PowerPoint (suggested name e.g.
25_AE_FE_20261002.pptx). Cancel here and nothing else runs. - Bulk loads the Ad Database Import sheet with every item row on the Planner (see Ad Database Import).
- Builds the slide. Each slot gets the description, VPN, RIN, retail, promo price, savings and call out, then the file is saved and PowerPoint closed.
- Logs the export to the Ad Tracker and shows a summary with the saved file’s location.
| Vehicle (E3) | Template | Layouts |
|---|---|---|
LE (large event) | Large_Event_Template.pptx | No prompt. 7 items per slide, as many slides as needed (up to 210 items). |
X or EMAIL (or an Ad Week containing X) | Email_Templates.pptx | 1 = feature hero + 3 (4 slots), 2 = 2×2 grid (4), 3 = single column (3). |
Anything else (AE, FE, …) | AE_and_FE_Templates.pptx | 1 = hero + 6 (7 slots), 2 = 9-up grid (9), 3 = hero + 3 (4). |
HL (holiday) | AE_and_FE_Templates.pptx | The Instructions tab mentions an 8-grid holiday template, but the current code treats HL like AE/FE. |
Ad Database Import (and the DB Uploader)

The rows that go into the Ad Database. Export To PowerPoint adds one row per Planner item below any existing rows:
| Column | Filled with |
|---|---|
| Wk (A) | Ad Week # and Vehicle combined, e.g. 25AE. |
| Supplier # / Supplier Name (B–C) | From RMS. |
| RIN, Style # (VPN) (D–E) | Trans RIN and VPN. |
| Item Description (F) | The Planner’s Description if typed, otherwise RMS. |
| Ad Information (G) | The Planner’s Call Out (J) if filled, otherwise the newest Ad Information in the Ad Database. (The macro looks for a Planner header named “Ad Information”; the Planner’s header is “Ad Info”, so it falls back to column J. Rename K9 to Ad Information if you want column K used instead.) |
| Priority (I) | 1, 2, 3… in Planner order. |
| NEX Price (P), Adv Price (Q) | Planner Retail (or RMS retail) and Promo Price. |
| NEX Cost (U), Reg Cost (AQ) | RMS cost. |
| IMAGE (AC) | The newest Image Delivery note in the Ad Database. |
| DEPT, CLASS, THEME, PARENT (AM–AP) | RMS dept and class, the Planner theme, Parent RIN. |
| New Item, Online Exclusive, Change Type, Pricing Strategy, YEAR | Pre-filled defaults: N, N, FIXED, YFB, 2026. |
Fill in anything still blank that the ad needs (Page, MSRP, Call Outs, Grouping Info, Coop $, Order Frequency, etc.).
Upload to the Ad Database (Ctrl+A)
The uploader finds each field by its header text in row 4, so columns can move but headers must keep their exact names. Don’t merge cells in rows 1 or 4.
- On the Ad Database Import sheet, select one cell in each row you want to upload, all from the same department (up to 500). Rows with no Wk and no RIN are skipped.
- Press Ctrl+A to open the Ad Items form (shown below). It copies the latest lookup list to
C:\tempand fills in what it can; complete the rest. - Click Update Ad Database. Each selected row becomes a new Ad Database record with the form’s week, event, department and ad dates plus the row’s values.
- When “Done!” appears, open the Ad Database and check the new records. You may still need to add imaging, Parent RIN, RPC dates or other details by hand.
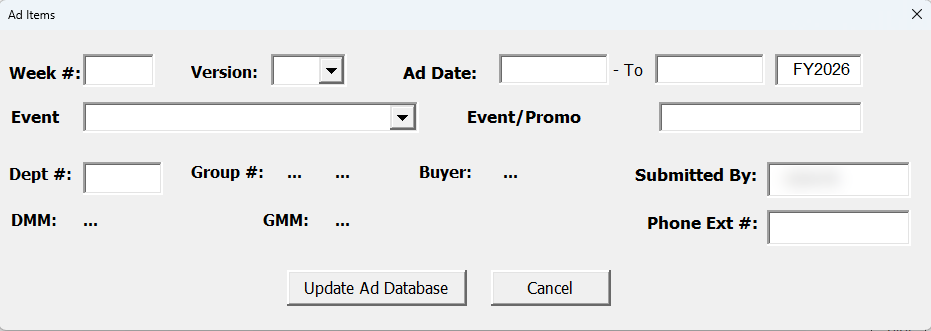
| Form field | How it’s filled |
|---|---|
| Week # | You: two digits, no letter (e.g. 25). Leaving the box loads that week’s versions. |
| Version | You: pick the letter from the list. |
| Ad Date (from – to), Event, Event/Promo | Automatic, from the Ad Database once Week # and Version are set. |
| FY | Automatic (e.g. FY2026). |
| Dept # | You: the department for this batch. Leaving the box fills Group #, Buyer, DMM and GMM. |
| Group #, Buyer, DMM, GMM | Automatic from the Dept #. They show “...” until a valid Dept # is entered. |
| Submitted By | Automatic: your network user name (greyed out). |
| Phone Ext # | You: required. |
- Sort or filter the sheet by DEPT (column AM).
- Select one cell in each row for the first department only, press Ctrl+A, enter that Dept # and upload.
- Repeat for each remaining department.
| Sheet column | Ad Database field |
|---|---|
| RIN | RIN or Item List (an R is added to numeric RINs) and Featured RIN (number only) |
| Supplier Name / Supplier # | Vendor / DUNS |
| Style # (VPN) | Vendor Style Number |
| Item Description / Ad Information | Item Description / Ad Information |
| Page | Page (two digits, e.g. 04) |
| New Item Y/N, Online Exclusive Y/N | Same fields (blank = N) |
| NEX Price / Adv Price / NEX Cost / Adv Cost | NEX Retail / Adv Retail / NEX Cost / Adv Cost |
| MSRP, % Off MSRP, Change Type, Pricing Strategy, Multi Buy, Billback, Call Outs, Grouping Info, Coop $ | Same names |
| IMAGE | Image Delivery |
| Order Frequency | Same (BAS becomes BAS (AR)) |
Troubleshooting
| Problem | Fix |
|---|---|
| “File does not match QuantaSense V1 layout.” | Export the Ad Planner V1 layout from QuantaSense; headers must be on row 3 with Group, SKU, Week and Inv OH in A, E, G and M. |
| “No ad week data found for the selected week(s).” | The week codes in the data don’t match. Check the Week column format (e.g. 2026:Wk14) and that the import covered those weeks. |
| Lots of LOW DATA or NEW LAUNCH verdicts | Pull a longer range (26 weeks) so there are enough normal weeks for a baseline. |
| Lift Query finds nothing | Run Build Ad Summary for the weeks you’re querying first; the query only reads the Ad Summary. |
| Import SKU Data / export: database or Oracle error | No access to RMS or the Ad Database share, or the Oracle ODBC / Access engine isn’t installed. |
| “Template not found” | Put the three .pptx templates in the same folder as the workbook. |
| “Layout n has x slots but you have y items” | Mark fewer items YES or choose a bigger layout. |
| “Column U row 9 must be labeled ‘Brand’” | Restore the Brand header in U9 on the Planner. |
| Duplicate rows on Ad Database Import | Each export appends. Delete old rows before exporting again. |
| Ctrl+A form: “Could not find any Week Versions” | That week has no versions set up in the Ad Database yet; check the week number and fiscal year. |
| Ctrl+A form: “Too Many Cells” | Select just one cell per row (500 at most). |
| Ctrl+A form: “Error Posting” | A value doesn’t fit its database field, e.g. text in a price, cost or date column. Remove stray notes from those cells and try again. |
| “Could not connect to database…” box | Network problem, a full network drive, or someone has the database open exclusively. Try again; if the database has moved, type its new path into the box. |
| Export cancelled at Save As | Nothing changed. The export is all-or-nothing; the database sheet and tracker only update after the file is saved. |
| Average Selling Price overwritten | Ad Summary column M is rebuilt on every Build Ad Summary run; don’t type into it. |
| A macro stops working after editing the code | Close and reopen Excel; VBA sometimes keeps stale state. |
Ad Bible (Standalone)
The Ad Bible is a stand-alone copy of the Ad Planner’s Ad Database Import sheet and its DB Uploader. Use it to key items straight into the Ad Database without the planner: no QuantaSense data, lift analysis or PowerPoint export. It’s handy for vendor submissions, last-minute additions, or anyone who only needs to enter ad items.
- Type the RINs.
- Click Update Information to fill in item details from RMS and past ad copy from the Ad Database.
- Finish the ad details and upload the rows with Ctrl+A.
Ad Bible vs. Ad Planner
| Ad Bible (standalone) | Ad Planner | |
|---|---|---|
| Purpose | Enter and upload ad items only | Measure past ads, plan the week, build the PowerPoint, then upload |
| How rows get on the sheet | You type the RINs (and Wk) yourself | Export To PowerPoint bulk-loads them from the Planner |
| Item details | Update Information button, on just the RINs you select | Bulk load during the export |
| Header row | Row 5 (row 4 holds the group labels) | Row 4 |
| Parent RIN on upload | PARENT column → Ad Database Featured RIN | RIN column → Featured RIN |
| Long ad copy | Over 255 characters is split into Ad Information + Ad Like Item | Single field |
Before You Start
- Enable macros when you open the workbook.
- Network access to the Ad Database on the shared drive and to RMS. RMS is read through the Oracle ODBC driver with a read-only login; the password is read from a protected network file.
- Installed: the Microsoft Access Database Engine (ACE OLEDB) and Microsoft ODBC for Oracle driver. In the VBA editor under Tools → References, Microsoft ActiveX Data Objects 6.1 Library must be ticked.
- The upload form copies the department lookup list to
C:\temp(created if missing).
The Ad Database Import Sheet
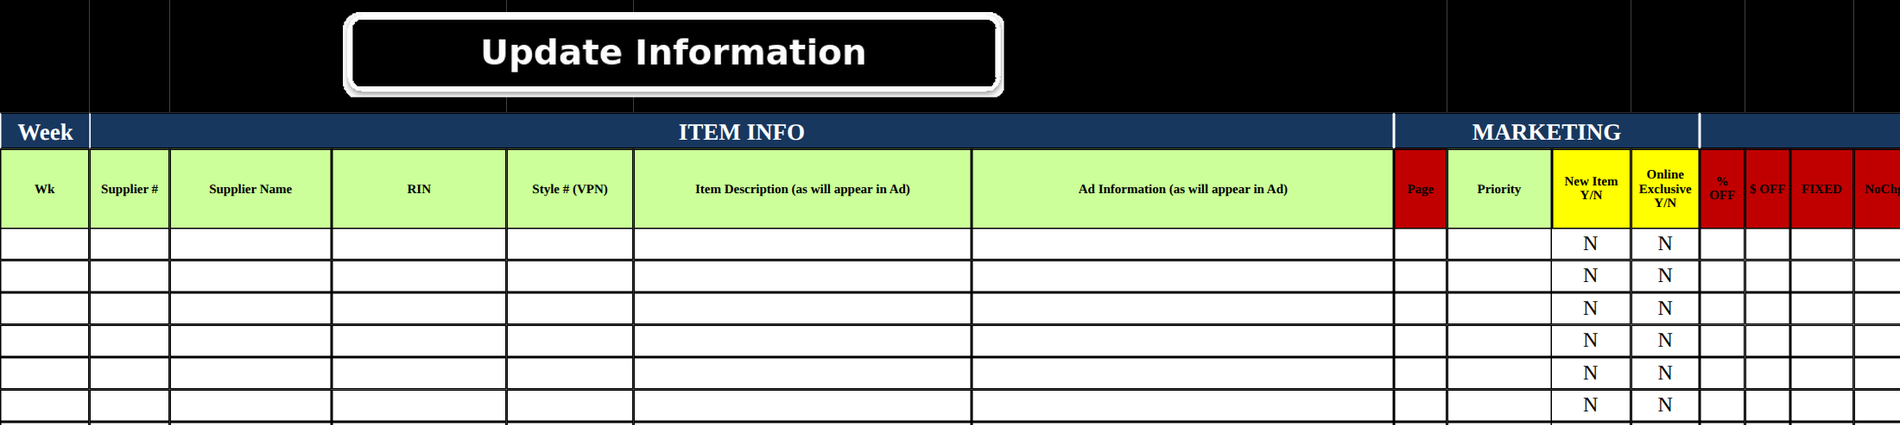

One row per ad item from row 6. The column headers are in row 5, grouped under Week, Item Info, Marketing, Pricing, Image, Order Info and Coop. New Item and Online Exclusive default to N, Change Type to FIXED, Pricing Strategy to YFB and Year to 2026.
Step 1: Enter the Items
For each item, type the Wk (A), e.g. 25AE, and the RIN (D), one per row, starting on row 6. RINs need at least 6 digits to be looked up.
Step 2: Click Update Information
- Select the RIN cells in column D that you want filled in. Only cells in the RIN column are processed, and the header row is skipped. If nothing in column D is selected you’ll see “Please select the cells containing the RIN numbers…”.
- Click Update Information. For each selected RIN the macro reads RMS and the Ad Database and fills the row:
| Column | Filled with |
|---|---|
| Supplier # / Supplier Name (B–C) | From RMS |
| Style # (VPN) (E) | From RMS |
| Item Description (F) | RMS description |
| Ad Information (G) | The newest ad copy for that item in the Ad Database (blank if none) |
| NEX Price (P) | RMS retail |
| NEX Cost (U), Reg Cost (AQ) | RMS cost |
| IMAGE (AC) | The newest Image Delivery note in the Ad Database |
| DEPT, CLASS (AM–AN) | From RMS |
| PARENT (AP) | Parent RIN from RMS |
Step 3: Finish the Ad Details
| Column(s) | What to enter |
|---|---|
| Page (H), Priority (I) | Ad page and order. Page uploads as two digits (4 → 04). |
| New Item Y/N, Online Exclusive Y/N (J–K) | Y or N (blank uploads as N). |
| % OFF, $ OFF, FIXED, NoChg (L–O) | How the price changes. |
| Adv Price (Q) | The ad price. |
| Change Type, MSRP, % Off MSRP (R–T) | Pricing details. |
| Adv Cost, Pricing Strategy, Multi Buy, Billback (V–Y) | Cost and deal details. |
| Call Outs, Grouping Info (Z–AA) | Ad call outs and how items are grouped. |
| Order Frequency (AE) | BAS uploads as BAS (AR). |
| Coop $ (AJ) | Co-op dollars. |
| Item Description, Ad Information (F–G) | Edit the text as it should appear in the ad. Ad Information over 255 characters is split automatically (see Step 4). |
Step 4: Upload to the Ad Database (Ctrl+A)
Copy2DB) reads its column headers from row 4, but in this workbook they’re in row 5; row 4 only has group labels. As shipped, the upload would miss almost every column. In the VBA editor (Alt+F11) open modMain and change For Each cell In Range("A4:BA4") to For Each cell In Range("A5:BA5"), then save.- Select one cell in each row to upload, all from the same department (500 at most). Rows with no Wk and no RIN are skipped.
- Press Ctrl+A to open the Ad Items form (shown below) and fill it in.
- Click Update Ad Database. Each selected row becomes a new record.
- At “Done!”, open the Ad Database and check the new records; you may still need to add imaging, RPC dates or other details by hand.
| Form field | How it’s filled |
|---|---|
| Week # | You: two digits, no letter (e.g. 25). Leaving the box loads that week’s versions. |
| Version | You: pick the letter from the list. |
| Ad Date (from – to), Event, Event/Promo | Automatic, from the Ad Database once Week # and Version are set. |
| FY | Automatic (e.g. FY2026). |
| Dept # | You: the department for this batch. Leaving the box fills Group #, Buyer, DMM and GMM. |
| Group #, Buyer, DMM, GMM | Automatic from the Dept #. They show “...” until a valid Dept # is entered. |
| Submitted By | Automatic: your network user name (greyed out). |
| Phone Ext # | You: required. |
- Sort or filter the sheet by DEPT (column AM).
- Select one cell in each row for the first department only, press Ctrl+A, enter that Dept # and upload.
- Repeat for each remaining department.
| Sheet column (row 5) | Ad Database field |
|---|---|
| RIN | RIN or Item List (numeric RINs get an R prefix, e.g. 12345678 → R12345678) |
| PARENT | Featured RIN (digits only; a leading R or L is removed) |
| Ad Information | Ad Information. Over 255 characters: the first 255 go here and the rest go to Ad Like Item as “Rich Content Continued: …”. Blank uploads as empty. |
| Supplier Name / Supplier # | Vendor / DUNS |
| Style # (VPN) | Vendor Style Number |
| Item Description | Item Description |
| Page / Priority | Page (two digits) / Priority |
| New Item Y/N, Online Exclusive Y/N | Same (blank = N) |
| NEX Price / Adv Price / NEX Cost / Adv Cost | NEX Retail / Adv Retail / NEX Cost / Adv Cost |
| MSRP, % Off MSRP, Change Type, Pricing Strategy, Multi Buy, Billback, Call Outs, Grouping Info, Coop $ | Same names |
| IMAGE | Image Delivery |
| Order Frequency | Same (BAS → BAS (AR)) |
Troubleshooting
| Problem | Fix |
|---|---|
| Uploaded records are missing most fields | The uploader is reading row 4. Apply the row 5 fix in Step 4. |
| “Could not find required header ‘RIN’ on Row 5” | The RIN header in D5 was changed or moved. Restore it. |
| “Please select the cells containing the RIN numbers…” | Select cells in the RIN column (D) before clicking Update Information. |
| A row didn’t fill in | The RIN is blank, not a number, or shorter than 6 digits (Ad Information and IMAGE are cleared), or RMS has no single match for it. |
| “Database Connectivity Error” | No access to RMS or the Ad Database share, or the Oracle ODBC / Access engine isn’t installed. |
| Ctrl+A: “Could not find any Week Versions” | That week has no versions in the Ad Database yet; check the week number and fiscal year. |
| Ctrl+A: “Error Posting” | A value doesn’t fit its database field (e.g. text in a price or date column). Clean up the cells and try again. |
| Ctrl+A: “Too Many Cells” | Select one cell per row, 500 at most. |
| “Could not connect to database…” box | Network problem or the database is open exclusively. Try again, or type the database’s new path if it moved. |
Induction Checker (Item Validation Tool)
The Induction Checker is an Excel pre-check for RMS item induction workbooks, the templates used to create new item families, add GTINs and sizes, and attach suppliers in Oracle RMS. One run reviews every row on the Item tab and the Location tab, and catches the mistakes that would otherwise get an induction rejected or need fixing after it’s loaded:
- Missing or invalid data: required fields for each Action, allowed dropdown values, number formats, GTIN length and check digit, prohibited characters.
- Rules between fields: Case Size must be a multiple of Inner Size, one primary supplier per item, one Case/Each/Inner row per GTIN, department-specific requirements.
- Live RMS lookups: whether the supplier, Dept/Class/Subclass, size, UDA values or GTIN already exist, and whether a new child item matches its parent’s hierarchy and retail.
- Description quality: brand at the start, proper case, spelling, size and colour words that don’t belong, the 100-character limit.
Every problem cell is colour-highlighted, many get a comment explaining the exact fix, and a pass/fail stamp with your user name and the time is written to cells A2–A4, so a reviewer can see the file was checked before it was submitted.
Item Validation Tool User Guide v2.0
Where It Fits in the Induction
- Build the induction workbook as usual: one row per item on the Item tab (headers on row 7, data from row 8), with the Action for each row, and the Location tab if the Action needs it.
- Run the Induction Checker on it.
- Fix everything highlighted and run it again. Repeat until cell A3 says Successful, No Errors were Found.
- Save and submit the workbook for RMS processing. The A2–A4 stamp shows who checked it and when.
The checker understands the four induction Actions and applies different rules to each:
| Action | Used to | Key checks |
|---|---|---|
| Create Item Family | Set up a new item family (parent) with its first items | All red-header fields filled; Parent Item and Transaction Item left blank; Family ID 25 characters or fewer and not numbers only; dimensions for departments that need them; Family ID listed on the Location tab |
| Add Tran Item or GTIN | Add a new size/colour or GTIN under an existing parent | Initial Retail, Supplier Site, Unit Cost and Buyer filled; Dept/Class/Subclass match the parent in RMS; colour + size not already built; retail matches the parent’s other children |
| Add Item Supplier | Attach another supplier site to an item | Supplier Site, Primary Supplier Ind, Unit Cost and Buyer filled; at least one of Family ID, Parent Item or Transaction Item; only one primary supplier; not a repeat of the Create Item Family supplier |
| Add Item Supp Country Dimension | Add dimensions for a supplier/country | Skips the Inner/Case/Ti/Hi and colour description requirements that apply to the other Actions |
Before You Start
- Enable macros when you open the checker workbook.
- Network or VPN access to RMS. RMS is read through the Microsoft ODBC for Oracle driver with a read-only login; the password is read from a protected network file, so no one types it in.
- Access to the approved brand list on the shared induction drive. If it can’t be opened, only the brand-name check is skipped.
- Keep the template’s header names intact. The checker finds columns by header text, not by column letter, so inserting or moving columns is fine but renaming a header is not.
How to Run It
- Open the induction workbook you want to check.
- Open HighlightSizeColorDuplicates2.xlsm and enable macros. Its window hides itself; that’s expected. It stays open in the background so its macro can run on any workbook.
- Click into the induction workbook, ideally on the Item tab. If you’re on the Location tab, the checker finds the Item tab itself (the sheet with an Action header on row 7).
- Press Alt+F8, choose HighlightSizeColorDuplicates2 and click Run.
- Wait for the Check complete! box. It either says No errors found or lists each error type with how many were found.
- Review the highlighted cells, fix them, and run it again.
Reading the Results
| Where | What it shows |
|---|---|
| A2 | Your network user name and the date and time of the check. |
| A3 | Successful, No Errors were Found or Errors were found, Please visually Review, Correct, and Save |
| A4 | The same error summary as the pop-up, e.g. GTIN Invalid Check Digit: 2. Blank when the check passes. |
| Cell comments | Hover over a flagged cell. Comments name the missing headers, the value RMS has, the required UDA, the flagged word, the character count, or the Phase ID end date. |
The highlight colour tells you what kind of problem it is:
| Looks like | Means |
|---|---|
| Abc | Required field missing, or a format or value problem. Most errors use this colour. |
| Abc | The RMS Size (Diff ID) doesn’t exist in RMS. |
| Abc | The item or GTIN already exists in RMS. |
| Abc | Duplicate values inside the worksheet. |
| Abc | Dept/Class/Subclass doesn’t match RMS for the parent item (Add Tran Item or GTIN). |
| Abc | Parent Description doesn’t start with the brand. |
| Abc | Parent Description has proper-case, spelling, size, colour or unit-word problems. |
| Abc | The same Parent Description is used for more than one Family ID. |
| Red bold word | That word in the description is misspelled, or is a size/colour/unit word that should come out. |
| Underlined word | That word isn’t in proper case (brand words are exempt). |
What It Checks
The checker reports about 60 error types. The full list, with what each means and how to fix it, is in the user guide; this is the overview:
| Area | Examples of what’s checked |
|---|---|
| Required fields | Red-header fields on Create Item Family; Inner Size, Case Size, Ti and Hi; Action-specific fields (see the Actions table above); Consignment Rate for consignment items. |
| Supplier & packaging | Supplier Site is digits only and exists in RMS; only one primary supplier per item; Case Size is an exact multiple of Inner Size; only one Case, Each, Inner, Outer or Pallet row per Family ID + GTIN. |
| Description & brand | Brand in capitals, on the approved brand list and at the start of the Parent Description; proper case and spelling; colour description not repeated in the Parent Description; 100-character limit; no ! @ & $ ™ ® © ? in the Parent, Transaction or Web Description. |
| Colour, UDA & e-commerce | NRF Color Code is three digits (000–999) with a description unless it’s 000; e-commerce colour family, warranty and gender from the allowed lists; required UDAs for certain Dept/Class/Subclass; UDA ID + value pairs exist in RMS. |
| Department rules | Departments that require Perishable, Consignment/Concession item type, or dimensions; e-commerce warranty only for eligible departments. |
| GTIN / UPC | Length matches the Item Number Type (UCC12 = 12, EAN/UCC-13 = 13, EAN/UCC-14 = 14); valid GS1 check digit; not already in RMS; not duplicated for the same Action. GENERATE (capitals) is accepted as a placeholder. |
| RMS lookups | Dept/Class/Subclass combination exists; size exists and is attached to the Size Group; colour + size not already built under the parent; retail matches the parent’s existing children. |
| Allowed values & seasons | Dropdown fields (Status, Item Type, UOMs, Round Level, Ticket Type, Handling Temp, etc.) contain allowed values; Phase IDs aren’t for a season that has already ended; no $ typed in Initial Retail, MSRP or Unit Cost. |
| Countries | Source Country is USA; Manufacture Country is a valid three-letter code. |
| Location tab | Present when the Actions need it; every Create Item Family Family ID is listed; item and location numbers are digits only; every row has a Family ID or Item. |
| Consistency | Rows sharing a Family ID use the same Dept/Class/Subclass and Size Group ID. |
Use Case Examples
| You see | Why | Fix |
|---|---|---|
| GTIN cell orange, comment “GTIN Invalid Check Digit” | A digit was mistyped. The last digit of a GTIN is calculated from the others, so a single typo is caught. | Re-copy the GTIN from the vendor’s file or the product label. |
| Supplier Site orange, “Supplier Site Not Numbers Only”, but it looks fine | A hidden space was pasted in with the number. | Retype the number in the cell. |
| Dept, Class and Subclass purple on an Add Tran Item or GTIN row | The new size or colour was given a different hierarchy than its parent item has in RMS. | Change them to match the parent (the comment shows RMS’s values), or check the parent item number. |
| Parent Description light blue with Blue in red bold | The colour is in the parent description. Colour belongs in the NRF Color Description and transaction description. | Remove the colour word from the Parent Description. |
| RMS Size yellow | That size code doesn’t exist in RMS. | Pick a valid size for the Size Group ID. |
| Phase ID orange with an end date in the comment | The Phase ID is for a season that has already ended. | Choose a current or future season. |
| Several Case rows light yellow | Two rows for the same Family ID + GTIN both have Package Type Case. | Keep one Case row for that GTIN. |
Recommended Fix Order
- Start with the summary in A4 to see which error types are present.
- Fix orange required-field and format problems first; they often cause other errors.
- Read the comments for errors that give a specific RMS value, UDA, Phase ID end date or description detail.
- On Add Tran Item or GTIN rows, fix hierarchy mismatches (purple) before looking at RMS duplicate results on the same row.
- Resolve RMS existence (pink) and size (yellow) conflicts.
- Check duplicates across the whole sheet, including hidden or filtered rows.
- Run the checker again until A3 says Successful, then save.
Built-in Exceptions
- Supplier Color may be blank when the NRF Color Code is
000. - Package Type, Depth, Width, Height, Gross Weight and Presentation Method are only required for departments that need dimensions. Dept 884 Class 1401, and buyers 60, 90, 720 and 960, are exempt.
- The brand-at-start check is skipped when
S/Oappears in the description, and accepts the brand without apostrophes. - Colour code
262Sis never flagged as an already-built colour + size. - Duplicate GTINs are only compared within the same Action.
- Perishable departments accept Yes or No; only a blank is an error.
- The Location tab is only required when an Action on the Item tab needs it (not for Add Tran Item or GTIN or Add Item Supplier).
Keeping It Up to Date
Department lists, allowed values, season and Phase IDs, buyer exemptions and required UDAs are written into the VBA. When the business rules change, update the macro and the user guide together. In particular, each new season needs adding in two places: the allowed Phase ID list and the season end-date table (e.g. FAL26 ends 10/31/2026, WNT26 ends 01/31/2027), otherwise the new Phase ID passes without being checked for expiry.
Troubleshooting
| Problem | Fix |
|---|---|
| The macro isn’t in the Alt+F8 list | Open HighlightSizeColorDuplicates2.xlsm and enable macros. It’s hidden once open; check View → Unhide if you need to confirm it’s loaded. |
| “Item Tab Not Found” | No sheet has an Action header on row 7. Click into the induction workbook (not the checker) and check its headers weren’t moved to another row. |
| “Problem connecting to network drive. Check your VPN/Access.” | You’re off the network or VPN, or don’t have access to the share holding the RMS password file. Connect and run again. |
| “Failed to check: …” | RMS couldn’t be reached, the Oracle ODBC driver isn’t installed, or a required header is missing or renamed. The message names the problem; the workbook is not marked as checked. |
| Brand errors never appear | The brand list on the shared drive couldn’t be opened, so that one check was skipped. Check your access to the induction folder. |
| A fixed cell is still highlighted | Highlighting from earlier runs isn’t cleared. Set the cells to No Fill and run again. |
| A correct vendor word is flagged as a spelling error | The spell check uses Microsoft’s dictionary. Confirm the wording with the vendor; it can be submitted after review. |
| A new season’s Phase ID is rejected, or an old one isn’t | The season lists in the VBA need updating (see Keeping It Up to Date). |
Pack Item Induction Checker
The Pack Item Induction Checker validates the Pack Item Induction Template, the workbook used to set up packs in Oracle RMS: a sellable or orderable unit made of other items (components), such as a multi-pack, a gift set or a vendor case pack. A pack induction is spread across three linked tabs, so mistakes are easy to make and hard to spot by eye. One run of the checker:
- Checks every row on the Pack Item, Component Item and Location tabs together, including that each pack appears on all three.
- Confirms required fields for each Action, dropdown values, number formats, GTIN length and check digit, Pack Family ID rules and description rules.
- Looks up RMS to confirm suppliers are active, Dept/Class/Subclass exist, new GTINs aren’t already used, and component items exist.
- Fixes two things automatically: it swaps component GTINs for their RMS item number (TransactionRIN), and stores Location-tab pack numbers as text.
- Colours every problem cell, adds a note explaining it, and stamps the result in A2–A4 of the Pack Item tab.
The checker is built into the template (macro ValidatePackTemplate), so there’s nothing extra to install.
Pack Item Induction Template (with checker)
Pack Checker vs. Induction Checker
| Pack Item Induction Checker | Induction Checker | |
|---|---|---|
| Template | Pack Item Induction Template | Regular item induction workbook |
| Where the macro lives | Inside the template | Separate workbook, run on any induction file |
| Tabs checked | Pack Item, Component Item, Location | Item tab and Location tab |
| Highlights | Two colours: yellow = missing, red = error | Several colours by error type |
| Re-running | Clears its own previous highlights and notes first | Doesn’t clear earlier highlights |
| If RMS is unavailable | Runs every non-RMS check and says the RMS checks were skipped | Stops with a failure message |
| Changes your data | Yes: component GTIN → TransactionRIN, Location pack numbers → text | No |
The Template’s Tabs
| Tab | Headers on | Data from | What goes on it |
|---|---|---|---|
| Pack Item | Row 6 | Row 7 | One row per pack and Action: pack type, Pack Family ID or Pack Number, hierarchy, description, GTIN, supplier, cost, case pack, dimensions, UDAs, season and phase. Results are stamped in A2–A4. |
| Component Item | Row 3 | Row 4 | What’s inside each pack: Pack Family ID, Component Item and Component Quantity, one row per component. |
| Location | Row 2 | Row 3 | Where each pack is ranged: Pack Family ID (or Pack Number), a Location List or single Location, and the primary supplier for each. |
| Zone Retail / Zone Details | Retail by zone, and the zone reference list. Not checked. |
The checker finds columns by header name, so columns can be moved, but headers mustn’t be renamed. The template’s own Populate Template button is a separate step that builds the hidden upload tabs; run the checker first.
Actions and Required Fields
| Action | Used to | Required on that row |
|---|---|---|
| Create Pack | Set up a new pack | Status, Pack Type, Order As, Sellable, Orderable, Pack Family ID, Dept, Class, Subclass, Parent/Transaction Item Description, Web Description, Primary Ref Ind, Item Number Type, GTIN, Merchandise, Plan-o-gram Required, SOH Inquiry at Pack Level, Supplier Site, Primary Supplier Ind, Drop Ship Ind, Source Country, Primary Source Country Ind, Manufacture Country, Primary Manufacture Country Ind, Unit Cost, Default UOP, Inner Size, Case Size, Ti, Hi, Round Level, Buyer |
| Add GTIN | Add another GTIN to an existing pack | Pack Number, Item Number Type, GTIN, Primary Ref Ind |
| Add Item Supplier | Add a supplier to an existing pack | Pack Number, Supplier Site, Primary Supplier Ind, Drop Ship Ind, Source Country, Primary Source Country Ind, Manufacture Country, Primary Manufacture Country Ind, Unit Cost, Default UOP, Inner Size, Case Size, Ti, Hi, Round Level, Buyer |
| Add Item Supp Country Dimension | Add dimensions for a pack’s supplier | Pack Number, Supplier Site, Package Type, Depth, Width, Height, Gross Weight, Weight UOM, Presentation Method, Buyer |
| Add UDAs / Add Item CFAs | Add attributes to an existing pack | No required-field list; dropdown, number and other checks still apply |
Rows count as data only when Action, Pack Family ID, Pack Number, Description, GTIN or Supplier Site is filled, so the template’s pre-filled defaults on empty rows are ignored. Perishable is also required for perishable departments (e.g. 551, 590, 884, 991).
How to Run It
- Open the template and enable macros. If the window doesn’t appear, go to View → Unhide and pick the template; its open macro hides the window.
- Fill in the Pack Item, Component Item and Location tabs.
- Press Alt+F8, choose ValidatePackTemplate and click Run. The status bar shows progress (connecting to RMS, checking GTINs, checking rows).
- Read the Pack Template Check summary: the total number of issues and a count per category, any component GTINs that were replaced, and any notes such as RMS checks being skipped.
- Fix the yellow and red cells (hover to read each note), then run it again. Earlier highlights and notes are cleared automatically each run.
- When A3 shows Successful, No Errors were Found, save the file and continue with Populate Template and submission.
Reading the Results
| Mark | Means |
|---|---|
| Abc | Missing required input. The Action cell also gets a note listing every missing field on that row. |
| Abc | Error: invalid value, format, rule or RMS problem. The note explains what’s wrong. |
| Note, no colour | Information only, e.g. “GTIN 0123… replaced with TransactionRIN 4567…” on the Component Item tab. |
| Pack Item cell | Shows |
|---|---|
| A2 | Who ran the check and when. |
| A3 | One of:
|
| A4 | One line per category, e.g. 3 - Missing required field, plus any run notes. |
Checker notes start with CHK:. Only those notes and their colours are cleared on the next run; your own comments are left alone.
What It Checks
| Area | Checks |
|---|---|
| Required fields | By Action (see above); Action itself can’t be blank; Perishable for perishable departments; on the Location tab, the primary supplier when a Location List or Location is entered. |
| Dropdown values | Action, Status, Pack Type, Order As, Item Number Type, Ticket Type, Default UOP, Round Level, Package Type, Presentation Method, Weight UOM, e-commerce warranty and gender, Package UOM, Retail Label Type, Handling Sensitivity and Temp, Wastage Type, and every Yes/No field. |
| Pack Family ID | 25 characters or fewer; letters and numbers; no spaces or special characters; can’t start with 0, be a date, be numbers only, or look like scientific notation (e.g. 12E45); the same description must always use the same Pack Family ID; must also be on the Component Item and Location tabs. |
| Description | 100 characters or fewer; no ©, ®, ™ or (c)/(r)/(tm); possible misspellings (words with digits are skipped). |
| GTIN | Digits only; length matches Item Number Type (UCC12 = 12, EAN/UCC-13 = 13, EAN/UCC-14 = 14); valid GS1 check digit; not already in RMS. MANL is skipped. |
| Numbers | Unit Cost, Inner Size, Case Size, Ti, Hi, Depth, Width, Height and Gross Weight are numbers above zero; no $ in Unit Cost; Case Size is a multiple of Inner Size. |
| Countries | Source Country is USA; Manufacture Country is a 3-letter uppercase code (e.g. CHN, not China). |
| Season / Phase | On the approved list, and not a past season. S## phases are valid through July 31, F## phases through January 31 of the next year, and BASIC never expires. |
| Formulas | Sellable and Orderable are formulas; flagged only if they return an error. |
| RMS | Supplier Site and Location primary suppliers are active suppliers; Dept exists, Class is under that Dept, Subclass is under that Class; GTIN is new; each Component Item exists. |
Automatic Fixes
- Component Item GTIN → TransactionRIN. The Component Item column can hold a transaction item number or a GTIN. If you enter a GTIN, the checker looks it up in RMS and replaces it with the item’s TransactionRIN, leaving an information note with the original GTIN. If it isn’t found, the cell turns red.
- Location Pack Number stored as text. Long numbers can lose leading zeros or turn into scientific notation. The checker converts the Location tab’s Pack Number column to text (the same as Data → Text to Columns → Text).
Use Case Examples
| You see | Why | Fix |
|---|---|---|
| Pack Family ID red: “Cannot be numbers only” | The vendor used their 6-digit pack number as the ID. | Add letters, e.g. GIFTSET123456. |
| Pack Family ID red: “Not found on the ‘Location’ tab” | The pack was added to Pack Item but nobody ranged it. | Add Location rows for that Pack Family ID. |
| Same ID flagged: “Same Parent/Transaction Item Description as row 12 but different Pack Family ID” | Two rows describe the same pack but were given different IDs. | Use one Pack Family ID for that pack. |
| Phase ID red: “…is a past season/phase as of today” | 3 - S26 MAR was copied from an old template; S26 ended July 31, 2026. | Choose a current or future phase. |
| Component Item has a note, no colour | You entered a component’s GTIN. | Nothing to do: it was replaced with the TransactionRIN. |
| Location primary supplier red: “not an active supplier in RMS” | The supplier is inactive or mistyped. | Use the pack’s active supplier site. |
| A3: Checks were not completed | RMS couldn’t be reached, so the RMS checks didn’t run. | Connect to the network or VPN and run again. If A4 says the account is locked (ORA-28000), wait about 5 minutes. |
Keeping It Up to Date
The allowed values, season and phase lists, perishable departments, required fields and country codes are lists at the top of the macro, so they’re quick to edit in the VBA editor (Alt+F11, Module2). Add new Season and Phase IDs as they’re released. The Add GTIN required-field list is marked in the code as an assumption; confirm it with the induction team.
Troubleshooting
| Problem | Fix |
|---|---|
| The template opens but no window appears | View → Unhide and choose the template. Its open macro hides the window. |
| “Header check” box listing tabs or headers | A tab was renamed or deleted, or a header was changed or moved off its row (Pack Item row 6, Component Item row 3, Location row 2). Restore it. |
| A4: “RMS checks skipped: could not read the RMS password file” | No network or VPN access to the share. Connect and run again. |
| A4: “RMS account is locked (ORA-28000)” | Too many failed logins on the shared read-only account. Wait about 5 minutes. |
| A4: “unable to connect to RMS” | The Oracle driver isn’t installed for your Excel (64-bit needs the Oracle Instant Client driver). |
| “No data found below row 6” | The Pack Item tab is empty, or the data starts on the wrong row. |
| A correct word is flagged as a misspelling | Brand and product names often aren’t in Excel’s dictionary. Confirm the wording and continue. |
| A new season or phase is rejected | Add it to the Season or Phase list in Module2. |
| “Macro error: …” | An unexpected problem; the message names it. Check the tabs and headers, then run again. |
Sort and Format BI Report
Reports exported from the BI tool arrive with five rows of title and filter information above the column headers, unsorted rows, and columns too narrow to read. Sort and Format BI Report cleans one up in a single click:
- Sorts the whole report by PARENT, then TRANSACTION, so every parent’s items sit together in order.
- Highlights the PARENT and TRANSACTION values in soft yellow so the item numbers stand out.
- Auto-fits every column and row so all the text is visible.
- Deletes rows 1–5 (the report title and filters), leaving the headers in row 1, ready to filter, pivot or paste into another workbook.
It works on whichever sheet you’re looking at, so it’s meant to live on a Quick Access Toolbar button and be used on any report you open.
Sort and Format BI Report workbook
Before and After
Before: the Item Induction Results Report w/UPC & VPN as exported. Rows 1–5 hold the report title and the selection criteria (buyer, user, department and create dates), the column headers are on row 6, and the columns are too narrow to read the vendor, parent and item names.

Click a screenshot to open it full size.
After: the title and criteria rows are gone, so the headers are on row 1. Rows are sorted by PARENT and then TRANSACTION, so each parent’s sizes run in order (6, 6.5, 7, 7.5…). The PARENT and TRANSACTION values are highlighted yellow and the columns are widened to fit, ready to check UPCs, VPNs and induction status.

One-Time Setup: Add the Button
- Save CustomSortandFormat.xlsm somewhere permanent, then open it and enable macros. Its window hides itself, which is expected: it stays open in the background so the macro can run on other workbooks.
- In Excel go to File → Options → Quick Access Toolbar.
- Under Choose commands from, pick Macros, select CustomSortandFormat.xlsm!CustomSortAndFormat and click Add >>.
- Click Modify… to choose an icon and a display name such as Sort BI Report, then OK.
%APPDATA%\Microsoft\Excel\XLSTART into the File Explorer address bar and save it there. It opens hidden with Excel.How to Use It
- Export the report from BI and open it in Excel.
- Make sure you’re on the report’s sheet and the headers are on row 6, with columns named PARENT and TRANSACTION (any position, any capitalisation).
- Click the Sort BI Report button.
- When “Sort, targeted highlight, autofit, and row cleanup completed!” appears, the report is ready. Save it.
How It Works
| Step | What happens |
|---|---|
| Find the data | The last row is the last filled cell in column A; the last column is the last header on row 6. If there’s nothing below row 6 it stops. |
| Find the columns | Searches row 6 for PARENT and TRANSACTION, ignoring case and extra spaces, so the report’s column order doesn’t matter. |
| Sort | Sorts the whole block (all columns, so rows stay intact) ascending by PARENT, then TRANSACTION, with row 6 treated as the header. |
| Highlight | Fills only the data cells under PARENT and TRANSACTION in soft yellow; headers and other columns are untouched. |
| Auto-fit | Resizes every column width and row height to fit its contents. |
| Clean up | Deletes rows 1–5 last, so the headers end up in row 1. |
Troubleshooting
| Problem | Fix |
|---|---|
| “No data found below Row 6 to sort!” | Column A is empty below row 6, or the report was already processed. Check you’re on the right sheet and column A has data. |
| “Could not find ‘PARENT’ or ‘TRANSACTION’ in Row 6” | The report layout changed, the columns are named differently, or the macro already ran (headers are now on row 1). Check the headers on row 6. |
| The button does nothing or says the macro can’t be found | The workbook was moved or renamed after the button was added. Open it again from its new location, or remove the button and add it again. |
| The last few rows weren’t sorted | Those rows have a blank cell in column A, so they were treated as past the end of the data. Fill column A or delete the blank rows first. |
| Item numbers sort oddly (e.g. 1000 before 999) | Some numbers are stored as text. Convert the column to numbers (Data → Text to Columns → Finish) and run on a fresh export. |
| I can’t see the workbook to edit the macro | It hides itself on open. Use View → Unhide, or press Alt+F11 to open the VBA editor directly. |
QTY KEY Macro
The QTY KEY Macro (LocationLookup) fills in the Location tab of an induction workbook from RMS. For every row with an Item and a Location, it looks up that item at that store in RMS and writes:
- Primary Supplier: the supplier RMS has set up for the item at that location.
- Location – Store Order Multiple (the quantity key): how the store orders the item, as Cases, Inner or Eaches.
Typing these by hand means looking up every item/store pair, which is slow and easy to get wrong on large rangings. The macro reads all the rows at once and queries RMS in batches of 500 items, so even thousands of rows fill in within seconds. Rows RMS has no record for are left exactly as they are.
QTY KEY Macro (LocationLookup) workbook
Example
Location tab before running (Item and Location entered; supplier and quantity key blank or out of date):
| C: Item | H: Location | I: Primary Supplier | J: Store Order Multiple |
|---|---|---|---|
| 100247 | 715 | ||
| 100247 | 0820 | ||
| 100249 | 715 | Eaches | |
| 100251 | 999 |
After running (filled from RMS shown in green; row 4 had no RMS record for that item and store, so it was left alone):
| C: Item | H: Location | I: Primary Supplier | J: Store Order Multiple |
|---|---|---|---|
| 100247 | 715 | 600123 | Cases |
| 100247 | 0820 | 600123 | Inner |
| 100249 | 715 | 600123 | Cases |
| 100251 | 999 |
Note that 0820 matched store 820 (leading zeros are ignored), and that row 3’s Eaches was replaced with the value RMS holds.
One-Time Setup
- Save LocationLookup.xlsm somewhere permanent, open it and enable macros. Its window hides itself, which is expected: it stays open in the background so the macro can run on your induction workbook.
- Add a button: File → Options → Quick Access Toolbar, choose commands from Macros, pick LocationLookup.xlsm!LocationLookup, click Add >>, then Modify… to name it e.g. QTY KEY.
- Optional: save the workbook in
%APPDATA%\Microsoft\Excel\XLSTARTso it loads hidden every time Excel starts.
How to Use It
- Open the induction workbook and fill the Location tab’s Item and Location columns.
- With that workbook active (any tab), click the QTY KEY button (or Alt+F8 → LocationLookup → Run).
- The macro runs silently: there’s no “done” message. When the cursor returns, check that the Primary Supplier and Store Order Multiple columns have filled in.
- Fill any rows that stayed blank by hand. Those item/store pairs aren’t set up in RMS yet (e.g. a new store for that item).
- Run your induction checker and submit.
How It Works
| Step | What happens |
|---|---|
| Find the tab | Uses the active workbook’s tab named Location, or failing that the first tab with “Location” in its name. |
| Find the columns | Finds the header row (the first row in rows 1–25 with an Item header), then the Item, Location, Primary Supplier and Store Order Multiple columns by name. If a header isn’t found it uses columns C, H, I and J. |
| Read the rows | Reads every row down to the last Item. Locations must be numbers (up to 10 digits); leading zeros are dropped, so 0715 = 715. Rows missing an Item or a valid Location are skipped. |
| Query RMS | Looks up the unique items in the RMS item/location table in batches of 500, limited to the stores on the sheet. |
| Translate | Converts RMS’s store order multiple codes: C → Cases, I → Inner, E → Eaches. |
| Write | Fills Primary Supplier and Store Order Multiple only on rows with a match. Unmatched rows aren’t touched. |
| Tidy up | Restores Excel’s calculation mode and screen updating, even if an error occurs. |
Troubleshooting
| Problem | Fix |
|---|---|
| Nothing happened | No tab with “Location” in its name, no Item header in rows 1–25, or no rows with both an Item and a numeric Location. Check you ran it with the induction workbook active, not another file. |
| Some rows stayed blank | RMS has no record for that item at that store. Fill them by hand. Also check the Location is digits only (no letters or spaces). |
| Values landed in the wrong columns | Your Location tab’s headers don’t match the names the macro looks for (e.g. Location - Primary Supp), so it fell back to columns I and J. Move the columns to I and J, or rename the headers to Primary Supplier and Store Order Multiple. |
| “Problem connecting to network drive. Check your VPN/Access.” | You’re off the network or VPN, or can’t reach the RMS password file. Connect and run again. |
| “Error …” box titled Location Lookup | Usually an RMS connection problem or a missing Oracle ODBC driver. The message gives the details. |
| I can’t see the workbook to edit it | It hides itself on open. Use View → Unhide, or Alt+F11 for the VBA editor. |
AGC Macro
The AGC Macro turns a greeting-card vendor’s item list (American Greetings and Papyrus-Recycled Greetings) into ready-made Add Tran Item or GTIN rows on the item induction template. Card lines arrive as long lists of card numbers and UPCs; keying each one into the template, looking up its parent and transaction item, retail and supplier, and fixing the UPC format by hand takes hours. In one click the macro:
- Reads the vendor list (card number and UPC) from the sheet you’re on.
- Opens the shared item induction template and adds one row per card below any existing rows.
- Cleans each UPC into a 12-digit GTIN and fills the fixed card-line values (Action, Dept/Class/Subclass, colour, size, buyer).
- Looks up each card number in the TPGC Master database (Microsoft Access) for its Parent Item, Transaction Item, Initial Retail and supplier.
- Sets the supplier from the card-number prefix:
AGCE…→ American Greetings,PRGS…→ Papyrus-Recycled Greetings.
Before You Start
- Enable macros when you open the workbook.
- Network access to the shared drives holding the induction template (109) and the TPGC Master Access database. Both locations are set in the macro.
- The Microsoft Access Database Engine (ACE OLEDB 12.0) installed, so Excel can read the Access database.
- A vendor list with headers in row 1, including
cpn_nbr(the card number) andprim_upc_cd(the primary UPC). Other columns can be there too; they’re ignored.
How to Use It
- Open AGC_Macro.xlsm and paste the vendor’s list onto Sheet1, starting at A1 so the headers are in row 1. Clear any rows from the previous run first.
- Stay on that sheet and click the button on it (or Alt+F8 → CopyData_And_AccessLookup_Optimized → Run).
- The induction template opens and fills in. When “Fast processing complete! (n rows added)” appears, switch to the template.
- Review the new rows: any card without a database match has a blank Parent Item, Transaction Item and Initial Retail to fill in.
- Use File → Save As to save the template under a new name for this induction. Don’t save over the shared template.
- Run the Induction Checker on it, fix anything flagged, and submit.
What Gets Filled In
| Template column | Value | Where it comes from |
|---|---|---|
| A: Action | Add Tran Item or GTIN | Fixed |
| L / M / N: Dept / Class / Subclass | 532 / 1001 / 1 | Fixed (greeting cards) |
| O: Parent Item Description | The card number, e.g. AGCE1234 | cpn_nbr |
| GTIN | 12-digit cleaned UPC | prim_upc_cd (see below) |
| Z: NRF Color Code | 000 | Fixed |
| AD / AE: Size Group ID / RMS Size | 262S / 0000 | Fixed. The Induction Checker deliberately skips its colour + size check for 262S. |
| DK: Buyer | 260 | Fixed |
| Parent Item, Transaction Item | From the database | TPGC Master record whose Item Desc matches the card number |
| AG: Initial Retail | From the database | Retail (or Retail Price) |
| BE / BF: Supplier Site / Name | From the database, or the prefix rule | AGCE… → American Greetings; PRGS… → Papyrus-Recycled Greetings; otherwise the database value |
Text columns (Dept, Class, Subclass, description, colour, size, GTIN, item numbers, supplier, buyer) are formatted as text first, so leading zeros such as 000 and 0000 are kept.
How UPCs Are Cleaned
Vendor files mix UPC formats. The macro strips anything that isn’t a digit, then makes it a 12-digit UPC-A GTIN:
| Vendor UPC | Rule | GTIN written |
|---|---|---|
0-12345-67890-5 | Remove dashes and spaces; 12 digits stay as-is | 012345678905 |
0012345678912 | 13 digits starting with 0: drop the leading zero | 012345678912 |
12345678 | Fewer than 12 digits: pad with leading zeros | 000012345678 |
4012345678901 | 13 digits not starting with 0 (EAN-13), or 14 digits: left unchanged | 4012345678901 |
Example
Vendor list on Sheet1:
| cpn_nbr | prim_upc_cd |
|---|---|
| AGCE1234 | 0-12345-67890-5 |
| PRGS5678 | 0012345678912 |
Rows added to the template (Parent, Transaction and Retail from the database):
| Action | Dept/Class/Sub | Parent Item Description | GTIN | Size Group / Size | Retail | Supplier Name |
|---|---|---|---|---|---|---|
| Add Tran Item or GTIN | 532 / 1001 / 1 | AGCE1234 | 012345678905 | 262S / 0000 | 4.99 | AMERICAN GREETING CORP. |
| Add Tran Item or GTIN | 532 / 1001 / 1 | PRGS5678 | 012345678912 | 262S / 0000 | 7.99 | PAPYRUS-RECYCLED GREETINGS INC |
Troubleshooting
| Problem | Fix |
|---|---|
| “Could not find headers ‘cpn_nbr’ or ‘prim_upc_cd’ in Row 1” | The list wasn’t pasted at A1, the headers are named differently, or you ran it from a different sheet. Paste the list with its headers in row 1 and run it from that sheet. |
| “No data found under headers” | Nothing below the cpn_nbr header. |
| “Destination file not found” | The shared induction template has moved or you can’t reach that drive. Connect to the network; if it moved, update the path in the macro. |
| “Could not find one or more required headers in Row 7” | The template’s first sheet doesn’t have GTIN, Parent Item and Transaction Item headers on row 7. Check the template wasn’t changed. |
| “Access Database not found” | The TPGC database is unreachable. The rows have already been added to the template without database values; close the template without saving, fix access, and run again. |
| Parent, Transaction or Retail blank on some rows | No TPGC Master record has that exact card number as its Item Desc. Add the card to the database or fill those cells by hand. |
| Supplier wrong or blank | The card number doesn’t start with AGCE or PRGS and the database has no supplier for it. Enter the supplier by hand. |
| The template opened read-only | Someone else has it open. Close it, wait, and run again, or Save As a copy. |
| Rows from the last run appear again | Sheet1 still had the previous list. Clear it before pasting a new one. |
| “An unexpected error occurred: …” | Usually the Access Database Engine isn’t installed, or the database is locked. The template may be left open with partial rows; close it without saving. |
Email Count
Email Count measures the Data Steward Team’s workload straight from Outlook. One click scans the team’s shared mailbox, picks out the item induction and maintenance requests, and builds a PivotTable of request emails per day. Use it for weekly workload reports, to spot spikes around seasonal or ad deadlines, or to back up staffing and turnaround-time discussions with real numbers instead of estimates.
- Reads the Data Steward Team mailbox only, never your personal inbox.
- Counts mail in the team’s working folders: Inbox, each team member’s personal folder, Item Induction and Item Maintenance.
- Keeps only emails whose subject looks like a request (e.g. Item Induction, Add Supplier, GTIN Delete) and drops confirmations such as Successful Upload.
- Writes every matching email to a RawData sheet and summarises it on PivotResult.
How to Use It
- Make sure Outlook (desktop) is open and the Data Steward Team shared mailbox appears in your folder pane.
- Open ExportEmailToPivot.xlsm and enable macros.
- On Sheet1, click Update Pivot Table. It can take 1–2 minutes on a full mailbox; Excel looks frozen while Outlook is read.
- If a folder can’t be found you’ll get a list of the ones skipped; the rest are still counted.
- When “Done. n matching emails processed into the pivot table.” appears, you’re taken to PivotResult.
What Gets Counted
| Rule | Details |
|---|---|
| Mailbox | The first Outlook mailbox whose name contains Data Steward Team. |
| Folders | Inbox, each team member’s folder, Item Induction and Item Maintenance. Each is found by exact name anywhere in the mailbox; Deleted Items, Trash, Junk Email and Outbox are never searched. |
| Inbox only | Only unread emails, with category (none), Item Induction, Manual Maintenance or GTIN Deletes. Read or differently categorised Inbox mail has been handled or isn’t a request. |
| Other folders | All emails, read or unread (they’ve been filed to that person or queue). |
| Excluded subjects | Anything containing SUCCESSFUL UPLOAD, COMPLETE is dropped first. |
| Included subjects | The subject must contain at least one request keyword (below). Matching ignores case and looks anywhere in the subject. |
| Date | The received date, with the time removed so the pivot groups by day. |
Request keywords:
| Request type | Keywords |
|---|---|
| New items / induction | New Item, New Items, New Item Build, Item Build, Item Induct, Item Induction, NIB, Add GTIN, Add Item Gtin |
| Suppliers | Add Supplier, Update Supplier, Update Primary Supplier, Range Supplier |
| Ranging | Range item, Range Location, Range Loc, Range Locs |
| Maintenance | Item Maintenance, MSRP Update, MIM, AIS, UDA Removal, BOPIP, RMS Download |
| GTIN deletes | GTIN Delete, GTIN Deletes |
Reading the Results
PivotResult shows one row per day and the total for the period (illustrative numbers):
| Row Labels | Total Emails |
|---|---|
| 08/17/2026 | 1 |
| 08/18/2026 | 4 |
| 08/19/2026 | 9 |
| 08/20/2026 | 12 |
| 08/21/2026 | 38 |
| Grand Total | 64 |
RawData holds the detail behind it, one row per email: ReceivedDate, Folder and Subject, as an Excel table named EmailData.
Things to Keep in Mind
- Every email counts, including replies. A request with three RE: replies in the same folder counts four times. Treat the number as email volume, not unique requests.
- Keywords match inside words. Short keywords such as AIS, MIM or NIB also match words that contain them, and COMPLETE also excludes subjects with Completed or Incomplete. Spot-check RawData if a number looks off.
- Only what’s still in the folders. Emails moved elsewhere, archived or deleted aren’t counted, and read Inbox mail is skipped.
- One folder per name. If the mailbox has two folders with the same name, only the first one found is counted.
- Adding a team member or a new keyword means editing the folder and keyword lists in the macro (Alt+F11, Module1).
Troubleshooting
| Problem | Fix |
|---|---|
| “Could not connect to Outlook” | Install or open Outlook desktop (the new web-style Outlook doesn’t support macros), then run again. |
| “Could not find the mailbox: ‘Data Steward Team’” | The shared mailbox isn’t in your Outlook profile. Add it (File → Account Settings, or ask IT for access), restart Outlook and run again. |
| A list of folders “not found … and were skipped” | Those folders were renamed or don’t exist. The others were still counted; update the folder list in the macro if a name changed. |
| “No mail items matched the subject line filters” | No email in those folders has a request keyword in its subject (or the Inbox has no unread, correctly categorised mail). |
| Outlook shows a security prompt | Allow access. Some security settings ask before a program reads mail. |
| Excel seems frozen | Normal for 1–2 minutes on a large mailbox. Wait for the Done message. |
| Counts look too high | Replies are counted separately and short keywords match inside other words. Check RawData. |
TPGC Macro
The TPGC Macro sets up third-party gift cards (TPGC) for the point-of-sale system. A gift card needs records in up to five POS tables: the UPC cross-reference, the non-merchandise item, its price or price range, and any activation fees attached to it. Each table has its own layout and a dozen fixed codes. Buyers fill in one simple row per card on the TPGC Cheat Sheet; one click then:
- Checks every row and skips any with missing or invalid data, so the tables never get out of step.
- Writes each card to the right tabs of the MNT Master Creator workbook, based on its Type of Gift Card, adding all the fixed codes for you.
- Builds the MNT files: one pipe-delimited upload file per populated tab, saved to a folder you choose.
The Cheat Sheet
One row per gift card on the TPGC tab, headers on row 3, from row 4 down:
| Column | What to enter |
|---|---|
| Type of Gift Card | Pick from the list: Fixed Price NoFee, Fixed Price Fee, Price Range No Fee or Price Range Fee. |
| Transaction Level RIN# | The gift card’s item number. |
| Group, Dept, Class, Subclass | Its merchandise hierarchy. The Group tab lists every Dept with its Group number. |
| Description with no Special Characters | The name shown at the register. |
| Price Range (Min) / (Max) | Price range cards only: the lowest and highest amount a customer can load. |
| Fixed Retail | Fixed price cards only: the card’s price. $ and commas are fine. |
| Fee Rins Associated | Fee cards only: the activation fee RIN(s). Pick from the list (e.g. 14243675 (3.95)) or type several separated by commas; the amount in brackets is ignored. |
| Effective Dates | When the card goes live. Needed for fixed price cards and for any card with a fee. |
| GTIN/UPC# | The card’s barcode. Any format works; only the first 11 digits of the UPC-A are used. |
What Each Gift Card Type Creates
| MNT Master Creator tab | Fixed Price NoFee | Fixed Price Fee | Price Range No Fee | Price Range Fee |
|---|---|---|---|---|
| TPGC_UPC: RIN + first 11 UPC digits | ✔ | ✔ | ✔ | ✔ |
| TPGCNonMerchandise: item, name, merch levels | ✔ | ✔ | ✔ | ✔ |
| ItemPriceAction: fixed retail and effective date | ✔ | ✔ | ||
| GCITMProperties: minimum and maximum load amount | ✔ (2 rows) | ✔ (2 rows) | ||
| TPGCAttachFee: one row per fee RIN | ✔ | ✔ | ||
| Attached Items flag / Prompt for Price flag | 0 / 0 | 1 / 0 | 0 / 1 | 1 / 1 |
Every row also gets the fixed codes those tables need (action INSERT, record identifiers, voucher type and sub-type, “disallow discounts/deals/self-checkout” flags, all-stores *, and so on). The merch levels are built from the hierarchy: Group 270 → 270G, Dept 512 → 512D, Class → 512-3C, Subclass → 512-3-1S.
How to Use It
- Open the TPGC Cheat Sheet and enable macros. Fill in one row per gift card from row 4.
- Click Export. The macro opens the MNT Master Creator from the shared templates folder (or uses it if it’s already open).
- Read the summary: how many cards of each type were written, the fee and property rows created, and any skipped rows with the reason (e.g. Row 7: missing/invalid Fixed Retail, Effective Date).
- Click Yes to create the MNT files now. A check box lists each tab’s row count, last column and last cell; if anything looks wrong click No (see below).
- Choose the folder to save to. Files are named
MNTCreation_<Tab>-<username><yyyy_mm_dd_hhmm>.mnt. - Upload the MNT files as usual. Fix and re-export any skipped rows.
What Gets Checked
A card is only written if every check passes, so all its tabs stay in sync. Otherwise the whole row is skipped and listed in the summary.
| Type | Must have |
|---|---|
| All types | Transaction Level RIN#, and a GTIN/UPC# with digits in it. |
| Fixed Price | A numeric Fixed Retail and a valid Effective Date. |
| Price Range | Numeric Min and Max, with Min not greater than Max. |
| Any Fee type | At least one fee RIN (digits only) and a valid Effective Date. |
| Unknown type | A Type of Gift Card that isn’t one of the four options is skipped. |
The macro also standardises what it writes: retail as 0.00, dates as yyyy-mm-dd, and UPCs to 12 digits (restoring lost leading zeros, removing extra ones from 13- and 14-digit codes) before taking the first 11.
Example
| Type | RIN# | Retail / Range | Fee RINs | Effective | UPC |
|---|---|---|---|---|---|
| Fixed Price Fee | 20100001 | $25 | 14243675 (3.95) | 10/15/2026 | 0-12345-67890-5 |
| Price Range No Fee | 20100002 | Min 15 / Max 500 | 812345678901 |
| Tab | Rows written |
|---|---|
| TPGC_UPC | 20100001 | 01234567890 and 20100002 | 81234567890 |
| TPGCNonMerchandise | Two items; the first flagged Attached Items = 1, the second Prompt for Price = 1 |
| ItemPriceAction | 20100001 | 25.00 | 2026-10-15 |
| TPGCAttachFee | 20100001 → 14243675, effective 2026-10-15 |
| GCITMProperties | 20100002 TPGC_MIN_PRICE 15 and 20100002 TPGC_MAX_PRICE 500 |
Troubleshooting
| Problem | Fix |
|---|---|
| “Could not find these headers on row 3” | A Cheat Sheet header was renamed or moved, or you ran it from another sheet. Run it from the TPGC tab. |
| “Could not open target workbook” | The MNT Master Creator isn’t in the shared templates folder or you can’t reach the drive. Connect to the network; if the file was renamed (e.g. a new year’s version), update the path in the macro. |
| “Tab … not found” or “Headers not found on …” | The Master Creator’s tabs or headers changed. Use the current Master Creator or update the names in the macro. |
| Rows skipped | The summary gives the row and the missing field. Fix them and export again; only the fixed rows are added. |
| All rows skipped / nothing exported | Every row failed a check, or no Type of Gift Card was chosen. |
| “This workbook is locked and cannot be saved again.” | Expected: the Cheat Sheet is a reusable blank form. Close without saving. |
| MNT row counts too high | Old or hidden rows on the Master Creator. Clear them and rebuild with CreateTPGCMNTFiles. |
| “MNT creation failed” | Usually no permission to write to the chosen folder, or a file with the same name is open. Pick another folder. |
Files & Templates
Workbooks and templates used across merchandising. Save a copy to a shared path your team can access.
Web Tools
Browser-based helpers. Files are processed on your own computer and never uploaded.
Inspection Tools
These are small, single-purpose lookup tools. Each one is its own workbook: you open it, it hides itself in the background, and then from any spreadsheet you select a column of RINs (or VPNs/UPCs) and run the tool. It looks the items up in RMS and shows the results in a pop-up window you can keep open and copy from while you work.
How These Tools Work
- Open the tool workbook (e.g.
Supplierins2.xlsm) and enable macros. It hides itself straight away (see Open Document in Background below), so it looks like nothing opened. It stays available until you close Excel. - Go to the spreadsheet you’re working in and select the cells with the item numbers, in one column.
- Press Alt+F8, pick the tool’s macro (listed with each tool below) and click Run. To make it one click, add the macro to the Quick Access Toolbar (File → Options → Quick Access Toolbar → Choose commands from: Macros).
- The results open in the RIN Inspection window, one line per item, lined up across the boxes. The window doesn’t block Excel, so you can keep working and copy values out of it.
| Tool | You select | You get | Best for |
|---|---|---|---|
| Supplier Inspect 1 | Transaction RINs | Parent RIN, Dept, primary Supplier ID & name, total stock on hand | Who supplies an item and how much stock exists |
| Supplier Inspect 2 | Transaction or Parent RINs | Everything in v1 plus description, average cost and retail (all children of a parent) | Checking cost, retail and margin before a deal |
| FFInspect 1 | Transaction or Parent RINs + warehouse group(s) | Each location’s stock, total on hand incl. in-transit, last sold/received dates, min/max | Frustrated freight and replenishment questions |
| FFInspect 2 | Same + a sales date range | Each location’s stock and units sold in the date range, plus total units sold | Is the item selling where it’s stocked? |
| CLASS Inspector | Transaction or Parent RINs | Dept, Class and Subclass with names | Checking an item’s hierarchy (reclasses, reporting) |
| VPN RIN Finder | RINs, VPNs (model numbers) or UPCs | Transaction RIN, Parent RIN, primary UPC, VPN | Turning a vendor’s model list or a UPC into RINs |
Open Document in Background
Every tool workbook is set up so that when the file opens it turns off screen updating and hides its own window, so the tool runs quietly in the background and its macros can be used on any other workbook.
- It’s a two-line
Workbook_Openroutine in the workbook’s ThisWorkbook module: it turns off screen updating and hides the workbook’s window. Any tool workbook can be set up the same way. - To see or edit a tool workbook again: View → Unhide, pick the workbook, make your changes, then hide it again (View → Hide) before saving so it keeps opening in the background.
- Use case: keep several tools open at once (e.g. VPN RIN Finder and Supplier Inspect 2) while you build a deal sheet, without extra windows getting in the way.
Supplier Inspect 1
Looks up the primary supplier and total stock for a list of transaction RINs.
How to use it
- Open
Supplierins1.xlsm(it hides itself). - Select the transaction RINs, in a single column.
- Run SupplierInspect (Alt+F8).
| Result | Meaning |
|---|---|
| Trans RIN / Parent RIN | The item and the parent it rolls up to. |
| Dept | RMS department. |
| Supplier ID / Supplier Name | The item’s primary supplier. |
| SOH | Total stock on hand across all locations. |
Use case examples
- A vendor emails a list of RINs for a deal: confirm they are the primary supplier for every item before entering the promotion.
- Finding which department (and so which buyer) owns a list of items someone asked about.
- Checking whether there’s any stock in the system before agreeing to advertise an item.
| Trans Rin: | Parent Rin: | Supplier ID: | Supplier Name: | Dept: | SOH: |
|---|---|---|---|---|---|
| 14758414 | 14758397 | 66272964 | SONY ELECTRONICS INC. | 811 | 13 |
Supplier Inspect 2
An expanded Supplier Inspect that also shows description, cost and retail, and accepts parent RINs (it lists every child item under the parent).
How to use it
- Open
Supplierins2.xlsm(it hides itself). - Select transaction or parent RINs, in a single column.
- Run SupplierINSPECTORv2 (Alt+F8).
| Result | Meaning |
|---|---|
| Trans RIN / Parent RIN / Description | Each item (all children if you selected a parent). |
| Cost | Average unit cost across locations. |
| Retail | Average unit retail across locations. |
| Supplier ID / Supplier Name | Primary supplier. |
| Dept / SOH | Department and total stock on hand. |
Use case examples
- Building a Deal Offer Form or promotion: check cost and regular retail so the promo price still leaves margin.
- A vendor quotes a new cost: compare it with the current average cost in RMS.
- Select a parent RIN to see every size/color under it, with each one’s cost, retail and stock, before deciding which to include in an ad.
| Trans Rin: | Parent Rin: | Description: | Cost: | Retail: | Supplier ID: | Supplier Name: | Dept: | SOH: |
|---|---|---|---|---|---|---|---|---|
| 14758414 | 14758397 | Sony XR77A80L 77-Inch 4K HDR OLED TV_D | 2347.99 | 3449.99 | 66272964 | SONY ELECTRONICS INC. | 811 | 13 |
FFInspect 1
A frustrated freight tool: shows where an item’s stock is, by location, and when it last sold and was received, so you can work out why freight is stuck or not moving.
How to use it
- Open
FFINS1.xlsm(it hides itself). - Select transaction or parent RINs.
- Run FFINS1 (Alt+F8).
- In the Which Warehouse? window, tick one or more location groups (9830, 9930, 9840, 9950) and click Use Form. Closing the window without choosing cancels.
| Result | Meaning |
|---|---|
| Trans RIN / Parent RIN / Description / Dept | The item. |
| Supplier ID / Supplier Name | Primary supplier and vendor. |
| Location | Each location in the chosen group(s), with its name. |
| Last Sold Date / Last Received | When the item last sold and was last received there. |
| SOH | Store stock on hand at that location. |
| OH (Total) | Store + warehouse stock + quantity in transit. |
| Min / Max | Replenishment minimum and maximum (0 if not set up). |
Use case examples
- A DC reports frustrated freight for an item: see which locations have it, how much is in transit, and when it last sold.
- A store says it never gets an item: check whether its Min/Max is 0 (no replenishment set up) or it simply hasn’t been received.
- Spotting stale stock: items with stock on hand but no sale in months are candidates for transfer or markdown.
| Trans Rin: | Parent Rin: | Description: | Dept: | Supplier ID: | Supplier Name: | Location: | Last Sold Date: | Last Received: | SOH: | OH (Total): | Min: | Max: |
|---|---|---|---|---|---|---|---|---|---|---|---|---|
| 14758414 | 14758397 | Sony XR77A80L 77-Inch 4K HDR OLED TV_D | 811 | 66272964 | SONY ELECTRONICS INC. | 10 - NORF MAIN STORE | 09/02/2024 | 07/24/2024 | 0 | 0 | 0 | 0 |
FFInspect 2
Everything in FFInspect 1, plus units sold at each location over a date range you choose, with a total. Use it to see whether an item is actually selling where it’s stocked.
How to use it
- Open
FFINS2.xlsm(it hides itself). - Select transaction or parent RINs.
- Run FFINSPECT (Alt+F8).
- Tick the location group(s) in Which Warehouse? and click Use Form.
- Enter the Sales Start and Sales End dates (MM/DD/YYYY). They default to the last 7 days; leaving either blank cancels.
| Result | Meaning |
|---|---|
| Trans RIN / Parent RIN / Description | The item. |
| Location | Each location in the chosen group(s). |
| SOH | Store stock on hand there. |
| Units Sold | Units sold at that location between your dates. |
| Total Sales | All units sold across the listed locations. |
Use case examples
- Before moving frustrated freight: see which stores are selling the item so stock goes where it will sell.
- After a promotion: enter the promo dates to see units sold by store and in total.
- Comparing two periods: run it once for last week and once for the week before to see if sales are slowing.
CLASS Inspector
Shows an item’s merchandise hierarchy: department, class and subclass, with names.
How to use it
- Open
CLASS.xlsm(it hides itself). - Select transaction or parent RINs, in a single column.
- Run CLASS (Alt+F8). All selected items are looked up in one pass, so it’s quick even for long lists.
| Result | Meaning |
|---|---|
| Trans RIN / Parent RIN | The item (all children if you selected a parent). |
| Dept | Department number. |
| Class | Class number and name, e.g. 1001 - HOUSEHOLD BAT. |
| Subclass | Subclass number and name, e.g. 1 - ALKALINE. |
Use case examples
- Before submitting an item reclassification: confirm the item’s current class and subclass.
- Checking a list of items is in the right class before a class-level promotion or report.
- Finding the Class/Sub-Class text to use in the Ad Planner’s Lift Query filters.
| Trans Rin: | Parent Rin: | Description: | Class: | Subclass: |
|---|---|---|---|---|
| 13544915 | 13544902 | 1001 – HOUSEHOLD BAT | 1 – ALKALINE |
VPN RIN Finder
Finds RINs from whatever you have: a transaction RIN, parent RIN, VPN (vendor model number) or UPC. It returns the transaction RIN, parent RIN, primary UPC and VPN for every matching item.
How to use it
- Open
VPNrinFinder.xlsm(it hides itself). - Select the values to look up, in a single column. You can mix RINs, VPNs and UPCs.
- Run VPNRINFIND (Alt+F8).
| You enter | You get |
|---|---|
| VPN / model number | The RIN(s) with that VPN. |
| UPC | The RIN the UPC belongs to. |
| Parent RIN | Every child item under it. |
| Transaction RIN | Its parent, primary UPC and VPN. |
Use case examples
- A vendor sends a deal sheet with only model numbers: paste the VPNs, select them, and get the RINs for the Deal Offer Form or Promotion Macro.
- You have a product in hand: type or scan the UPC to find its RIN.
- Getting the primary UPC for every item under a parent, e.g. for sign or fact-tag requests.
| Trans Rin: | Parent Rin: | UPC: | VPN: |
|---|---|---|---|
| 17483392 | 17483382 | GS108-400NAS |